I don’t know how you design your cards, especially for an event, but for me it often starts with a basic color and a stamp set I’m determined to use. In this case the returning color Calypso Coral was high on my list ( I just can’t seem to get enough of that color ) and of course that also brought poppies to mind.
Of course then the whole process came to a screeching halt as I really wanted to do something special and rarely seen before and my brain and my mojo deserted me both at the same time. It happens that way some days. 😀
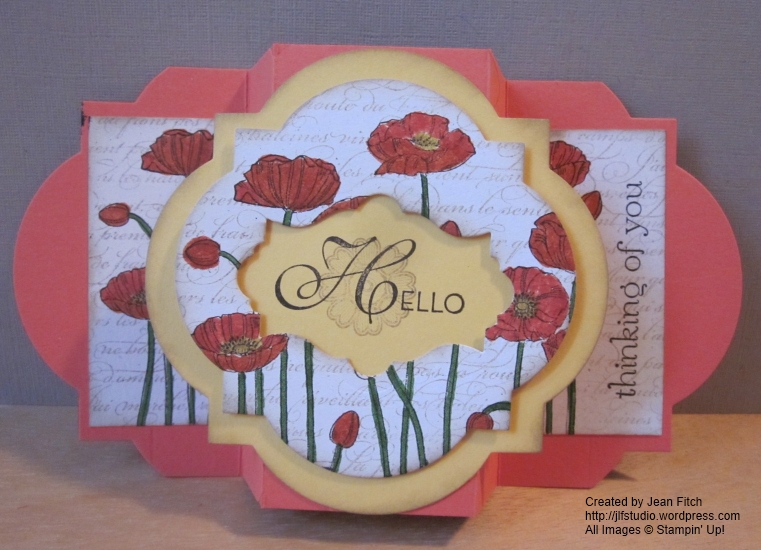
Then I remembered that recently I had come across a very fun tutorial on the Splitcoast Stampers (SCS) website. The Window Layered Fold tutorial. It was love at first site! Truly it was. And that phenomenon repeated itself when I shared the project below at a recent Stamp Camp. Then again when Pleasant Poppies (a Stampin’ Up background stamp) is involved what’s not to love.
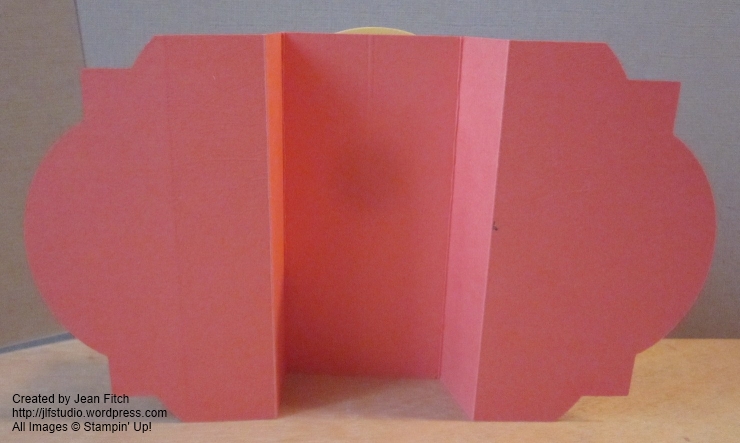
Here’s the card in its folded position.
To give you an idea of its true size the folded card fits in a standard A2 envelope.
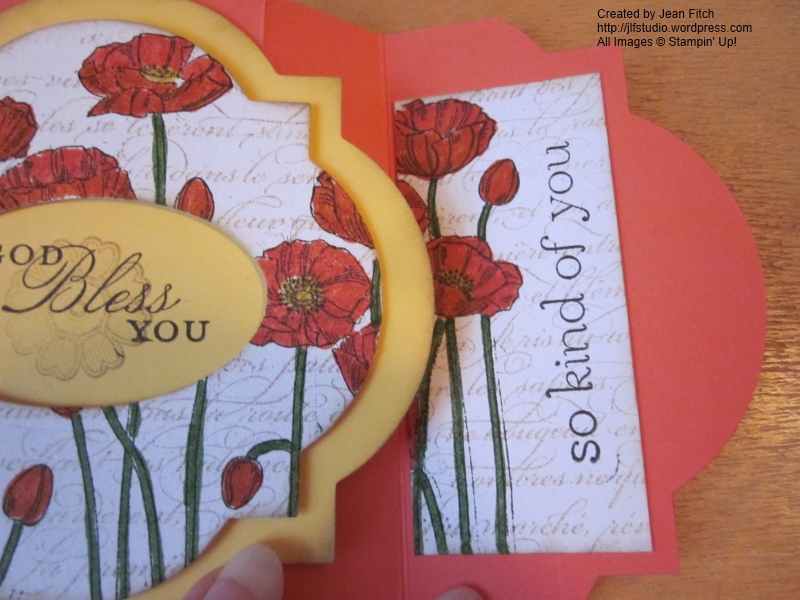
Now check it out opened up!
Is that cool or what! Cooler yet…it stands up all by itself with no supports needed.
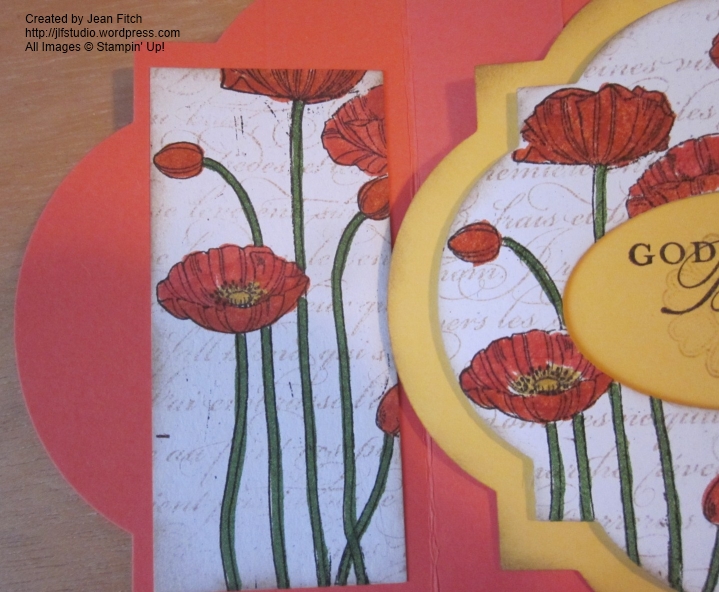
Here’s a close up of the side details.
One of the truly fun things is that you can vary the center die cut for your texts and it gives a very different look to your project depending on the die selected. The card looks tricky but is actually quite simple, just follow the steps. If you have the new Stampin’ Up Magnetic Platform for the Big Shot it’s even easier yet. I’ve added pictures of other variations at the end of the post.
I’ll also note that this same basic design works with any of our larger dies. The Squares, Circles, Ovals and really any framelit that fits around the mountain plateau created by the basic folds and has several sizes for mats and focal pieces.
I found my favorite stamp sets for the side lights were Sweet Essentials and Loving Thoughts. Both sets have nice long verses whose text styles work with a number of word sets – plus the sets have a few short words to go with the long if you prefer the matchy matchy look.
As you can see I kept the basic card background pretty simple and let the poppies speak for themselves. Of course if you were of a mind to you could add more textured layers and pieces and ribbon and any other embellishments that struck your fancy.
Supplies (for all cards in post):
Stamps: Pleasant Poppies, En Français, Sweet Essentials, Trust God, Loving Thoughts, Fabulous Phrases, Lacy & Lovely
Ink: Crumb Cake & Early Espresso ink pads, Calypso Coral, Tangerine Tango, Gumball Green & Daffodil Delight Markers
Other: Big Shot, Window Frames Framelit, Apothecary Accents Framelits, Oval Framelits, dimensionals & other adhesive.
Sample above made use of Trust in God, Sweet Essentials, En Francais, Pleasant Poppies, Lacy & Lovely, Oval Framelit (for text window)
*****
Of course you know I’ll hook you up with a step by step and also a Word Doc of the SCS tutorial – though I would suggest you check out the video too on the SCS site here:
Here’s a few others including what the back looks like undecorated.
Keeping it all in the Window Frame family.
Apothecary Accents Framelit front and center.
You’ll notice this last set fell afoul of an ink pad at last weekends event. 😀 Ah well…luckily the bases are easy to replicate and I can probably lift the panels off and reattach to a new, cleaner base.
*****
Thanks for sharing my little window on the world today. Yep…really bad pun. {grin}
If you don’t have poppies in your garden you can always add them to your cards.
Hugs and blessings on a brand new summer day. – Jean
I know, I know….I’m a couple months early for real pumpkins…and I’m not exactly a Fairly Godmother but….with Stampin’ Up’s help this month you may think I am.
There is another kind of pumpkin that will drop this stamp right on your doorstep (along with a couple of others) read on for a special not to be missed deal.
Perfect for an August Summer Ball right? Or something to create and send to a friend.
Supplies:
Stamps: Hey Friend ( Paper Pumpkin Welcome Kit Stamp)
Ink: Early Espresso
Paper: Pool Party, Crumb Cake, Whisper White
Punches: Extra Large Oval Punch, Itty Bitty Punch Pack
Other: Big Shot, Scallop Circle Bigz die, Manhattan Flower Folder (retired), Perfect Polka Dots Folder, Pool Party Seam Binding, Rhinestone Jewels, Craft Scissors (long bladed), Dimensionals.
After showing friends how the new dress framelits work a few started asking…if we don’t have the framelit just yet (and yeah…why don’t you. LOL) isn’t there something else cool I can use to make a dress with…something I might already have? Well yes…there is. If you have a Big Shot and Scallop Circle die (or if you don’t mind petite – a scallop circle punch will work just fine) here’s a quick and fun summer frock. And you know I’ll hook you up with a tutorial for the template right? As with many designs that have been floating around for years this is a CASE of a CASE of a CASE and on back down the line and I wouldn’t be surprised if you saw something similar elsewhere – I found my inspiration here (Thanks Jen!) and did an almost total lift except for the text stamp and the little flower accent. Since it’s August and Pool Party weather…what other color would you expect to see for this Cinderella number. Embossed Polka Dots add to the festive air and the retired Manhattan Flower folder adds that summer floral touch. What more could a soon to be princess ask right? Well…a deal on the makings would be nice so read a little further.
Here’s the venue to get the stamp I used. Sign up before August 31st and remember to use the promotion code and the entire kit including shipping will only cost you $10! Not bad for a block, a spot, stamps and the makings for 4 cards! That’s cheaper than a class!
Check it out!
Click on the word here below to be whisked away to my sign up site. And don’t for get to add the magic word pumpkindeal
Offer Dates: July 18, 2013 -August 31, 2013
Offer Details: Use the promotion code PUMPKINDEAL to join Paper Pumpkin before August 31, 2013, and pay only $10 a month* for the first two months. *plus tax, where applicable. Shipping included!
The Fine Print:
For new subscribers only. (If you’ve subscribed before and quit just use a new to the pumpkin email address as your contact/account key and you’re in)
Promotion applies only to the first two months of a new subscription. After receiving two month’s worth, the price for each month’s kit will go to the regular price: $19.95.
You must click “Add Promo Code” and then enter the promo code PUMPKINDEAL in the “Promo Code” field when you sign up on the mypaperpumpkin.com website to take advantage of this promotion.
You must join by Saturday, August 31, 2013; 11:50 PM (MT).
More info you need to know. If you sign up after the 10th of August your first kit will arrive the mid to end of September and then the second $10 kit will arrive in October. October’s kit will be the same as anyone else in the program gets. In September (or August if you get on the ball and order today or by the 10th) you’ll receive the following “Welcome Kit” for your first Pumpkin experience.
Now that you’ve seen the card and heard about the fabulous deal why aren’t you dancing? Hee, hee. Deals always make me do the happy dance. How about you?
Click the empty box to see the dance.
Okay…so that may not win me my Prince…but a girl can dream right? And take dance lessons. 😀
Hugs and happy hazy days of summer from your Paper Pumpkin Godmother wanna be. – Jean
A tiny tad tricky since I wanted one layout to work for guys and gals. So Floral Fusion Sizzlit to the rescue! Lets me use more guy type colors and soften it with a floral flourish right? And bling…can’t forget the bling for the girls. And curves…definitely need a few curves (did I mention I’m working slightly blue today…Bashful Blue to be exact…seemed appropriate).
In case you are wondering…it’s supposed to be read Celebrate You, Celebrate Life, Celebrate Dreams. I know…I shouldn’t have to explain but when I did this card at a Stamp Camp it turned out to be necessary. Campers thought I left off the r on the you. What do you think…should I send instructions with the card? Sad when you don’t know if a graduate can read (or at least read the way I intend them too) don’t you think? 😀
And here’s the more masculine version:
I should probably mention too that this card is a great layout for using up scraps and leftover die cuts and punches from other projects. If you are like me you have a box filled with punch cuts from those scraps you just don’t want to throw away with out taking tiny punches to them. One other note about this use of the Floral Fusion. I used the two smaller sizes on the die and added in the Itty Bitty punch pack matching punch so my flowers would be smaller than the one on the CASE of Carrie’s card here.
Supplies:
Stamps: Fabulous Phrases, Suggestions for interior: Pure Gumption, Word Play, Pursuit of Happiness
Ink: Bravo Burgundy, Early Espresso, Soft Suede
Paper: Bravo Burgundy (4”x11”), Bashful Blue (2-1/4”x 3-3/4”), Certainly Celery (3-1/2” x 1-3/4” & 3-1/2” x 1-1/4”), Whisper White (3-1/4” x 1-1/2”)
Punches: Itty Bitty Shapes Punch Pack
Other: Simply Scored, Borders Scoring Plate, Jewels Basics Rhinestones, 3/8” Whisper White Or Crumb Cake ribbon, Big Shot, Square Lattice Embossing Folder, Flower Fusion Sizzlit, Apothecary Accent Framelit, Label Framelit.
Gotta love that Floral Fusion die. Simple shape that layered really stands out. And…it coordinates with the little punch from the Itty Bitty Punch Pack so nicely. Classic shape I used to come across quite a bit in my Art History classes too. For the masculine version I made use of the basic shape and skipped the floral frou frou. Although now that I think about it…I think I did intend to put one rhinestone jewel on the Bashful Blue itty bitty punch piece. Sigh…the best laid plans right?
And did you notice the embossed designs on the Bashful Blue larger layer piece? Nope not a new folder or a new use for an old one. It’s the Simply Scored Borders Scoring Plate! How’s that for a mouthful. I love the extended use that plate gives me for my favorite Stampin’ Up tool. Well…favorite next to my Big Shot that is. And that’s exactly where that Simply Scored tool is…right next to my Big Shot on my beat up German dresser I found when thrifting several years ago. A small adult could almost sleep in the drawers that’s how big it is. Makes for a nice work surface.
If you haven’t used the Borders Scoring Plate here are a couple of videos with tips and details on it’s use. My favorite is Kay Kalthoff’s but Donna Griffith of Stampin’ Up does a nice job with the basics as well.
If you’d like the extended details and directions here they are. Feel free to mix up the colors to match your school or your stash or next Stampin’ up paper order.
I think I’m obsessed with windows lately. Both the kind in my house and the one’s on my cards. The real windows are sealed shut against the smoke from area fires…so of course I want to open them….badly! My brain keeps thinking fresh air is on the other side of the glass even though my eyes tell me there is only heat and smoke. I guess my old Sandycat and I have something in common. When she was alive she was always wanting on the opposite side of the door or window in front of her. I guess I really do have cat DNA like my friends like to say. Now if only I had a few of their other attributes than lack of patience….sigh.
As I was flipping through some of my cards looking to send a few rays of joy outside the smoke zone, I came across a few of my favorite Window cards I’ve never shared. As you can see I’ve been using up my stacks of retired designer series papers and ribbons but of course the design works in whatever colors you have on hand or are planning on purchasing. This same design in Gumball Green or even the lighter Pistachio Pudding would work equally well.
Supplies:
Stamps: Apothecary Art, Loving Thoughts
Ink: Lucky Limeade, markers in your favorite pinks and reds
Paper: Lucky Limeade, Naturals Ivory Cardstock, Champagne Glimmer Paper, 2011- 2013 In Color Designer Series Paper stack (the set that retired in May)
Other: Big Shot, Labels Framelits, Tombow multi purpose glue, stampin’ dimensionals, glue dots – Sale-a-Bration 2012 ribbon
*****
Ever since Stampin’ Up released the shape based Framelit dies I’ve been hooked on creating frames and layered windows for cards. Hooked too on the great deal of getting multiple sizes of the shape for one low price. The new Magnetic Platform makes their use even easier than ever before. Sadly that lovely tool is so popular that the supplier can’t keep up! Stampin’ Up has assured us though that it should be back once again in early Fall. Stampin’ Up could have kept the platform in back order status and continued to accept orders, but they just didn’t feel good about sitting on people’s money for extended periods without getting them their platform so they have temporarily turned that order number off. Keep your eye open for it’s return in a few short weeks though…okay? You really do want the Stampin’ Up one. After all…you get me along with the platform right? {grin} And the great Stampin’ Up service and warranty guarantees that are so much easier to work with.
Back to the window frames…it really is easy. I found this excellent video on YouTube that shows the process really well.
When you are done watching that come on back and take a look at a few other versions I created last St. Patrick’s Day. Then give the technique a try for yourself. It’s really very, very easy. And addicting!
TIP: One tip I’ll pass along that I discovered. Keep a sample frame of the smallest and largest on hand to use as a frame for your stamping so you get a feel for what and where you need to place your image. Use the larger frame to center your stamping area and the smaller to see the overall size of image you are shooting for. You can also put your frames through an embossing folder for a different kind of framed look.
TIP: And another tip. If you have coordinating stamp sets for your Framelit dies they make an excellent choice for filling the windows. I’m so grateful to Stampin’ Up for carrying over the lovely Apothecary Art stamp set to our newest annual catalog. I love working with this shape and those images are elegant and vintage to boot.
SNEAK PEEK: If you too love the label shape take a look at the new Thinlit Card dies that Stampin’ Up is making available for sale starting August 1.
Create your own flip cards in a single pass and check out all the accessory dies that come with the basic moving card die. Whoo Hoo! Stampin’ Up! does it again!
*****
Here are the St. Patrick’s Day versions – easily adapted to hearts or other images for othe celebrations. Wouldn’t a Bird Punch image look lovely in place of the shamrock in the first card?
Paper: Lucky Limeade, Basic Black, Naturals Ivory Cardstock, Champagne Glimmer Paper, 2011- 2013 In Color Designer Series Paper stack (the set retiring in May)
Punches: Itty Bitty Punch Pack, Small Heart, Bird Builder, Wide Oval, Word Window, Scallop Circle (1-3/4”)
Other: Big Shot, Labels Framelits, Tombow multi purpose glue, stampin’ dimensionals, glue dots, Sale-a-Bration 2012 ribbon.
Spring has sprung my friends. At least here in Southern Oregon. While many of the Llamas still have snow on the ground and in the forecast, my little mountain valley is flooded with sun, and warm temperatures abound with only a cloud or two promising the occasional Spring shower.
I’m the tail end of the line on this hop. Depending on which direction you are traveling you are either heading to the wonderfully talented Christine who began our hop or moving on from Kath’s Springtime goodness. Either way…you are in for a Springtime, color filled treat, on these hop pages. If you get lost, click on the home button or the hop banner to get back to our Llama Hop Homepage and the hop’s participant blog listing.
Does Spring time find you looking for color and possibly a trip to Paris? Here’s my vision of those wishes as revealed at a recent stamp camp.
Springtime in Paris – Vintage Etchings
Color Scheme: Crumb Cake, Pool Party, Marina Mist, Wild Wasabi, Pink Pirouette, Primrose Petals
Do you see our Spring Catalog peeking through…the new 7/8″ scallop circle punch, Canvas Creations (yes it’s really canvas!) and the Honeycomb folder just to name a few fresh items. Don’t forget that catalog retires May 31st.
Created the central mini canvas in each piece with a delicate wash of color using our retiring Watercolor Wonder Crayons then heat embossed in gold over top. The crayons may not be available any more but with a blender pen and a light touch with diluted reinkers you can achieve something similar. It’s hard to see but the canvas I colored on is really canvas! Have you used our Canvas creations yet? Lots of fun. Next time I’m planning on ripping the edges so it’s more noticable just what I’ve used and adding another subtle layer of texture.
Should I mention that Artistic Etchings and French Foliage the two sets I made use of are also on the recently released retiring list? Yep. Paris and the Eiffel Tower may be eternal (oh wait…maybe that’s Rome :D) but sadly Stampin’ Up stamp designs aren’t. Hope you’ve gotten your copies of these two lovely sets. They disappear June 3rd. Luckily the Very Vintage wheel is continuing.
Supplies:
Stamps: Artistic Etchings, French Foliage
Ink: Crumb Cake, Soft Suede, Pool Party, Versamark (watermarking/embossing ink)
Paper: Crumb Cake, Naturals White, Canvas Creations (Naturals White or Watercolor Paper works too), Pool Party Core’dinations, Brushed Gold Cardstock
I hope you’ll join me later in the week for a more in depth look at the Watercolor Wash technique and how these were done. I’ll have a couple more examples that used different sets of stamps and color palettes.
Hoping that Spring is filling your skies with sun, your yard with color and just the right amount of April Showers.
Welcome one and all to the Llama’s Fall-i-Days Finale.
The blog hop capper to our series of Fall Festivals and Holidays.
Yes we are cheating just a tiny tad by including Christmas, New Years, Valentines and any other non fall holiday the mind of a Llama can imagine (I’ve heard rumors even Mardi Gras will appear in one of the posts) but…it is still technically Fall, Y’all! Right up until December 21! Hard to believe isn’t it what with snow on the ground, leaves off the trees and the sounds of Christmas Carols in the air. Not to mention the glittery, frosty elegance of our Finale Banner that just screams party time (as in New Years, Mardi Gras and more). Thanks Stephanie for once again creating banners and buttons with Stampin’ Up’s wonderful My Digital Studio program that puts us in the mood to celebrate.
If you’ve followed the listing on the Hop’s Home page then you’ve arrived from Buffy’s beautiful and festive edition of the Finale. If you’ve arrived from somewhere else (Christine’s perhaps?) that’s fine too…we Llamas are very into finding our own path after all and the home button will always get you back to the list and we are set up in circle so you can circle round in either direction using next or previous buttons as indicated for your personal journey. 😀 We’ve also permalinked all entries so you’ll be able to circle the hop anytime you’ve a mind to in the future.
*****
Keeping it simple is the theme I’ve adopted. Well…sort of. Simple is not something I do easily after all. It’s also a tad traditional or even vintage. And possibly patriotic given the colors.
All images and die cuts copyright Stampin’ Up!
Whether it’s for Christmas or for New Years you can’t go wrong with a bit of glitz and gold is as glitzy as it gets (without the shimmer paper that is). You also can’t go wrong with a bit of Champagne. Champagne shimmer paint that is…after all…you do want to be able to stamp straight right? 😀
With winter reaching out its grip the Northern Flurry embossing folder seemed the perfect choice. Reminds me too of a vintage candlewick bedspread I had for years and years. And for Christmas time Peace on Earth is my constant prayer. Actually it’s my prayer all year long but seems very appropriate as we end one year and begin another. A prayer, a wish and deep hope that fills my being. I was so happy to find such a beautiful version of this text in the Holiday Catalog Stamp Set Greetings of the Season. The set has my all time favorite Noel as well. And now Stampin Up has carried it over through the Spring Catalog so you can get it to use and enjoy all the way up till May 31st (no word yet whether it will be in the next catalog) or whenever you want to share that peace filled sentiment.
All images & die cuts copyright Stampin’ Up!
Supplies:
Stamps: Greetings of the Season
Ink: Versamark, Stampin’ Gold Dazzle Marker
Paper: Naturals White, Cherry Cobbler, Night of Navy, Crumb Cake Cardstocks
Basics of the Card: Pearls were colored with the Gold Stampin Dazzle Marker (also carried over from the Holiday Catalog) and allowed to dry. Naturals white layer was embossed with Norther Flurry ef. Corners of base and two layers punched with corner rounder. Embossed Naturals White layered with Cherry Cobbler onto base. Champagne Shimmer Paint daubed on centers of snowflakes and gold colored pearl applied to center. Greeting gold embossed and die cut with matching die cut layer. Tulle is cut in a 2″ strip folded over lengthwise and knotted.
*****
From a Wish for Peace to an invitation to party! The Celebrate is the energetic stamp from the Seasonal Sayings set in the Holiday Catalog. The perfect set for our Fall-i-Days hop series at it will take you from Halloween right through to Valentines. It’s also one of the sets that comes as single stamps up until January 2nd. I picked up the single image Celebrate as I thought it perfect for New Years, Birthdays or really anytime a party or a sense of joy was called for.
In this incarnation the Norther Flurry Snowflakes are doing double duty for fireworks. Kinda works for that don’t you think? Especially with the Champagne Shimmer Paint centers. Much shinier and a tad more subtle in person. And because we are partying for the New Year here I doubled up the Tulle knots too! Though of course with tulle and fireworks and pearls and a party it could also work for Mardi Gras – might want to add some traditional Mardi Gras green & purple for that though!
All images and die cuts copyright Stampin’ Up!
Supplies:
Stamps: Seasonal Sayings
Ink: Versamark, Stampin’ Gold Dazzle Marker
Paper: Naturals White, Cherry Cobbler, Night of Navy, Crumb Cake Cardstocks
Card design basics: Similar to the previous card just a different die cut and the added Cherry Cobbler Tulle knot.
*****
From the vintage and patriotic colors that ended and began our year to the softer sweeter and simpler tones of an old fashioned Valentines. A Valentines Cookie House that is. Yep…I’m still making these little cookie houses. If you’d like to see another edition as well as the link to the video for making them check out this post from Hanukkah Hop.
Still using pieces from the Festival of Prints Print Pack from the Holiday Catalog (hurry and get yours before its all gone) for the roof I added Pink Piroutte and some Cherry Cobbler Seam Binding. A die cut, a couple of stamped texts and you have the perfect and simple Valentines treat to share with friends, neighbors, classmates, teachers and anyone you can think of that would like a cookie and a reminder that you are thinking of them. Of course you could add a window sheet and then fill with peppermints or the traditional candy conversation hearts. And the best part…sh!!…don’t tell anyone. You can make one of these for less than 50¢ each once you have all the materials on hand. Of course…the cookie is extra. 😀
All images and die cuts copyright Stampin’ Up!
Supplies:
Stamps: You are Loved, Teeny Tiny Wishes
Ink: Cherry Cobbler Classic Ink
Paper: Pink Pirouette Cardstock, Festival of Prints Pack (holiday catalog)
Other: Big Shot, Hearts Framelit, Simply Scored, Stampin’ Trimmer, Cherry Cobbler Seam Binding, Crop-i-Dile, Sticky Strip, Paper Snips.
*****
That’s it for my edition of the Finale. Now it’s on to Christine’s fabulously creative entry (yep..I peeked!) – or Buffy’s if you are moving in reverse. You can use the buttons below to advance in whichever direction you are moving. If you find a broken link just click on the home button and you’ll find the list that will get you back on track. Hop on my friends and enjoy the last few days of Fall with our Fall-i-Days Finale!
Today is the last day of our first ANNUAL Hanukkah Blog Hop! We are overwhelmed with the extremely positive response we have received about this hop and all the amazing projects! We hope you were inspired to create and think outside the box when it comes to Jewish related projects! Watch out for future Jewish themed hops…we’ve already discussed one for Passover which is at the end of March 2013!
Thank you to everyone who have visited the first 8 days of the hop. We hope you have enjoyed all the projects and found lots of inspiration! If this is your first visit, go back and visit Day 1, 2, 3, 4, 5, 6, 7 and 8.
*****
Lighting the Menorah is the central Mitzvah of Hanukkah. We light the Menorah to remember the Miracle that happened when the Jewish rebels (the Macabees) took back the Holy Temple from their conquerors. The enemy had done everything that they could to defile the Temple, including bringing idols into the Temple.
The Macabees cleaned and restored the Temple service. They had only one small flask of the special olive oil that was used to light the large golden Menorah in the Temple. Miraculously, the small flask lasted for 8 days.
The Rabbis made this 8 day period into a holiday, now known as Hanukkah. They decreed that it would be celebrated by lighting an 8 branched Menorah, and increasing its lights each day to commemorate how the miracle became greater with each day that the oil continued to burn.
*****
Festival of Light
All images and die cuts copyright Stampin’ Up!
It’s hard to believe we’ve arrived at the last day of the blog hop and the beginning of Hanukkah. I came across this music video as I prepared for our final posting. The snowflakes and light in all it’s forms caught my eye. I invite you to listen and enjoy as you read through the rest of the post. To let it create the background and “light” as you continue with our Celebration of the Festival of Lights.
As I watched and listened to this video the importance of light and of miracles, it’s beauty and its many qualities sank into my heart and soul. As we begin the celebration of Hanukkah…the Festival of Lights and the miracle it commemorates all of us on the hop have chosen to celebrate light and in particular the light of the candle and all it represents in celebrating this special time. Particularly the shamash. The servant candle that lights all the others, that does the work so that the others remain a pure and holy expression of the miracle. A light by which no work must be done (except by the servant candle) or made practical use of.
Here are the close ups and the details:
Light For the World
Light for the World All images and die cuts copyright Stampin’ Up!
Can you tell that the partial die cuts are intended to represent the flame of the shamash and the other candles with the candle itself implied? That’ what was in my head anyway. 😀 The miracle that multiplied the oil and kept the flame burning for eight days. This is completely my own design though influenced by a sense of kinship with some of my favorite graphic artists from the 60’s and 70’s such as Corita Kent in some of her more restrained work.
Light for the World – Inside All images and die cuts copyright Stampin’ Up!
Supplies:
Stamps:Jewish Celebrations, Hanukkah Light Digital Sheet Created in Word (see linked document)
Ink: Midnight Muse Classic Ink, Versamark
Paper: Midnight Muse, Very Vanilla, Brushed Gold Cardstocks, Champagne Glimmer Paper
Much of the text used was created digitally with Word and the fonts on my computer. The Star of David is from Jewish Celebrations and is heat embossed with gold (what else would expect with a celebration of light…right?). The rest is basic layering and die cut pieces using the Window Frame Framelits (some of them trimmed).
Here’s the file you are welcome to use, play with and alter :
Again mostly die cutting, heat embossing with gold and punching then layering. The Star of David images are hand cut with the Snips, my favorite hand powered cutting tool (next to punches!). Lots and lots of dimensionals in this card as I wanted all the various layers to float. Only the base square of glimmer paper is layered direct to the card with Tombow. The rest all uses dimensionals. Tip: For the narrow frames…cut your Stampin’ Up dimensionals into thirds! Perfect width!
*****
What would Hanukkah be without presents right? 😀 Here’s a Gift Card Holder that matches in style and images (to some extent, the Snowflake Window Frame card above. Works actually for any time of the year. Saturday at Stamp Camp in fact several made variations for the men in their lives as birthday gift holders. The pocket inside will hold the gift card in either direction long side or short side. In many ways this is a CASE of my friend Jackie’s Llama blog Hop Card from a few weeks ago. You can see that card here. Next week I’ll share a few more variations along with the directions for the most basic version.
Again mostly die cutting, heat embossing with gold and punching then layering. The large underlayered snowflake is actually a series of the smaller snowflakes cut in half and slide under the window frame die cuts with glue dots. The small For You is from Mixed Midley (HolidayCatalog hostess) and the inside text is from Rejoicing with You from the Annual Catalog. The card shape is cut with the largest Window Frame Framlet with the card fold placed just below the cutting edge. Have you guessed yet that I’m in love with the color Midnight Muse, the Champagne Glimmer Paper and the Bold Snowflake single stamp from the current Single Stamp Promotion? Both the Glimmer Paper and the Bold Snowflake stamp go away January 2nd. Make sure you get yours before then!
*****
And lastly…I’m dating myself with this next music video. Peter, Paul & Mary have been a part of my life almost from its beginning. I’ve sung, cried, learned and grown from their music and its message. I’ve been privileged to attend some concerts in person too and each time at each concert they shared this song, Light One Candle. I found this YouTube recording made at Hanukkah time as far as I can tell and the message dovetails perfectly with the song and sentiments from the first video I shared today. Enjoy this blast from the past…and if you celebrate or find meaning in Hanukkah don’t forget to light the one shamash candle and the others each night of this wonderful Festival of Lights. Fill your homes and the world with light in your hearts and in your life. Whatever your faith or leanings we can all use a little light and find meaning in the sharing of it.
*****
I hope you’ve enjoyed our first Annual Hanukkah Hop. We’ve all enjoyed sharing the Festival of Lights in all its bright and shining aspects with you. We’re discussing the possibility of a Passover blog hop as well as what we might have in the works for next year!
Happy Hanukkah to you all! Wishing you a year of light, love and joy.
Blessings – Jean
*****
Thank you for hopping along with us.
Your next stop is Andi’s blog, where she is going to show you some more great Hanukkah related projects!
Make sure to come back and visit us again on Sunday the 9th, for our final day of our Hanukkah Blog Hop!
Here’s a complete list of the Hanukkah Blog Hoppers in case any links don’t work.
Welcome to the first ever Hanukkah Blog Hop! We are so excited to be able to share with you some wonderful Hanukkah related projects. We’ll be posting 2 projects a week on Sunday’s & Wednesday’s until the first day of Hanukkah on December 9th! There are 4 of us participating so that is a total of 9 hop days for a total of 36 ideas!! Are you ready to be Hanukkah project inspired?!
Thank you to everyone who have visited the first 7 days of the hop. We hope you have enjoyed all the projects and found lots of inspiration! If this is your first visit, go back and visit Day 1, 2, 3, 4, 5, 6 and 7.
Wow…totally loving Miriams take on Hanukkah gifts. I love washer jewelry and as a gal with long bangs I love barettes too! Thanks Miriam for sharing that.
*****
Hanukkah Houses…ready for occupancy!
So…is Hanukkah in your House yet? Yep it’s in mine…at least I’ve created my own Hanukkah Houses that are filled with goodies to aid in the celebration. Initially my first thought was that if you had someone living far away…perhaps a son or daughter in college…who would be late getting home to celebrate…you could send off a little package with candles and a small menorah…maybe a gift or two to tide them over until they could get home to share with the family. (whew…that was a run on sentence if ever there was one!)
By making the box in the shape of a house I thought it would also be a potent reminder of hearth and home. So I took out an idea from my 2011 convention file that I used last year to make my Big House. Then…I saw a video by fellow demo Kelly Kittelfinger. She’d taken the same house pattern I’ve used before and altered it slightly for size and ease of construction. Brilliant gal also figured out how to get two mini houses out of 1 sheet of paper! That sent me down another path…neighbor gifts! There are so many opportunities to share the love and what better occasion than Hanukkah. Of course you can also make a whole little village just to add to your own house’s decor.
First up the Neighbor gifts:
Basic Cookie Wrap with Window
all images and die cuts copyright Stampin’ Up!
Start simple…or go slightly larger. The single cookie pack is the one that was supposed to be included with my table setting from Day 6 of the hop. Oops. I think I mentioned that I wanted to send guests home with a sweet treat to kindle the thoughts and memories of the celebration. Works for a neighbor gift as well. Or at a luncheon, in a lunchbox, anytime really that you need a thinking of you type gift. After all…who doesn’t like cookies. Of course Miriams lovely gifts would fit in here too. 😀 You can even add a star ornament tag if you happen to have gone overboard with the star folds like yours truly.
All images and die cuts copyright Stampin’ Up!
Supplies:
Cookie Packet:
Stamps: Friendship Preserves
Ink: Midnight muse
Paper: Midnight Muse & Very Vanilla
Punches: 1-1/4” Scallop Circle, 1-3/4” Scallop Circle
Other: Big Shot, Window Frames Framelits, Simply Score, Stampin’ Trimmer, Midnight Muse Stitched Satin Ribbon, bone folder, Sticky Strip, Glue Dots, Snail, Cookie in Saran wrap.
Star Tag:
Stamps: Jewish Celebrations
Ink: Night of Navy
Paper: Night of Navy & Very Vanilla Cardstocks, Festival of Prints Designer Series Paper Pack
Other: Simply Score, Stampin’ Trimmer, 1-1/4” Scallop Circle Punch, 1” Circle Punch, Linen Thread, Crop-i-dile
Cookie Packet Directions:
Cut Base Paper: 10-1/2″ x 3-1/2″ Score at 3-1/2″ & 7″ (you can get two cookie packets per standard sheet)
Die cut window frame using Big Shot and Window Frame Framelits placing the die in the middle section of the three scored sections. Fold around cookie and tie with ribbon (add a bit of sticky strip or snail to the back flap to help hold closed if desired. Stamp Hello image (or other) from Friendship Preserves. Die cut with framelit and attach with glue dot.
Similar packets can be made with 12×12 sheets. Depending on the size of the cookie cut into 4″ x12″ or 3″ x 9″ and score in thirds. I split the difference in sizing in my packets.
*****
Going a little more upscale here’s my Hanukkah House mini gift boxes for friends and neighbors.
All images and die cuts copyright Stampin’ Up!
*****
All images and die cuts copyright Stampin’ Up!
This little Shalom Cookie House continues the cookie theme and I think is my favorite. I love the simplicity. Even without the little scallop ribbon tab it’s very cute. With the cookies wrapped in saran wrap you don’t even have to put a cover in the window. The only thing cuter would be if I had made cookies using our Stampin’ Up Cookie Stamps. The house will accomodate 2-3 cookies about 3″in diameter (possibly a little bit larger)
All images and die cuts copyright Stampin’ Up!
Here’s the little menorah house that at the moment is holding a set of candles and a star tag. Appropriate don’t you think? I loosened the roof and added an interior picture so you can get a feel for how the little house works. Kelli designed the mini’s to hold 3×3 post-it pads so anything that runs about that size will fit perfectly. I found I was able to get about 20 candles in the box along with the star tag.
Supplies for the mini Hanukkah Houses
Stamps:Jewish Celebrations, Every Little Bit
Ink: Midnight muse
Paper: Bashful Blue, Night of Navy Cardstock, Silver Glimmer Paper, Festival of Prints Designer Series Paper Pack.
Of course with such a small amount of designer series paper used you could take advantage of our digital Hanukkah themed papers in the Hanukkah Happiness download and get quite a few parts for mini houses out of a single printed sheet.
These guys are so much fun to make you’ll find it hard to stop. Takes about 10-15 minutes each once you get the hang of it. Our Festival of Prints papers are turning out to be quite adaptable too. When I first got the pack I thought of them as Christmas papers…then started looking closer and discovered over half of the designs would also work for Hanukkah! Hooray! Multiculteral paper designs. I love it! Of course these little houses will work all year round for any occasion in any color.
Here’s the Big Brother to my mini’s:
all images and die cuts copyright Stampin’ Up!
Supplies:
Stamps: Jewish Celebrations
Inks: Midnight muse
Paper: Midnight Muse & Brushed Silver Cardstocks, Silver Glimmer Paper, Festival of Prints Designer Series Paper Pack.
Punches: 1-1/4” Scallop Circle, 1-3/4” Scallop Circle
Other: Big Shot, Perfect Pennants Bigz L die, Crop-i-dile, Simply Score, Stampin’ Trimmer, Midnight Muse Stitched Satin Ribbon, Cherry Cobbler Seam Binding, bone folder, Sticky Strip, Dimensionals, Glue Dots, Snail
And a detail close up:
all images and die cuts copyright Stampin’ Up!
all images and die cuts copyright Stampin’ Up!
I originally intended to put a small menorah inside but my mini has gone walkabout as our Australian sister demos say. Pretty easy to find this time of year though if you are looking for one. Means a trip to town though. In the meantime I’ve filled my little house with a cookie, tag, candles and…
Two Tags Gift Card Holder all images and die cuts copyright Stampin’ Up
.. this item from last Sunday’s post with a gift card. If I can find a small dreidel and some chocolate gelt coins I’ll be all set.
If you’d like to make a large House of your own you can find the basic directions and template on my old blog post here. Decoration and paper choices are entirely up to you. As you can see I’ve done them two ways (more actually since I made one for Valentines but never posted it. I did make one or two minor changes to the template this time around. Instead of scoring and folding the diagonals for the roof I trimmed them using my Stampin’ Trimmer (love that tool) the same as Kelly did on hers and I did the roof attachement like hers too. If you read my past post and watch Kelly’s video I think you’ll be able to figure it out. If you have any questions please email me and I’ll be happy to help.
And lastly…here’s another look at my Hanukkah House village:
all images and die cuts copyright Stampin’ Up!
I wish you could see these close up and in person as they shimmer and shine and the roof details show up much better. So perhaps you’ll make some of your own? So you can see?
That’s it from my House to yours…sorry…I couldn’t resist! 😀
Hugs and blessings – Jean
*****
Thank you for hopping along with us.
Your next stop is Andi’s blog, where she is going to show you some more great Hanukkah related projects!
Make sure to come back and visit us again on Sunday the 9th, for our final day of our Hanukkah Blog Hop!
Here’s a complete list of the Hanukkah Blog Hoppers in case any links don’t work.
Welcome to the first ever Hanukkah Blog Hop! We are so excited to be able to share with you some wonderful Hanukkah related projects. We’ll be posting 2 projects a week on Sunday’s & Wednesday’s until the first day of Hanukkah on December 9th! There are 4 of us participating so that is a total of 9 hop days for a total of 36 ideas!! Are you ready to be Hanukkah project inspired?!
Weren’t Miriam’s digitally created coffe covers amazing! Simple to create and print too! I love the new downloads! And don’t forget to check out Stampin’ Up’s My Digital Studio Facebook Page you could win a whole year of My Digital Studio downloads and the program itself! Lots of prizes to be had for adding your Like to the page.
Thank you to everyone who have visited these past 6 days of the hop. We hope you have enjoyed all the projects and found lots of inspiration! If this is your first visit, go back and visit Day 1, 2, 3, 4, 5 and 6.
Keeping it simple today. A very simple card and a simple gift card holder. And the alteration to my menorah I forgot to add for the last hop picture. Can you tell I’m still loving the Jewish Celebrations set from the Holiday Catalog? Loving the papers from the Festival of Prints Designer Series Paper Stack too. Such a convenient size to use and store. This large pack of smaller sized paper is perfect for any crafter. The designs are not specific to any one holiday and so work for all. It’s all about the colors and the patterns. there are even some I see myself using for Spring or for Valentines or Father’s Day or……you’re only limited by your imagination.
(click the pictures for closeups)
All images & die cuts copyright Stampin’Up!
Jewish Celebrations Plain & Simple Card
Outside
All images & die cuts copyright Stampin’Up!
A few people have asked what the inside of a Hanukkah card might look like so here you go….
…the inside
All images & die cuts copyright Stampin’Up!
This card was as simple as simple could be. Wheel on the base, die cut a layer, stamp, add rhinestones and voila! A card in under 10 minutes. No fancy folds, details or techniques. Just good old basic stamping and Big Shot. To be any simpler you’d have to start with a White Base Card and skip the Big Shot. Hm….that might work too. Had a friend ask me what a 3 minute card would look like….I think I just described one. 😀
It’s hard to see but I used the Illuminate Glimmer Ink on the Starburst Jumbo wheel to add a bit of texture to both the Midnight Muse card base and the Whisper White Oval Accent die cut. While hard to see in the pictures it’s perfectly visible in person and I wanted to pair this card with the gift card holder because those same stars are similar in pattern to the designer series paper on the holder.
Other: Big Shot, Two Tags die, Simply Score, Silver Embossing Powder, Heat Tool, Sticky Strip, glue dots and Snail adhesive
The holder uses the same paper trick I used for the napkin ring holder in this post. Long strip doubled in half placed just above the cut line. This time you just staple the scalloped ends together and cover with a scalloped punch piece (both sides if you want to keep it neat and don’t want the staples showing. 😀 Insert your card into the folded piece (I’d use a glue dot to hold it in place) and when the scalloped end is pulled the card will appear from the cover.
Were you hoping for a template?
How about a full set of directions with more pictures?
And a little credit. I’ve seen the basic idea several places but the tutorial I mostly followed was here . I’ve no idea who the originator was. I created my own template and detailed directions to share. Enjoy!
*****
One last note…I haven’t forgotten about the directions for the Hanukkah Dove or the extra details on the star folds I promised. Life with stamping events, new Spring Catalog preorders and rain…lots of rain has intervened just a bit. But I’ll have them up next week for sure.
*****
Thank you for hopping along with us.
Your next stop is Andi’s blog, where she is going to show you some more great Hanukkah related projects!
Make sure to come back again and visit on Wednesday for Day 8 of our Hanukkah Blog Hop!
Here’s a complete list of the Hanukkah Blog Hoppers in case any links don’t work.
No sooner does the Online Extravaganza end than another promotion begins. You don’t even have to be a stamper to enjoy this one! It’s all about the packaging of your treats and gifts and other holiday giving AND about making it simple and stress free! As the title says All the cuteness without all the work!
SAVE 20%
Holdiday & Annual Catalog Goods have been bundled to save you money and time.
Available November 29-January 2.
In the new New Arrivalssection of the Online Store.
Trimmings & Tags Bundle
Item# 132769
$13.50 (a $16.85 value)
Includes
Gusseted Cellophane Bags (25 bags; 5″ x 3″ x 11-1/2″)
Snow Festival Designer Printed Tags (25 double-sided tags; 4-1/2″ x 3-1/8″)
Cherry Cobbler 1/4″ Sweater Trim (10 yards)
Petite Treats Bundle
Item# 132770
$13.50 (a $16.85 value)
Includes
Glassine Bags with die-cut edges (10 bags; 3″ x 5″ x 1-1/2″)
Handmade Holidays Stitched Felt (8 pieces)
Gumball Green 3/8″ Stitched Satin Ribbon (10 yards)
*****
New Arrivals!
When you are ready to shop…This is the first place to check to see what’s new and shaking in the SU world. Well…the Clearance Rack is always a good place to check too! 😀 No new additions there yet but give it some time. The Holiday Catalogs days are numbered and you know what that means….get it while you can. These bundles and most of what’s in the Holiday Catalog will be going bye bye January 2nd.
(or click on the Online Shopping Graphic in the sidebar)
See the fun in action!
Here’s a few closeups of the included product (just in case you aren’t yet convinced this stuff is CUTE!)
That’s it. Sorry the glassine bags aren’t available individually but you can see what they look like by checking page 27 of the Holiday Catalog where they are also currently available in a Halloween Kit Configuration.
Enjoy the New Arrivals and of course enjoy your holidays too!
Click Here to view – Downloadable Stamping docs/files
What Stampin’ Up! Wants You to Know:
What Stampin' Up! Wants You to Know:
This is my personal blog. I am an Independent Stampin' Up! Demonstrator and responsible for its content. Stampin' Up! does not endorse the use of or contents of the classes, services, or non-Stampin' Up! products I may offer here.
Michelle Laycock at:
www.laycockdesigns.com
Check out her free buttons for blogging demos at:
http://laycockdesigns.com/category/free-promo-buttons-for-demos/
And some were created by:
Webs by Amy at:
http://websbyamy.com/
Check out her free buttons for blogging demos at:
http://websbyamy.com/category/stampin-up-demo-related


