The snow is falling in curtains, the deicing trucks are moving on the roads and of course it’s cold….so what better time for cocoa and Christmas carols to warm the heart, the spirit and the body!
Luckily I put together some cocoa packets, candy canes and treats to share with neighbors and of course…I had one left over to put under my own tree. Yep…that’s what my late husband (who was a boy scout) would call planning ahead and being prepared. {grin}
Here’s a peek in case you want to make your own. They’re quick, easy and the perfect warm up to share with others. All you need is some paper, an envelope punch board and the treats. Of course if you want to glam it up then you’ll want a few other bits too!
Envelope Punch Board Cocoa Treat Packets
Supplies:
Stamps: Jingle all the Way, White Christmas, Cozy Christmas
Ink: Mossy Meadow
Paper: Mossy Meadow Cardstock, Home for Christmas Designer Series Paper, Red Foil
Other: Envelope Punch Board, Itty Bitty Accents (star) punch pack, Big Shot, Seasonal Frame Thinlit dies (Holiday Catalog and now sale priced), Christmas Greetings Thinlits, Fine Tip Glue Pen, Tear and Tape, Cocoa Packets, candy canes and Pearson’s Peppermint Patties.
Hot Chocolate Envelope – Envelope Punch Board Pouch
Paper: Designer Series Paper – 6-3/4” x 6-3/4” Start Score and Punch at 3-3/4”
Measure, score and punch once at 3-3/4” then rotate and line up previous score with guide then punch and score again all the way around. Fold on score lines and trim off upper flap. Score lightly so as not to tear DSP.
I CASE’d the idea from one of my favorite stampers Nicole Tugrul. You can see her original creation here.
*******
It’s Christmas Eve here as I’m writing this and unfortunately I wasn’t able to make it to Midnight Mass this year. But YouTube and the Internet make so many things available – Carols, Christmas programs, broadcast Mass from around the world and of course I have my cocoa. How about you? Are you warm and safe and feeling the joy of the season? I hope so.
Peace and joy be yours on this very special night.
Here’s one more share.
A picture I came across that melds perfectly with one of my favorite songs for this night.
Stampin’ Up’s Retiring Product List is now up. On your mark, get set…SHOP NOW! (before it’s all gone)
To make your shopping easier…not to mention marking your catalog I’ve converted the standard list to one by page number. so now you can have it both ways…whichever works for you.
One other note. Many items are going fast but at least the stamps will last a wee bit longer. Stampin’ Up will continue making some of your favorite retiring stamps until May 26th. The accessories (non stamp items) however are disappearing as I type!
Note: I’ve revised the Page number sorting documents below to correct some errors that crept in in the original documents.
For this challenge Heidi has provided us with a wonderful combination challenge to play with and create projects.
Challenge: Create with watercolors and a silhouette
Join the rest of the design team over at the Challenge blog website here to see the rest of the teams designs and to add your own with the linky doodad.
I once knew a lady who using a pair of small sharp and pointed scissors (her “snippity snips”), could cut the most amazing silhouettes of people, animals, plants and even complicated lace patterns. Not being quite that talented with scissors (my paper snips from Stampin’ Up), I resorted to Stampin’ Up punches and dies.
Here’s my entry…no bunnies today but it is another 3D. Have I mentioned lately that I’m hooked on 3D and punch and die related projects? With Father’s Day on the horizon (okay…this basket would work for Mom too) I wanted something in what I considered guy colors. I know…all our colors work for anyone (though good luck with Pink Pirouette or Blushing Bride for any guy who knows the names of our colors…or just has an aversion to pink) but you have to admit some can be a challenge (hm…maybe I should have given some thought to adding to my Father’s Day challenge coming up just to make it tough on all concerned) more than others. My late husband was a fan of tans, blues and browns (a big fan of birds and other natural wonders too) so keeping all of that in mind here’s what I came up with.
and a corner view so you can see the handle and a bit more of the lining.
I’m still deciding what to put inside this fun basket. Maybe little 3″ x3″ why I love you cards or coupons for chores or dinners out or whatever your heart desires. Of course…Hershey’s kisses and other treats are always a great pleaser as well. And if your imagination fails you…Dad can always use another tie wrapped up and placed inside this much more imaginative basket!
Supplies:
Stamps: None so far
Ink: Elegant Eggplant, Night of Navy, Lost Lagoon (does water count as an ink?)
Paper: Lost Lagoon, Early Espresso, Basic Black Cardstock, Festive Designer Kraft Paper (Clearance Rack), Watercolor Paper
Punches: Bird Builder, What’s Up, Owl Builder (circle for the birdhouse door)
Other: Big Shot, Circles Framelit Collection, Flower Frenzy die (leaf bough), Two Way glue pen, Sticky Strip, SNAIL
********************
Not too bad for my first Berry Basket attempt. Of course I had a bit of help. My friend Patti Leeke created this gorgeous basket that was my starting point along with Heidi’s wonderful (and brain teasing challenge). I saw that and knew I had to incorporate the bird and bird house into my design. I learned a few things along the way. One…I love this Berry Basket die! And I bet you will too. Here’s another fun project by my friend Deb that will give you a few more ideas on using with a card. Deb posted it on our last Challenge in the linky doodad. Nice when you can do cards and other things with a die than just it’s intended use.
Other tips from my friend Patti Leeke who has done quite a few of these. 1) Always line your basket with a fun paper. That’s Patti’s firm and fast rule. 2) Put your cardstock basket together first (except for the rim and handle) and then add the liner -matching up the holes at bottom of basket and adding glue in between the holes as well as other areas (Patti’s favorite glue for this is the Tombow multipurpose liquid glue in the green capped bottle). Once that’s done then add the scalloped or straight rim by placing the completed rim on the table and then squeezing the basket sides and move the rim up into position. 3) If you have a slightly imperfect side…hide it with a doily! Boy do I wish I’d remembered that rule!
My tip…don’t stress about how it all goes together. These baskets are going to be stinking cute no matter how it goes together. I’m looking forward to making one with copper flashing. Then I can put it on my desk to hold various doodads. That’s the genius of a Bigz die. It can cut 5o materials – see the list here:
Here’s a quick look at the liner – do you remember that paper from the 2014 Holiday Catalog? It’s now on the Clearance Rack at a killer price. And a close up of the flowers I used to cover up the handle attachment:
Can you guess where I found the tiny heart? It’s from a fairly new photopolymer monthly stamp set that doesn’t appear in the catalog – Lovely Amazing You.
In case you are still wondering about the basics of the Berry Basket die from the Occasions Catalog here’s a video from Stampin’ Up showing their tips:
I hope you’ll join the Watercooler challenge and show us your own watercolor and silhouette project and link up to us. Don’t forget to check the Watercooler Challenge Blog post here to see who was the winner of the last challenge submissions by linky artists. Check the challenge site for rules on competing for future challenges.
And check further down in the post to see how you can celebrate with
Free Shipping today!
Once again the Envelope Punch Board was front and center creating the grass and my many punches did the rest. I’ve been hooked on all the sun’s everyone is creating with the new Banner punch from Sale-a-Bration (luckily you still have a couple of weeks to take advantage of getting it for free!) so had to try my hand at one.
I counted them up and in addition to the Envelope Punch Board which probably qualifies as a punch in and of itself I used 12 other punches to create this card! I think that’s a record for me. It sure added to the weight of the boxes being transported to the church hall for this event. Filled the center of the table too.
Here’s the supply list.
Supplies:
Stamps:Occasions Alphabet, Petite Petals, Teeny Tiny Wishes & Trust God (inside). Assortment of retired St. Patrick’s Day stamps.
Ink: Gumball Green, Real Red (optional Black Journaling pen/marker for making a sun face.)
Paper: Gumball Green (1”x 4-1/4”), Real Red, Daffodil Delight, Naturals White, Basic Black Cardstock & Champagne Glimmer Paper. Little hearts: Real Red, Daffodil Delight, Pear Pizzazz, Gumball Green, Island Indigo, Pumpkin Pie
Punches:1-3/8” Circle, Petite Petals, 1-1/4” Scallop Circle, Decorative Label, Owl Builder, Word Window, Banner (from SAB), Bird Builder, Scallop Oval, Small Oval, Large Oval, Itty Bitty Punch Pack.
Other: Envelope Punch Board, Big Shot, Square Lattice embossing folder, Daffodil Delight ¼” stitched grosgrain ribbon, two way glue pen, tweezers, adhesives.
And here are the directions I shared with my stamp camp attendees:
And a few tips on creating the various elements (no worries…these pictures are also in the directions):
Line up the 8 banner punched pieces on the back of the sun circle in two sets of overlapping squares. Then run through the Big Shot with the Square Lattice folder and add another circle on top.
For the Pot O’ Gold I punched a Decorative Label piece then put the half piece on a post it note for better control and using the small oval punch I snipped just a hint out of the middle to get rid of the point and preserve the “legs” for the pot. Added a word window punch and a half a scalloped circle of glimmer paper and there’s the pot.
For the grass I created a base piece and a rick rack piece. Embossed with the Square Lattice and overlaid the two pieces at the base of the card.
Create your two grass strips with the two 1”x 4-1/4” Gumball Green strips + the Envelope Punch Board. Strip 1: Place the strip first with the edge of the paper lined up with the tip of the score guide. Punch.
Slide strip over to the 1-1/2” mark, punch. Slide strip to the 2-1/2” mark, punch. Continue sliding down 1 more inch and punching till you reach the end of the strip.
Strip 2: Create the same as Strip 1 then flip over and center each “mountain” then punch, continue sliding and aligning and punching till you have a full rick rack looking strip.
Place both completed strips in the Square Lattice embossing folder the longways and run through the Big Shot. Over lap both strips so you have a series of peaks and valleys between the two strips, adhere strips together and then adhere “grass” piece to card base. Trim edges if necessary.
Cool trick isn’t it. Creating rick rack with the Envelope Punch Board. It does take a bit of flipping around to get the right orientation so the peaks show between the valleys but it’s a fun puzzle. Of course if you have the Tasteful Trim die it might be a bit quicker but I love that with the Envelope Punch Board I’m not limited to the length of the rick rack pieces I create. Oh…and the “mountain” base piece also works for a sponging mask to create hills. Especially if you vary the measurements you use to punch the base.
Hope you’ve enjoyed this fun project. I can’t tell you how many movies I watched while punching enough “owl” hearts for 12 people to create this card. Fun!
Please note: In honor of St. Patrick’s Day I am offering FREE shipping on any Stampin’ Up! orders over $25 placed today March 17th 2014!
And don’t forget to pick up more FREE product during the last two weeks of Sale-a-bration. I’d be happy to be your demonstrator. When you click on the online store button in the sidebar select me as your demo and place your order. I especially recommend the Envelope Punch Board. It really is a wonder! You can see what else it can do on my Pinterest board here.
You have a couple options for ordering:
Visit the online store, select me as your demonstrator in your profile and place your order~ I will refund your shipping after the order is placed or
Email me at jlfstudio@live.com and let me know what you want to order – include your phone number and email ~ I will then contact you to make arrangements for payment minus shipping.
Don’t forget to place your order (minimum $25) or send your email before Midnight – March 17, 2014 to get your free shipping. 😀
*****
To celebrate my own Irish roots let me leave you with this traditional blessing and a few YouTube videos with blessings and Celtic music to enjoy the day.
Here’s a great blog post on the Stampin’ Up customer blog that outlines ideas and uses for the new die sets.
Time to flip someone a card don’t you think? 😀
As always you can order these dies and any other of your Stampin’ Up products by dropping me an email or selecting me as your demonstrator in the Stampin’ Up online store.
While we were sleeping Stampin’ Up Restocked the Clearance Rack!
Hi all,
You know, some days I think its a good thing I don’t sleep (much). 😀 While the rest of you were sleeping and dreaming holiday dreams Stampin Up announced:
And when they say Blitz…they do mean BLITZ!!!!! Items up to 80% off! But only while supplies last. When they are gone…they are GONE!
Papers under $3, Embellishments under 80¢, Ribbons under $2. Dies…well you won’t believe the dies and their prices. AND…STAMPS!!!!!! For the first time ever Stampin’ Up has put actual Stamps on the Clearance Rack. Simply Amazing. I’m still waiting for my heart to go back to beating in a normal rythmn. Last night I was having a moan about several items I’d missed out on the last year or two. And guess what…Santa and Stampin’ Up loaded up the Clearance Rack with them!! Now that’s a Christmas Miracle for sure. Or at least the ask and you shall receive variety…don’t you think? 😀
My order is in…how about yours???? Items are going fast…even at this early hour.
And to sweeten the deal I have a little Christmas Gift of my own for you. How about….FREE SHIPPING!!! Through the end of December! That’s another 10% savings for you! One catch…you have to place the order through my online store here and I’ll have to PayPal you the shipping back or give you a gift certificate towards your next order as the online store doesn’t yet have a way to handle a demonstrators personal specials.
Here’s the Blitz details:
Dates: December 14, 2012 – while supplies last
Details:
Over 300 new Clearance Rack items are being added to the Online Store at discounts up to 80 percent off retail-only while supplies last!
The Fine Print
Only online orders qualify for this promotion. Feel free to order both Clearance Rack and non-Clearance Rack items on the same order-we’re flexible like that.
There is no minimum purchase required to participate in this special offer-go nuts!
Qualifying Clearance Rack orders are eligible for hostess benefits/Stampin’ Rewards. Bonus! – Note only if ordered through my online store site.
Clearance Rack Blitz items are only available while supplies last-so don’t wait! And sorry, but there are no refunds or exchanges on Clearance Rack items.
Note: You can add regular non Blitz items to the same order so if you are running low on my beloved Champagne Glimmer Paper or anything else from the Holiday Catalog or the Annual Catalog feel free to add those to your order and yes…I’ll even honor the Free Shipping on those items too!
Times a-wasting and the items are flying off the shelves. Santa and the Blitz waits for no woman! Or man! Click here to start your own personal Holiday Blitz experience!
*****
Need a little something to get you in the Holiday Crafting spirit? Check out this latest Stampin’ Up video:
Today is the last day of our first ANNUAL Hanukkah Blog Hop! We are overwhelmed with the extremely positive response we have received about this hop and all the amazing projects! We hope you were inspired to create and think outside the box when it comes to Jewish related projects! Watch out for future Jewish themed hops…we’ve already discussed one for Passover which is at the end of March 2013!
Thank you to everyone who have visited the first 8 days of the hop. We hope you have enjoyed all the projects and found lots of inspiration! If this is your first visit, go back and visit Day 1, 2, 3, 4, 5, 6, 7 and 8.
*****
Lighting the Menorah is the central Mitzvah of Hanukkah. We light the Menorah to remember the Miracle that happened when the Jewish rebels (the Macabees) took back the Holy Temple from their conquerors. The enemy had done everything that they could to defile the Temple, including bringing idols into the Temple.
The Macabees cleaned and restored the Temple service. They had only one small flask of the special olive oil that was used to light the large golden Menorah in the Temple. Miraculously, the small flask lasted for 8 days.
The Rabbis made this 8 day period into a holiday, now known as Hanukkah. They decreed that it would be celebrated by lighting an 8 branched Menorah, and increasing its lights each day to commemorate how the miracle became greater with each day that the oil continued to burn.
*****
Festival of Light
All images and die cuts copyright Stampin’ Up!
It’s hard to believe we’ve arrived at the last day of the blog hop and the beginning of Hanukkah. I came across this music video as I prepared for our final posting. The snowflakes and light in all it’s forms caught my eye. I invite you to listen and enjoy as you read through the rest of the post. To let it create the background and “light” as you continue with our Celebration of the Festival of Lights.
As I watched and listened to this video the importance of light and of miracles, it’s beauty and its many qualities sank into my heart and soul. As we begin the celebration of Hanukkah…the Festival of Lights and the miracle it commemorates all of us on the hop have chosen to celebrate light and in particular the light of the candle and all it represents in celebrating this special time. Particularly the shamash. The servant candle that lights all the others, that does the work so that the others remain a pure and holy expression of the miracle. A light by which no work must be done (except by the servant candle) or made practical use of.
Here are the close ups and the details:
Light For the World
Light for the World All images and die cuts copyright Stampin’ Up!
Can you tell that the partial die cuts are intended to represent the flame of the shamash and the other candles with the candle itself implied? That’ what was in my head anyway. 😀 The miracle that multiplied the oil and kept the flame burning for eight days. This is completely my own design though influenced by a sense of kinship with some of my favorite graphic artists from the 60’s and 70’s such as Corita Kent in some of her more restrained work.
Light for the World – Inside All images and die cuts copyright Stampin’ Up!
Supplies:
Stamps:Jewish Celebrations, Hanukkah Light Digital Sheet Created in Word (see linked document)
Ink: Midnight Muse Classic Ink, Versamark
Paper: Midnight Muse, Very Vanilla, Brushed Gold Cardstocks, Champagne Glimmer Paper
Much of the text used was created digitally with Word and the fonts on my computer. The Star of David is from Jewish Celebrations and is heat embossed with gold (what else would expect with a celebration of light…right?). The rest is basic layering and die cut pieces using the Window Frame Framelits (some of them trimmed).
Here’s the file you are welcome to use, play with and alter :
Again mostly die cutting, heat embossing with gold and punching then layering. The Star of David images are hand cut with the Snips, my favorite hand powered cutting tool (next to punches!). Lots and lots of dimensionals in this card as I wanted all the various layers to float. Only the base square of glimmer paper is layered direct to the card with Tombow. The rest all uses dimensionals. Tip: For the narrow frames…cut your Stampin’ Up dimensionals into thirds! Perfect width!
*****
What would Hanukkah be without presents right? 😀 Here’s a Gift Card Holder that matches in style and images (to some extent, the Snowflake Window Frame card above. Works actually for any time of the year. Saturday at Stamp Camp in fact several made variations for the men in their lives as birthday gift holders. The pocket inside will hold the gift card in either direction long side or short side. In many ways this is a CASE of my friend Jackie’s Llama blog Hop Card from a few weeks ago. You can see that card here. Next week I’ll share a few more variations along with the directions for the most basic version.
Again mostly die cutting, heat embossing with gold and punching then layering. The large underlayered snowflake is actually a series of the smaller snowflakes cut in half and slide under the window frame die cuts with glue dots. The small For You is from Mixed Midley (HolidayCatalog hostess) and the inside text is from Rejoicing with You from the Annual Catalog. The card shape is cut with the largest Window Frame Framlet with the card fold placed just below the cutting edge. Have you guessed yet that I’m in love with the color Midnight Muse, the Champagne Glimmer Paper and the Bold Snowflake single stamp from the current Single Stamp Promotion? Both the Glimmer Paper and the Bold Snowflake stamp go away January 2nd. Make sure you get yours before then!
*****
And lastly…I’m dating myself with this next music video. Peter, Paul & Mary have been a part of my life almost from its beginning. I’ve sung, cried, learned and grown from their music and its message. I’ve been privileged to attend some concerts in person too and each time at each concert they shared this song, Light One Candle. I found this YouTube recording made at Hanukkah time as far as I can tell and the message dovetails perfectly with the song and sentiments from the first video I shared today. Enjoy this blast from the past…and if you celebrate or find meaning in Hanukkah don’t forget to light the one shamash candle and the others each night of this wonderful Festival of Lights. Fill your homes and the world with light in your hearts and in your life. Whatever your faith or leanings we can all use a little light and find meaning in the sharing of it.
*****
I hope you’ve enjoyed our first Annual Hanukkah Hop. We’ve all enjoyed sharing the Festival of Lights in all its bright and shining aspects with you. We’re discussing the possibility of a Passover blog hop as well as what we might have in the works for next year!
Happy Hanukkah to you all! Wishing you a year of light, love and joy.
Blessings – Jean
*****
Thank you for hopping along with us.
Your next stop is Andi’s blog, where she is going to show you some more great Hanukkah related projects!
Make sure to come back and visit us again on Sunday the 9th, for our final day of our Hanukkah Blog Hop!
Here’s a complete list of the Hanukkah Blog Hoppers in case any links don’t work.
Thanksgiving, a time of year to pause and reflect and remember the blessings of the year. This year I’ll be sharing time and a meal with a friend and her family and thanking God for the gift of friendship and so much more.
Another friend passed along this video of the song Thankful. Seemed appropriate today.
Here’s the lyrics in case you’d like to sing along:
“Thankful”
Somedays we forget
To look around us
Somedays we can’t see
The joy that surrounds us
So caught up inside ourselves
We take when we should give.So for tonight we pray for
What we know can be.
And on this day we hope for
What we still can’t see.
It’s up to us to be the change
And even though we all can still do more
There’s so much to be thankful for.
Look beyond ourselves
There’s so much sorrow
It’s way too late to say
I’ll cry tomorrow
Each of us must find our truth
It’s so long overdue
So for tonight we pray for
What we know can be
And every day we hope for
What we still can’t see
It’s up to us to be the change
And even though we all can still do more
There’s so much to be thankful for.
Even with our differences
There is a place we’re all connected
Each of us can find each other’s light
So for tonight we pray for
What we know can be
And on this day we hope for
What we still can’t see
It’s up to us to be the change
And even though this world needs so much more
Sitting here in my jammies drinking Cocoa and planning my own Extravaganza order. Wow are there some hidden gems in there! A few confusing things too that I thought I should point out so you won’t be surprised when you order.
First off…the two special items on sale only for 24 hours! Whoo Hoo…my two favorite tools so you know they are topping my list.
Simply Score & Cookie Stamps available at 20% off – makes it the perfect time to grab these lovelies!
Now Only $23.96 order #122334
Only $13.56 order # 125152
Don’t forget these two items go back to regular pricing at 11:59pm MT.
For more information:
Simply Scored Flyer – Flyer lists the features and benefits of this cool new tool
Take your love of stamping into the kitchen! Create fun and tasty stamped cookies for any occasion. The silicone stamps fit over the bottom of wooden handle then you press into the dough—it’s that easy! Perfect for kids! Food-safe, easy-to-clean and dishwasher safe. Each set includes 3 silicone stamps, 1 handle, and 2 cookie recipes.
They work as a paper mold as well. Stay tuned for more posts as I play with my own set!
Need more convincing?
*****
Another WOW Deal:
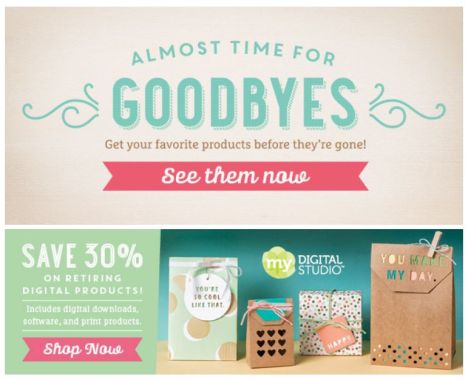
If you are into digital crafting or think you’d like to give it a try Stampin’ Up has an offer too good to pass up.
Purchase My Digital Studio Express Version and get one of three bundles worth up to $40 for free! Basically that’s the same as 50% off the regular 2 disk version since one of the bundle choices is the booster pack that adds back in all the files found in the two disk version and stripped from the Express version.
This downloadable version comes with the full software and fresh, minimal digital content using Stampin’ Up!’s artwork, designs, and colors! Windows and Mac compatible.
My Digital Studio Express includes over $50 worth of content:
12 Designer Series paper patterns
One 9-piece stamp brush set
81 embellishments
26 punches
Five designer templates (24-page 11″ x 8-1/2″ photobook, 7″ x 5″ postcard, 5″ x 7″ postcard, 4-1/4″ x 5-1/2″ greeting card, 4″ x 9-1/4″ trifold card)
If you order the software you’ll need to do so online through my online store so that you can access the download links as soon as you pay for the program. As part of the order process you’ll be prompted to input your choice of bundle the flyer shows the bundle order number at the top of the page showing the pictured contents.
The rest of the offerings run the gamut from Big Shot to digital downloads to accessories to stamps!
Just in time for Christmas and Valentines the Glimmer Brad bundle will add shine to your projects and lighten the load on your wallet! And the fabrics…with 50-60% off you can’t go wrong planning holiday projects. Check yesterdays post for ideas on using it.
The stamps…wow…the stamps. Not only are some old favorites included but there is even a brand new set…The Occasions Alphabet…Have you seen this beauty. It covers every event and occasion you could possibly need with text as well as letters. And now…its 50% off! I love when the alphabets go on sale.
Now 50% off your choice of clear mount or wood!
Other classic stamp sets like Winter Post and Many, Merry Messages are also on that 50% off list.
The Big Shot is well represented with the Candy Wrapper die…perfect for making your own crackers (tubes with hidden surprises and noise makers popular in Europe) as well as other gifty items and stocking stuffers. There is also a Happy Birthday strip die. For my uplines Birthday I cranked one of these out dusted it with dots of dazzling diamonds and rhinestones and attached it to some bamboo skewers to top her birthday cake. A fun 5 minute project with lots of dazzle and shine. And….
Did you see that my beloved Letterpress Plates are also 50% off? To see what you can do with these lovelies check out my post here and here.
So much good product and I’ve only touched on a few. Grab the flyer, visit my online store and grab some goodness for yourself. Hee, hee…not promising there won’t be any backorders after I place my own order! Which reminds me…while this is an online extravaganza…all but the digital products can also be ordered at workshops or emailed to me for regular ordering through November 30th.
What do you bet Santa will be shopping the Extravaganza too. If you think he needs help I’ll be happy to provide gift certificates and Wish Lists for his many helpers. You can email me at jlfstudio@live.com for details and samples.
Time to get back to my cocoa as Jack Frost is nipping at my nose as I sit here typing. Winter is in the air for sure…can snow be far behind?
Hugs and blessings and happy savings during the Extravaganza! – Jean
Click Here to view – Downloadable Stamping docs/files
What Stampin’ Up! Wants You to Know:
What Stampin' Up! Wants You to Know:
This is my personal blog. I am an Independent Stampin' Up! Demonstrator and responsible for its content. Stampin' Up! does not endorse the use of or contents of the classes, services, or non-Stampin' Up! products I may offer here.
Michelle Laycock at:
www.laycockdesigns.com
Check out her free buttons for blogging demos at:
http://laycockdesigns.com/category/free-promo-buttons-for-demos/
And some were created by:
Webs by Amy at:
http://websbyamy.com/
Check out her free buttons for blogging demos at:
http://websbyamy.com/category/stampin-up-demo-related


")


