Llama Blog Hop: Fall-i-Days Finale (Don’t worry…we’ll be back with a new title next month!)

It’s the Llamas last Fall Hop!!

*****


Header001  

Welcome one and all to the Llama’s Fall-i-Days Finale.  

The blog hop capper to our series of Fall Festivals and Holidays. 

Yes we are cheating just a tiny tad by including Christmas, New Years, Valentines and any other non fall holiday the mind of a Llama can imagine (I’ve heard rumors even Mardi Gras will appear in one of the posts) but…it is still technically Fall, Y’all!   Right up until December 21!     Hard to believe isn’t it what with snow on the ground, leaves off the trees and the sounds of Christmas Carols in the air.    Not to mention the glittery, frosty elegance of our Finale Banner that just screams party time (as in New Years, Mardi Gras and more).   Thanks Stephanie for once again creating banners and buttons with Stampin’ Up’s wonderful My Digital Studio program that puts us in the mood to celebrate.

If you’ve followed the listing on the Hop’s Home page then you’ve arrived from Buffy’s beautiful and festive edition of the Finale.  If you’ve arrived from somewhere else (Christine’s perhaps?) that’s fine too…we Llamas are very into finding our own path after all and the home button will always get you back to the list and we are set up in circle so you can circle round in either direction using next or previous buttons as indicated for your personal journey.  😀   We’ve also permalinked all entries so you’ll be able to circle the hop anytime you’ve a mind to in the future.

*****

Keeping it simple is the theme I’ve adopted.  Well…sort of.   Simple is not something I do easily after all.    It’s also a tad traditional or even vintage.  And possibly patriotic given the colors.

All images and die cuts copyright Stampin' Up!

All images and die cuts copyright Stampin’ Up!

Whether it’s for Christmas or for New Years you can’t go wrong with a bit of glitz and gold is as glitzy as it gets (without the shimmer paper that is).  You also can’t go wrong with a bit of Champagne.   Champagne shimmer paint that is…after all…you do want to be able to stamp straight right? 😀

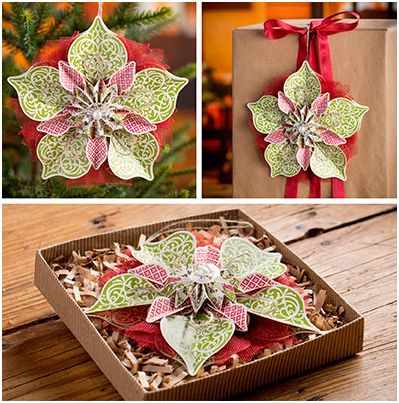
With winter reaching out its grip the Northern Flurry embossing folder seemed the perfect choice.  Reminds me too of a vintage candlewick bedspread I had for years and years.   And for Christmas time Peace on Earth is my constant prayer.  Actually it’s my prayer all year long but seems very appropriate as we end one year and begin another.  A prayer, a wish and deep hope that fills my being.     I was so happy to find such a beautiful version of this text in the Holiday Catalog Stamp Set Greetings of the Season.   The set has my all time favorite Noel as well.   And now Stampin Up has carried it over through the Spring Catalog so you can get it to use and enjoy all the way up till May 31st (no word yet whether it will be in the next catalog)  or whenever you want to share that peace filled sentiment.

All images & die cuts copyright Stampin' Up!

All images & die cuts copyright Stampin’ Up!

Supplies:

Stamps:   Greetings of the Season

Ink:  Versamark, Stampin’ Gold Dazzle Marker

Paper: Naturals White, Cherry Cobbler, Night of Navy, Crumb Cake Cardstocks

Other: Big Shot, Northern Flurry Embossing Folder, Labels Framelits, Pearls, Crumb Cake Scalloped Tulle Ribbon, Gold Embossing Powder, Heat Tool, Champagne Shimmer Mist, Sponge Dauber, 3/16″ Corner Rounder Punch, glue dots, dimensionals

Basics of the Card:  Pearls were colored with the Gold Stampin Dazzle Marker (also carried over from the Holiday Catalog) and allowed to dry.  Naturals white layer was embossed with Norther Flurry ef.   Corners of base and two layers  punched with corner rounder.   Embossed Naturals White layered with Cherry Cobbler onto base.  Champagne Shimmer Paint daubed on centers of snowflakes and gold colored pearl applied to center.   Greeting gold embossed and die cut with matching die cut layer.   Tulle is cut in a 2″ strip folded over lengthwise and knotted. 

*****

From a Wish for Peace to an invitation to party!  The Celebrate is the energetic stamp from the Seasonal Sayings set in the Holiday Catalog.  The perfect set for our Fall-i-Days hop series at it will take you from Halloween right through to Valentines.  It’s also one of the sets that comes as single stamps up until January 2nd.    I picked up the single image Celebrate as I thought it perfect for New Years, Birthdays or really anytime a party or a sense of joy was called for.   

In this incarnation the Norther Flurry Snowflakes are doing double duty for fireworks.  Kinda works for that don’t you think?  Especially with the Champagne Shimmer Paint centers.   Much shinier and a tad more subtle in person.  And because we are partying for the New Year here I doubled up the Tulle knots too!     Though of course with tulle and fireworks and pearls and a party it could also work for Mardi Gras – might want to add some traditional Mardi Gras green & purple for that though!

All images and die cuts copyright Stampin' Up!

All images and die cuts copyright Stampin’ Up!

Supplies:

Stamps:   Seasonal Sayings

Ink:  Versamark, Stampin’ Gold Dazzle Marker

Paper: Naturals White, Cherry Cobbler, Night of Navy, Crumb Cake Cardstocks

Other: Big Shot, Northern Flurry Embossing Folder, Apothecary Accents Framelits, Pearls, Crumb Cake & Cherry Cobbler  Scalloped Tulle Ribbon, Gold Embossing Powder, Heat Tool, Champagne Shimmer Mist, Sponge Dauber, 3/16″ Corner Rounder Punch, glue dots, dimensionals

 Card design basics:  Similar to the previous card just a different die cut and the added Cherry Cobbler Tulle knot.

*****

From the vintage and patriotic colors that ended and began our year to the softer sweeter and simpler tones of an old fashioned Valentines.   A Valentines Cookie House that is.   Yep…I’m still making these little cookie houses.   If you’d like to see another edition as well as the link to the video for making them check out this post from Hanukkah Hop.

Still using pieces from the Festival of Prints Print Pack from the Holiday Catalog (hurry and get yours before its all gone) for the roof I added Pink Piroutte and some Cherry Cobbler Seam Binding.    A die cut, a couple of stamped texts and you have the perfect and simple Valentines treat to share with friends, neighbors, classmates, teachers and anyone you can think of that would like a cookie and a reminder that you are thinking of them.    Of course you  could add a window sheet and then fill with peppermints or the traditional candy conversation hearts.   And the best part…sh!!…don’t tell anyone.  You can make one of these for less than 50¢ each once you have all the materials on hand.  Of course…the cookie is extra.  😀

All images and die cuts copyright Stampin' Up!

All images and die cuts copyright Stampin’ Up!

Supplies:

Stamps:   You are Loved, Teeny Tiny Wishes

Ink:  Cherry Cobbler Classic Ink

Paper:  Pink Pirouette Cardstock, Festival of Prints Pack (holiday catalog)

Other:  Big Shot, Hearts Framelit, Simply Scored, Stampin’ Trimmer, Cherry Cobbler Seam Binding, Crop-i-Dile, Sticky Strip, Paper Snips.

*****

That’s it for my edition of the Finale.   Now it’s on to Christine’s  fabulously creative entry (yep..I peeked!) – or Buffy’s if you are moving in reverse.  You can use the buttons below to advance in whichever direction you are moving.  If you find a broken link just click on the home button and you’ll find the list that will get you back on track.  Hop on my friends and enjoy the last few days of Fall with our Fall-i-Days Finale!

Hugs & Blessings – Jean

Previous001       Home001       Next001

Hanukkah Blog Hop: Day 9

Hanukkah 2012 Blog Hop

Today is the last day of our first ANNUAL Hanukkah Blog Hop! We are overwhelmed with the extremely positive response we have received about this hop and all the amazing projects! We hope you were inspired to create and think outside the box when it comes to Jewish related projects! Watch out for future Jewish themed hops…we’ve already discussed one for Passover which is at the end of March 2013!

Thank you to everyone who have visited the first 8 days of the hop. We hope you have enjoyed all the projects and found lots of inspiration! If this is your first visit, go back and visit Day 1, 2, 3, 4, 5, 6, 7 and 8.
 

*****

Lighting the Menorah is the central Mitzvah of Hanukkah. We light the Menorah to remember the Miracle that happened when the Jewish rebels (the Macabees) took back the Holy Temple from their conquerors. The enemy had done everything that they could to defile the Temple, including bringing idols into the Temple.

The Macabees cleaned and restored the Temple service. They had only one small flask of the special olive oil that was used to light the large golden Menorah in the Temple. Miraculously, the small flask lasted for 8 days.

The Rabbis made this 8 day period into a holiday, now known as Hanukkah. They decreed that it would be celebrated by lighting an 8 branched Menorah, and increasing its lights each day to commemorate how the miracle became greater with each day that the oil continued to burn.

*****


Festival of Light

All images and die cuts copyright Stampin' Up!

All images and die cuts copyright Stampin’ Up!

It’s hard to believe we’ve arrived at the last day of the blog hop and the beginning of Hanukkah.   I came across this music video as I prepared for our final posting.  The snowflakes and light in all it’s forms caught my eye.  I invite you to listen and enjoy as you read through the rest of the post.  To let it create the background and “light” as you continue with our Celebration of the Festival of Lights.

As I watched and listened to  this video the importance of light and of miracles, it’s beauty and its many qualities sank into my heart and soul.   As we begin the celebration of Hanukkah…the Festival of Lights and the miracle it commemorates all of us on the hop have chosen to celebrate light and in particular the light of the candle and all it represents in celebrating this special time.  Particularly the shamash.  The servant candle that lights all the others, that does the work so that the others remain a pure and holy expression of the miracle.  A light by which no work must be done (except by the servant candle) or made practical use of.

Here are the close ups and the details:

Light For the World

Light for the World

Light for the World
All images and die cuts copyright Stampin’ Up!

Can you tell that the partial die cuts are intended to represent the flame of the shamash and the other candles with the candle itself implied?   That’ what was in my head anyway. 😀    The miracle that  multiplied the oil and kept the  flame burning for eight days.  This is completely my own design though influenced by a sense of kinship with some of my favorite graphic artists from the 60’s and 70’s such as Corita Kent in some of her more restrained work.

Light for the World - Miracles inside

Light for the World – Inside
All images and die cuts copyright Stampin’ Up!

Supplies:

Stamps: Jewish Celebrations, Hanukkah Light Digital Sheet Created in Word (see linked document)

Ink:  Midnight Muse Classic Ink, Versamark

Paper: Midnight Muse, Very Vanilla, Brushed Gold Cardstocks, Champagne Glimmer Paper

Punches: 1-1/4″ Scallop Circle, 1-3/8″ Circle, 1-3/4″ Circle,

Other: Big Shot, Window Frames Framelit, Stampin’ Trimmer, Simply Score, Printer, Snips, Gold Embossing Powder, Heat Tool, embossing buddy, Dimensionals, Snail, glue dots.

Card measures 5-1/2″ x 5-1/2″

Much of the text used was created digitally with Word and the fonts on my computer.  The Star of David is from Jewish Celebrations and is heat embossed with gold (what else would expect with a celebration of light…right?).   The rest is basic layering and die cut pieces using the Window Frame Framelits (some of them trimmed). 

Here’s the file you are welcome to use, play with and alter :

Hanukkah Light – Word document uses Castellar font

*****

Happy Hanukkah Snowflake Window Frame Card

Hanukkah Snowflake Window

All images and die cuts copyright Stampin’ Up!

Supplies:

Stamps: Jewish Celebrations, Bold Snowflake (single stamp promotion)

Ink:   Versamark

Paper: Midnight Muse,  Brushed Gold Cardstocks, Champagne Glimmer Paper

Punches:  1″ Circle, Blossom

Other: Big Shot, Window Frames Framelit, Stampin’ Trimmer, Simply Score, Snips, Gold Embossing Powder, Heat Tool, embossing buddy, Dimensionals, Snail, glue dots, Tombow Liquid Glue.

Card measures 5-1/2″ x 5-1/2″

Again mostly die cutting, heat embossing with gold and punching then layering.  The Star of David images are hand cut with the Snips, my favorite hand powered cutting tool (next to punches!).   Lots and lots of dimensionals in this card as I wanted all the various layers to float.  Only the base square of glimmer paper is layered direct to the card with Tombow.  The rest all uses dimensionals.  Tip:  For the narrow frames…cut your Stampin’ Up dimensionals into thirds!  Perfect width!

*****

What would Hanukkah be without presents right?  😀  Here’s a Gift Card Holder that matches in style and images (to some extent, the Snowflake Window Frame card above.  Works actually for any time of the year.   Saturday at Stamp Camp in fact several made variations for the men in their lives as birthday gift holders.  The pocket inside will hold the gift card in either direction long side or short side.   In many ways this is a CASE of my friend Jackie’s Llama blog Hop Card from a few weeks ago.   You can see that card here.   Next week I’ll share a few more variations along with the directions for the most basic version.

Festival of Lights Gift Card Holder

Festival of Lights Gift Card Holder

All images and die cuts copyright Stampin’ Up!

All images and die cuts copyright Stampin’ Up!

Supplies:

Stamps: Jewish Celebrations, Rejoicing With You, Mixed Medley, Bold Snowflake (single stamp promotion)

Ink:   Versamark

Paper: Midnight Muse,  Brushed Gold Cardstocks, Champagne Glimmer Paper

Punches:  3/4″ Circle, 1-1/4″ Scallop Circle, Blossom

Other: Big Shot, Window Frames Framelit, Stampin’ Trimmer, Simply Score, Snips, Gold Embossing Powder, Heat Tool, embossing buddy, Midnight Muse Stitched Satin Ribbon, Piercing Tool, Piercing Mat, Festive Paper Piercing Pack, Dimensionals, Snail, glue dots, Tombow Liquid Glue.

Card Holder measures 5″ x5″

Again mostly die cutting, heat embossing with gold and punching then layering.  The  large underlayered snowflake is actually a series of the smaller snowflakes cut in half and slide under the window frame die cuts with glue dots.  The small For You is from Mixed Midley (HolidayCatalog hostess) and the inside text is from Rejoicing with You from the Annual Catalog.   The card shape is cut with the largest Window Frame Framlet with the card fold placed just below the cutting edge.   Have you guessed yet that I’m in love with the color Midnight Muse, the Champagne Glimmer Paper and the Bold Snowflake single stamp from the current Single Stamp Promotion?   Both the Glimmer Paper and the Bold Snowflake stamp go away January 2nd.  Make sure you get yours before then!

*****

And lastly…I’m dating myself with this next music video.   Peter, Paul & Mary have been a part of my  life almost from its beginning.  I’ve sung, cried, learned and grown from their music and its message.   I’ve been privileged to attend some concerts in person too and each time at each concert they shared this song, Light One Candle.   I found this YouTube recording made at Hanukkah time as far as I can tell and the message dovetails perfectly with the song and sentiments from the first video I shared today.    Enjoy this blast from the past…and if you celebrate or find meaning in Hanukkah don’t forget to light the one shamash candle and the others each night of this wonderful Festival of Lights.    Fill your homes and the world with light in your hearts and in your life.     Whatever your faith or leanings we can all use a little light and find meaning in the sharing of it.

*****

I hope you’ve enjoyed our first Annual Hanukkah Hop.  We’ve all enjoyed sharing the Festival of Lights in all its bright and shining aspects with you.   We’re discussing the possibility of a Passover blog hop as well as what we might have in the works for next year!  

Happy Hanukkah to you all!   Wishing you a year of light, love and joy.  

Blessings – Jean

*****


Thank you for hopping along with us.
Your next stop is Andi’s blog, where she is going to show you some more great Hanukkah related projects!

Make sure to come back and visit us again on Sunday the 9th, for our final day of our Hanukkah Blog Hop!

Hanukkah 2012 Blog Hop Previous  Hanukkah 2012 Blog Hop Next

Here’s a complete list of the Hanukkah Blog Hoppers in case any links don’t work.

1. Andi Potler
2. Yapha Mason
3. Miriam Permut
4. Jean FitchYOU ARE HERE!

Hanukkah Blog Hop: Day 8

Hanukkah 2012 Blog Hop

******************************************************************

Thank you all for your patience.  WordPress is back to working again afer over a day full of issues.    Enjoy!

*******************************************************************

Welcome to the first ever Hanukkah Blog Hop! We are so excited to be able to share with you some wonderful Hanukkah related projects. We’ll be posting 2 projects a week on Sunday’s & Wednesday’s until the first day of Hanukkah on December 9th! There are 4 of us participating so that is a total of 9 hop days for a total of 36 ideas!! Are you ready to be Hanukkah project inspired?!

Thank you to everyone who have visited the first 7 days of the hop. We hope you have enjoyed all the projects and found lots of inspiration! If this is your first visit, go back and visit Day 1, 2, 3, 4, 5, 6 and 7.

Wow…totally loving Miriams take on Hanukkah gifts.  I love washer jewelry and as a gal with long bangs I love barettes too!   Thanks Miriam for sharing that.

*****

Hanukkah Houses…ready for occupancy!

all images and die cuts copyright Stampin' Up!

So…is Hanukkah in your House yet?   Yep it’s in mine…at least I’ve created my own Hanukkah Houses that are filled with goodies to aid in the celebration.   Initially my first thought was that if you had someone living far away…perhaps a son or daughter in college…who would be late getting home to celebrate…you could send off a little package with candles and a small menorah…maybe a gift or two to tide them over until they could get home to share with the family.  (whew…that was a run on sentence if ever there was one!)

By making the box in the shape of a house I thought it would also be a potent reminder of hearth and home.   So I took out an idea from my 2011 convention file that I used last year to make my Big House.     Then…I saw a video by fellow demo Kelly Kittelfinger.   She’d taken the same house pattern I’ve used before and altered it slightly for size and ease of construction.  Brilliant gal also figured out how to get two mini houses out of 1 sheet of paper!    That sent me down another path…neighbor gifts!    There are so many opportunities to share the love and what better occasion than Hanukkah.     Of course you can also make a whole little village just to add to your own house’s decor.

First up the Neighbor gifts:

Basic Cookie Wrap with Window

all images and die cuts copyright Stampin' Up!

all images and die cuts copyright Stampin’ Up!

Start simple…or go slightly larger.   The single cookie pack is the one that was supposed to be included with my table setting from Day 6 of the hop.  Oops.   I think I mentioned that I wanted to send guests home with a sweet treat to kindle the thoughts and memories of the celebration.   Works for a neighbor gift as well.   Or at a luncheon, in a lunchbox, anytime really that you need a thinking of you type gift.  After all…who doesn’t like cookies.   Of course Miriams lovely gifts would fit in here too.  😀    You can even add a star ornament tag if you happen to have gone overboard with the star folds like yours truly.  

All images and die cuts copyright Stampin' Up!

All images and die cuts copyright Stampin’ Up!

Supplies:

Cookie Packet:

Stamps: Friendship Preserves

Ink: Midnight muse

Paper: Midnight Muse & Very Vanilla

Punches: 1-1/4” Scallop Circle, 1-3/4” Scallop Circle

Other: Big Shot, Window Frames Framelits, Simply Score, Stampin’ Trimmer, Midnight Muse Stitched Satin Ribbon, bone folder, Sticky Strip, Glue Dots, Snail, Cookie in Saran wrap.

Star Tag:

Stamps: Jewish Celebrations

Ink: Night of Navy

Paper: Night of Navy & Very Vanilla Cardstocks, Festival of Prints Designer Series Paper Pack

Other: Simply Score, Stampin’ Trimmer, 1-1/4” Scallop Circle Punch, 1” Circle Punch, Linen Thread, Crop-i-dile


Cookie Packet Directions:

Cut Base Paper: 10-1/2″ x 3-1/2″  Score at 3-1/2″ & 7″  (you can get two cookie packets per standard sheet)

Die cut window frame using Big Shot and Window Frame Framelits placing the die in the middle section of the three scored sections.  Fold around cookie and tie with ribbon (add a bit of sticky strip or snail to the back flap to help hold closed if desired.  Stamp Hello image (or other) from Friendship Preserves.  Die cut with framelit and attach with glue dot.

Similar packets can be made with 12×12 sheets.  Depending on the size of the cookie cut into 4″ x12″ or 3″ x 9″ and score in thirds.  I split the difference in sizing in my packets.

*****


Going a little more upscale here’s my  Hanukkah House mini gift boxes for friends and neighbors.  

All images and die cuts copyright Stampin' Up!

All images and die cuts copyright Stampin’ Up!

 *****

Shalom cookie house - roof view

All images and die cuts copyright Stampin’ Up!

This little Shalom Cookie House continues the cookie theme and I think is my favorite.  I love the simplicity.  Even without the little scallop ribbon tab it’s very cute.   With the cookies wrapped in saran wrap you don’t even have to put a cover in the window.    The only thing cuter would be if I had made cookies using our Stampin’ Up Cookie Stamps.  The house will accomodate 2-3 cookies about 3″in diameter (possibly a little bit larger)

All images and die cuts copyright Stampin' Up!

All images and die cuts copyright Stampin’ Up!

Hanukkah House mini - roof open

Here’s the little menorah house that at the moment is holding a set of candles and a star tag.  Appropriate don’t you think?    I loosened the roof and added an interior picture so you can get a feel for how the little house works.   Kelli designed the mini’s to hold 3×3 post-it pads so anything that runs about that size will fit perfectly.  I found I was able to get about 20 candles in the box along with the star tag.

Supplies for the mini Hanukkah Houses

Stamps: Jewish Celebrations, Every Little Bit

Ink: Midnight muse

Paper: Bashful Blue, Night of Navy Cardstock, Silver Glimmer Paper, Festival of Prints Designer Series Paper Pack.

Punches: 1-1/4” Scallop Circle, 1-3/4” Scallop Circle, 1” Circle, 1-3/8” Circle

Other: Big Shot, Apothecary Accents Framelits, Crop-i-dile, Simply Score, Stampin’ Trimmer, Silver embossing powder, Heat Tool, Midnight Muse Stitched Satin Ribbon, bone folder, Sticky Strip, Dimensionals, Glue Dots, Snail

 Of course with such a small amount of designer series paper used you could take advantage of our digital Hanukkah themed papers in the Hanukkah Happiness download and get quite a few parts for mini houses out of a single printed sheet.

Here’s the link to Kelly’s video in case you want to make your own:  http://youtu.be/1un0TbK-q2w

These guys are so much fun to make you’ll find it hard to stop.  Takes about 10-15  minutes each once you get the hang of it.  Our Festival of Prints papers are turning out to be quite adaptable too.  When I first got the pack I thought of them as Christmas papers…then started looking closer and discovered over half of the designs would also work for Hanukkah!  Hooray!    Multiculteral paper designs.  I love it!    Of course these little houses will work all year round for any occasion in any color.

Here’s the Big Brother to my mini’s:

all images and die cuts copyright Stampin' Up!

all images and die cuts copyright Stampin’ Up!

Supplies:

Stamps: Jewish Celebrations

Inks: Midnight muse

Paper: Midnight Muse & Brushed Silver Cardstocks, Silver Glimmer Paper, Festival of Prints Designer Series Paper Pack.

Punches: 1-1/4” Scallop Circle, 1-3/4” Scallop Circle

Other: Big Shot, Perfect Pennants Bigz L die, Crop-i-dile, Simply Score, Stampin’ Trimmer, Midnight Muse Stitched Satin Ribbon, Cherry Cobbler Seam Binding, bone folder, Sticky Strip, Dimensionals, Glue Dots, Snail

And a detail close up:

all images and die cuts copyright Stampin' Up!

all images and die cuts copyright Stampin’ Up!

all images and die cuts copyright Stampin' Up!

all images and die cuts copyright Stampin’ Up!

I originally intended to put a small menorah inside but my mini has gone walkabout as our Australian sister demos say.   Pretty easy to find this time of year though if you are looking for one.  Means a trip to town though.  In the meantime I’ve filled my little house with a cookie, tag, candles and…

Two Tags Gift Card Holderall images and die cuts copyright Stampin' Up

Two Tags Gift Card Holder
all images and die cuts copyright Stampin’ Up

.. this item from last Sunday’s post with a gift card.   If I can find a small dreidel and some chocolate gelt coins I’ll be all set.

If you’d like to make a large House of your own you can find the basic directions and template on my old blog post  here.   Decoration and paper choices are entirely up to you.  As you can see I’ve done them two ways (more actually since I made one for Valentines but never posted it.   I did make one or two minor changes to the template this time around.  Instead of scoring and folding the diagonals for the roof I trimmed them using my Stampin’ Trimmer (love that tool)  the same as Kelly did on hers and I did the roof attachement like hers too.  If you read my past post and watch Kelly’s video I think you’ll be able to figure it out.  If you have any questions please email me and I’ll be happy to help.

Star Fold tag direction links can be found here.

And lastly…here’s another look at my Hanukkah House village:

all images and die cuts copyright Stampin' Up!

all images and die cuts copyright Stampin’ Up!

I wish you could see these close up and in person as they shimmer and shine and the roof details show up much better.    So perhaps you’ll make some of your own?   So you can see?

That’s it from my House to yours…sorry…I couldn’t resist!  😀

Hugs and blessings – Jean

***** 

Thank you for hopping along with us.
Your next stop is Andi’s blog, where she is going to show you some more great Hanukkah related projects!

Make sure to come back and visit us again on Sunday the 9th, for our final day of our Hanukkah Blog Hop!

Hanukkah 2012 Blog Hop Previous  Hanukkah 2012 Blog Hop Next

Here’s a complete list of the Hanukkah Blog Hoppers in case any links don’t work.

1. Andi Potler
2. Yapha Mason
3. Miriam Permut
4. Jean FitchYOU ARE HERE!

Ornamental Elegance Kit – Add an Elegant Ornament to your Holiday Decor!

Want to make one of these?   How about making 10?

For less than the cost of the stamps!

No Big Shot?   No Problem…the works all done for you!

Ornamental Elegance Kit - images

Buy Stampin’ Up’s latest kit and you can make 10 of these wonderful ornaments for a mere $14.95!

How do you buy it?  Check New Arrivals in my Online Store!

All you supply are the glue gun, Tombow liquid glue or our fabulous Stampin’ Up Glue Sticks and Scissors.  Personally I’d also use my Simply Score or brand new Stampin’ Trimmer too but they aren’t required.   And not to worry…the scissors are for the ribbons and thread.  The ornament images come prestamped and precut.  Just pop out the die cuts and assemble.   Stampin’ Up even provided the instructions in a PDF so you can see how easy these are to make.

Here’s the link to the PDF: http://204.228.150.61/holiday2012/ornamental_elegance_kit_instructions.pdf

And here’s what the kit contents look like.

Ornamental Elegance Kit

Order Item# 132832          Price  $14.95

 I did the math earlier today when Stampin’ Up announced these and trust me when I say…the total package has a higher retail value than they are charging!   How do they do that??  Must be that new math I’ve heard about.     That’s one of the things I love about Stampin’ Up Kits.  They are always a great value.

One other note.   Besides making the full ornaments you can also use this kit to create dozens of smaller ornaments (see page 3 of the Holiday Catalog for a medium sized set of ornaments- though you’ll need the snowflake die for that as well) or scads and scads of single ornaments like the one down below.

5 framelit ornament

Don’t wait too long though.  These kits are in limited supply.  Hurry and order yours today.  Click on the Shop button in my side bar to get yours now!    Don’t forget…these are in the New Arrivals section of the store.

Thanks for stopping by to day!

Hugs and blessings – Jean

Hanukkah Hop: Day 7

Hanukkah 2012 Blog Hop

Welcome to the first ever Hanukkah Blog Hop! We are so excited to be able to share with you some wonderful Hanukkah related projects. We’ll be posting 2 projects a week on Sunday’s & Wednesday’s until the first day of Hanukkah on December 9th! There are 4 of us participating so that is a total of 9 hop days for a total of 36 ideas!! Are you ready to be Hanukkah project inspired?!

Weren’t Miriam’s digitally created coffe covers amazing!  Simple to create and print too!  I love the new downloads!   And don’t forget to check out Stampin’ Up’s My Digital Studio Facebook Page you could win a whole year of My Digital Studio downloads and the program itself!  Lots of prizes to be had for adding your Like to the page.

Thank you to everyone who have visited these past 6 days of the hop. We hope you have enjoyed all the projects and found lots of inspiration! If this is your first visit, go back and visit Day 1, 2, 3, 4, 5 and 6.

Keeping it simple today.  A very simple card and a simple gift card holder.   And the alteration to my menorah I forgot to add for the last hop picture.  Can you tell I’m still loving the Jewish Celebrations set from the Holiday Catalog?   Loving the papers from the Festival of Prints Designer Series Paper Stack too.  Such a convenient size to use and store.   This large pack of smaller sized paper is perfect for any crafter.  The designs are not specific to any one holiday and so work for all.   It’s all about the colors and the patterns.  there are even some I see myself using for Spring or for Valentines or Father’s Day or……you’re only limited by your imagination.  

(click the pictures for closeups)

All images & die cuts copyright Stampin'Up!

All images & die cuts copyright Stampin’Up!

Jewish Celebrations Plain & Simple Card

 Outside

Jewish Celebrations Plain and Simple

All images & die cuts copyright Stampin’Up!

A few people have asked what the inside of a Hanukkah card might look like so here you go….

…the inside 

Inside - Hanukkah Plain and Simple

All images & die cuts copyright Stampin’Up!

This card was as simple as simple could be.  Wheel on the base, die cut a layer, stamp, add rhinestones and voila!  A card in under 10 minutes.  No fancy folds, details or techniques.  Just good old basic stamping and Big Shot.   To be any simpler you’d have to start with a White Base Card and skip the Big Shot.  Hm….that might work too.   Had a friend ask me what a 3 minute card would look like….I think I just described one. 😀

It’s hard to see but I used the Illuminate Glimmer Ink on the Starburst Jumbo wheel to add a bit of texture to both the Midnight Muse card base and the Whisper White Oval Accent die cut.   While hard to see in the pictures it’s perfectly visible in person and I wanted to pair this card with the gift card holder because those same stars are similar in pattern to the designer series paper on the holder.

Supplies:

Stamps: Jewish Celebrations

Ink: Midnight Muse Classic Ink, Illuminate Glimmer Ink

Paper: Midnight Muse & Whisper White cardstock

Other: Starburst Jumbo Wheel, Big Shot, Oval Accent Bigz die, Rhinestone Jewels


Hanukkah Gift Card Holder 

Jewish Celebrations Plain & Simple Card:

Jewish Celebrations Plain & Simple Card:

 The picture above is the closest to the actual Bashful Blue and Early Espresso Coloring.

 The following not so much in the color accuracy department but they do show how it all works.

All images & die cuts copyright Stampin'Up!

All images & die cuts copyright Stampin’Up!

All images & die cuts copyright Stampin'Up!

All images & die cuts copyright Stampin’Up!

Supplies:

Stamps: Every Little Bit, Jewish Celebrations

Ink: Versamark, Night of Navy

Paper: Bashful Blue, Night of Navy Cardstock, Silver Glimmer Paper, Festival of Prints Designer Series Paper Stack (Holiday Catalog 2012)

Punches:  1-1/4” Circle, 1-3/8” Circle, ½” circle, Itty Bitty Bits Punch Pack (scallop), 1-3/4” Scallop Circle, 1-1/4” Scallop Circle

Other: Big Shot, Two Tags die, Simply Score, Silver Embossing Powder, Heat Tool, Sticky Strip, glue dots and Snail adhesive

The holder uses the same paper trick I used for the napkin ring holder in this post.  Long strip doubled in half placed just above the cut line.  This time you just staple the scalloped ends together and cover with a scalloped punch piece (both sides if you want to keep it neat and don’t want the staples showing. 😀   Insert your card into the folded piece (I’d use a glue dot to hold it in place) and when the scalloped end is pulled the card will appear from the cover.   

Were you hoping for a template?

Two Tags - Gift Card Holder Template

How about a full set of directions with more pictures?

Happy Hanukkah….your wish is my gift:

Hanukkah Hop – Two Tags Gift Card Holder  – Directions for Gift Card Holder in PDF format

And a little credit.  I’ve seen the basic idea several places but the tutorial I mostly followed was here .  I’ve no idea who the originator was.     I created my own template and detailed directions to share.  Enjoy!

*****

One last note…I haven’t forgotten about the directions for the Hanukkah Dove or the extra details on the star folds I promised.  Life with stamping events, new Spring Catalog preorders and rain…lots of rain has intervened just a bit.  But I’ll have them up next week for sure.

*****

 Thank you for hopping along with us.
Your next stop is Andi’s blog, where she is going to show you some more great Hanukkah related projects!

Make sure to come back again and visit on Wednesday for Day 8 of our Hanukkah Blog Hop!

Hanukkah 2012 Blog Hop Previous  Hanukkah 2012 Blog Hop Next

Here’s a complete list of the Hanukkah Blog Hoppers in case any links don’t work.

1. Andi Potler
2. Yapha Mason
3. Miriam Permut
4. Jean FitchYOU ARE HERE!

News Flash: Time to Bundle Up! All the Cuteness Without all the Work!

Stampin’ Up has done it again!

New Arrivals!

No sooner does the Online Extravaganza end than another promotion begins.   You don’t even have to be a stamper to enjoy this one!  It’s all about the packaging of your treats and gifts and other holiday giving  AND about making it simple and stress free!  As the title says  All the cuteness without all the work!

SAVE 20%

Holdiday & Annual Catalog Goods have been bundled to save you money and time.

Available November 29-January 2.

In the new New Arrivals section of the Online Store.

Trimmings & Tags Bundle
Item# 132769
$13.50 (a $16.85 value)

Includes

  • Gusseted Cellophane Bags (25 bags; 5″ x 3″ x 11-1/2″)
  • Snow Festival Designer Printed Tags (25 double-sided tags; 4-1/2″ x 3-1/8″)
  • Cherry Cobbler 1/4″ Sweater Trim (10 yards)

Petite Treats Bundle

Item# 132770
$13.50 (a $16.85 value)

Includes

  • Glassine Bags with die-cut edges (10 bags; 3″ x 5″ x 1-1/2″)
  • Handmade Holidays Stitched Felt (8 pieces)
  • Gumball Green 3/8″ Stitched Satin Ribbon (10 yards)

*****

New Arrivals!

When you are ready to shop…This is the first place to check to see what’s new and shaking in the SU world.    Well…the Clearance Rack is always a good place to check too!  😀    No new additions there yet but give it some time.  The Holiday Catalogs days are numbered and you know what that means….get it while you can.   These bundles and most of what’s in the Holiday Catalog will be going bye bye January 2nd.

Click here to get shopping….HERE!

(or click on the Online Shopping Graphic in the sidebar)


See the fun in action!


Here’s a few closeups of the included product (just in case you aren’t yet convinced this stuff is CUTE!)

That’s it.   Sorry the glassine bags aren’t available individually but you can see what they look like by checking page 27 of the Holiday Catalog where they are also currently available in a Halloween Kit Configuration.

Enjoy the New Arrivals and of course enjoy your holidays too!

Hugs and Blessings – Jean

Hanukkah Blog Hop: Day 6

Hanukkah 2012 Blog Hop

Welcome to the first ever Hanukkah Blog Hop! We are so excited to be able to share with you some wonderful Hanukkah related projects. We’ll be posting 2 projects a week on Sunday’s & Wednesday’s until the first day of Hanukkah on December 9th! There are 4 of us participating so that is a total of 9 hop days for a total of 36 ideas!! Are you ready to be Hanukkah project inspired?!

Thank you to everyone who have visited these past 5 days of the hop. We hope you have enjoyed all the projects and found lots of inspiration! If this is your first visit, go back and visit Day 1, 2, 3, 4 and 5.

Happy Day 6 everyone!  I keep thinking it just can’t get any better and then it does.   All of my hop sisters keep outdoing themselves and setting the bar mighty high.   Last Sunday was a case in point.   I was only able to finish the menu in time so had to promise the rest for today.  In the meantime I was blown away by the table settings and decor Andi, Miriam and Yapha came up with.   So today as promised  here’s mine…finally finished!    And as the others mentioned we came up with the idea for showcasing table setting projects from Shelli Gardner, the co-founder of Stampin’ Up!’ and her  November Creative Challenge .   Don’t you just love a challenge…really gets the creative juices going.


Click on the picture for a larger view.
All images and die cuts copyright Stampin’ Up!

Picture the dove hanging from the chandelier above the table.  The lights turned down low.   The light reflecting from the silver and shimmer of the place cards, the place settings  and the napkin rings and best of all the company and the glow of the candle fire as the menorah shines in the window and out into the dark.  A true Festival of Lights…glimmer and all.

One practical tip though:  DO  NOT hang the dove from your computer screen for inspiration while writing a post.  Did you know computer screens get quite warm?  Yep…glue dots and adhesives aren’t real fond of up close and prolonged  warmth!  

*****

All Supplies:

Stamps:  Every Little Bit (menorah), Jewish Celebrations (star of David, Shalom, Happy Hanukkah)

Ink: Versamark (for heat embossing), Night of Navy, Silver Stampin’ Dazzle Marker (for writing name)

Paper: Brushed Silver, Brushed Gold, Whisper White, Night of Navy Cardstocks.    Silver & Champagne Glimmer Paper

Big Shot:  Big Shot, Elegant Bird Bigz die, Perfect Pennants Bigz L die, Two Tags Bigz die

Punches: 1-3/4″ Scallop Circle, 1-1/4″ Scallop Circle (Holiday Catalog), Boho Blossoms, 1-3/4″ Circle, Large Oval

Other:  Gold Glimmer Brad (Basics Collection), Silver embossing powder, heat tool, Simply Score, Stampin’ Trimmer, My Digital Studio (menu card), Midnight Muse Striped Satin Ribbon, Silver cord (retired SU), Rhinestone Jewels, blue sharpie for coloring the birds rhinestone eyes, crop a dile, piercing tool, glue dots and snail adhesive.

*****

On to the descriptions.   With the exception of the bird the rest of the table setting pieces were quite simple.  Mostly a matter of die cuts and punches with a bit of heat embossed images thrown in.

Click on the picture for a larger view.
All images and die cuts copyright Stampin’ Up!

Place Card

4-1/2″ x 3″ piece of Night of Navy Cardstock  scored at 2-1/4″ and folded to create the tent.   Stamped with the menorah image from Every Little Bit in Versamark and heat embossed with silver EP.   Die cut the doily like round image from Perfect Pennants in Brushed Silver cardstock.  Punch a Night of Navy 1-3/4″ circle and write name with Silver Stampin’ Dazzle Marker.  Adhere circle to die cut and attach to the base card.

Shalom Tag

Tie Midnight Muse ribbon around wine glass stem.  Stamp Shalom image from Jewish Celebrations in Night of Navy classic ink onto Whisper White Cardstock.  Punch with Large Oval punch.    Of course if you want to add a little bling you can back the oval with a Scallop Oval punched piece of Silver Glimmer paper.  Might end up sending light reflections into the eyes though. 😀

Click on the picture for a larger view.
All images and die cuts copyright Stampin’ Up!

Napkin Ring

Cut  2-1/2″ x 9″  strip of Brushed Silver Cardstock.   Score lightly and fold in half.    Die cut using the Two Tags Bigz die and placing the fold just above the bottom cut line of the scalloped bookmark tag.   Overlap the two scalloped ends and adhere one over top of the other with glue dots (use several)  Press flat with scallops centered.   Punch a Silver Glimmer Paper 1-3/4″ Scallop Circle.    Stamp and heat emboss a silver menorah from Every Little Bit on Night of Navy Cardstock and punch out with the 1-1/4″ Scallop Circle punch.  Using glue dots adhere the menorah punch piece to the Silver Glimmer paper punch piece and then glue dot the combined piece overtop of the scallops on the napkin ring.  Insert napkin.  😀

Click on the picture for a larger view.
All images copyright Stampin’ Up!

Menu Card

My Digital Studio Design.  Create your own – see description or grab the download from the Day 5 Hop Post here.


Click on the picture for a larger view.
All images and die cuts copyright Stampin’ Up!

Bird

That little beauty is a tad trickier and deserving of its own post don’t you think?  😀  I’ll try to have it finished before the weekend.   Should mention too that my dove was also inspired by the Late Night Stampers Challenge #201 – Add Sparkle.    My original plan was to use just the brushed metallic cardstocks then I decided to add sparkle with the glimmer paper too (now the Brushed Gold is only on the backs of the wings).    It really does add sparkle to the table setting don’t you think?

One last look at the basic pieces. 

Click on the picture for a larger view.
All images and die cuts copyright Stampin’ Up!

With all that beautiful glimmer paper bling involved I had to go for a low light solution for the photography so we wouldn’t see lots of hot spots and lens flare or glare.   That being the case I kept to the essentials and left out the silverware and dishes.  I also snuck all the candles into the menorah for picturesque balance really since I’m planning my dinner for an earlier night during the holiday.   Can you tell I also discovered that storing white and blue candles together in the same box makes for an interesting effect when you are ready to use them?   Ah well…blue and white is my color scheme.  Stampin’ Up’s Night of Navy and Whisper White  to be exact!

Did you notice that shalom tag on the wine glass?   There’s a reason apart from the artistic.  When my friends and I get together, especially if there is family there as well, the conversation can, at times, become shall we say…a little…spirited.     Therefore the shalom is both a greeting and a reminder of peace and harmony.

On a side note:  I was asked by a friend the other day the meaning of shalom.  She had seen it as a text image in the new Jewish Celebrations stamp set and was trying to figure out different ways to use it.   I went searching and found this very apt description online of its many layers of meaning.

Most know that the Hebrew word shalom is understood around the world to mean “peace.” However, “peace” is only one small part of the meaning. “Shalom” is used to both greet people and to bid them farewell, and it means much more than “peace, hello or goodbye”….

Hebrew words go beyond their spoken pronunciation. Each Hebrew word conveys feeling, intent and emotion. Shalom is more than just simply peace; it is a complete peace. It is a feeling of contentment, completeness, wholeness, well-being and harmony.

*****

So…since another phrase my family seems to follow  runs…In Vino Veritas (in wine is truth)…and I plan to serve wine with my Hanukkah celebratory meal…I thought it best to be prepared to respond…Shalom.     I’m hoping the tag will be a gentle reminder.  Or maybe I should rethink the wine?

*****

One more quick reminder…today is the last day for the Online Extravaganza Sale.   Have you called your  demonstrator with your order yet?   Sale ends shortly before Midnight which means…times running out!

Thank you for hopping along with us.
Your next stop is Andi’s blog, where she is going to show you some more great Hanukkah related projects!

Make sure to come back again and visit on Wednesday for Day 7 of our Hanukkah Blog Hop!

Hanukkah 2012 Blog Hop Previous  Hanukkah 2012 Blog Hop Next

Here’s a complete list of the Hanukkah Blog Hoppers in case any links don’t work.

1. Andi Potler
2. Yapha Mason
3. Miriam Permut
4. Jean FitchYOU ARE HERE!

Hanukkah Blog Hop: Day 4

Hanukkah 2012 Blog Hop

Welcome to the first ever Hanukkah Blog Hop! We are so excited to be able to share with you some wonderful Hanukkah related projects. We’ll be posting 2 projects a week on Sunday’s & Wednesday’s until the first day of Hanukkah on December 9th! There are 4 of us participating so that is a total of 9 hop days for a total of 36 ideas!! Are you ready to be Hanukkah project inspired?!

We hope you all enjoyed the first 3 days of our Hanukkah Blog Hop! If this is your first visit, go back and visit Day 1, 2 and 3.   And don’t forget to circle round to all 4 blogs in the hop for each of those days. 

******

Have you had a chance to make a few of the stars I showed you last Sunday?    I had hoped to have more tutorials and links up for you on Monday but it wasn’t to be.  Too much star gazing perhaps on my part?    Whatever caused it I’ve been down with a high fever so for the hop this time around I’m showing you a few more of my “star” creations.

Everyone in the pool!  It’s time to party!     Okay…that’s maybe a little bit over the top for an introduction of my Pool Party and Snow Flurry star.   Though I have to say…when I lived in Southern California the Hanukkah celebrations I was invited to did often end up in the pool!   Hm…maybe that’s why my hand grabbed for the pool party in the first place?   Doesn’t really explain the snowflake though now does it?  

All images and die cuts copyright Stampin’ Up!

I think I mentioned last Sunday that the flames of the Hanukkah lights remind me of starshine and today you can see that they also remind me of snowflakes.  Each one unique and glowing and starlike.  In my mind at least.  So I couldn’t help combining the two images.     Believe it or not if you place it correctly the star card will open with the snowflake in place so you can place a greeting inside then fold it closed again.  To see what the card looks like open you can see last Sunday’s star card here.   Of course you can also hang the star up like an ornament or place it on a card holder in the center of a bouquet.    Had a thought too that you could make several of the smaller stars then hang them off the larger one with fishing line or thread and then hang the entire piece from a chandelier as a decorative mobile over your table.   Of course if you live in Florida some might comment on your snowflake motif!

In case you are wondering, that snowflake is from the Snow Flurry die in the Holiday Catalog and it wasn’t cut with paper.   This time around I used aluminum flashing!  Yep…the same metal used on roofs and gutters and available fairly cheaply at your local home store.   That Snow Flurry die is one tough Bigz die and like all Bigz dies it can handle up to 50 different materials (see the list below) and flashing is one of the materials.   Some time back my local Lowe’s store had a flashing that was silver on one side and gold on the other.  Makes for a real two-fer as we used to say.   Also makes for some lovely snowflakes don’t you think?   Layer the various sized snowflakes in alternating colors with glue dots or a glue gun and top it all off with one of our large 8mm pearls.   We made just the snowflakes as winter ornaments at my last Stamp Camp.  Light and simple and fun to enclose in a card to a friend – especially if they live somewhere they don’t get to see the real thing.   Here’s a close up of  both of the stars and their details.

All images and die cuts copyright Stampin’ Up!


When I put this together I first had just the snowflake on the star and then I decided to see what setting it off would look like with a 2-1/2″ circle as a backing piece.   I was wonderfully surprised to find that the large snowflake seemed to be made with that size circle in mind.   I love that Stampin’ Up takes these kinds of details into consideration when they plan their designs.  Don’t you?

You’ll notice one little oops in the details.  We no longer sell the textured paper I used.  Not to worry though…the regular cardstock works just fine as you can see from the little star.

Supplies:

Stamps: none exterior – Jewish Celebrations interior – same design as that used in last Sunday’s Star here.

Paper: Pool Party Textured Cardstock, Brushed Gold Cardstock, Very Vanilla used inside

Inks: none exterior – Night of Navy interior

Other: Big Shot, Bigz Snow Flurry die (holiday catalog), aluminum flashing, Stampin’ Trimmer, Simply Score, 2-1/2″ Circle Punch,  glue dots, dimensionals

All images and die cuts copyright Stampin’ Up!


Supplies:  

Stamps:   Jewish Celebrations

Paper:  Pool Party & Very Vanilla Cardstock, Night of Navy page from Regals Designer Series Paper Pattern Stack

Ink:  Night of Navy

Other:  Stampin’ Trimmer, Simply Score, 1″ Circle Punch, 1-1/4″ scallop circle punch (holiday catalog), glue dots, dimensionals

Here’s the list of 50 materials I promised earlier:   Big Shot approved Materials – SU flyer

and a chart I created  with dimensions and a video tutorial link for the stars: Star Fold Card Dimensions

Here’s a close up of the Snow Flurry die from the catalog page so you can see the individual shapes I layered together.  Largest snowflake is 3-5/8″ x 3-5/8″  :

******

 And just for fun…here’s what my Pool Party star looks like when my photo program ran an automatic color adjustment routine on it.  I can’t decide if that’s what the star would look like when done in Marina Mist or Bashful Blue.  What do you think?  Gave the silver flashing a nice purple tint too don’t you think?  Interesting that the Brushed Gold paper stayed gold…though it does look just a tad more shimmery to me.   Makes for a more traditional Hanukkah color scheme too.

******

Late breaking Hanukkah News…what better place than the Hanukkah Hop to spill the beans….Stampin’ Up has released a brand new My Digital Studio download kit with everything you need to create cards, scrapbook pages and any kind of Hanukkah related project you can imagine.  After seeing what Miriam did with the new download I’m contemplating using it to create table decorations and other holiday favors.    Might even create a few decorative bits to put on the fronts of  some brand new stars.   What could be easier than dropping some of the images and embellishments on a single page then punching them out and adhering to my many stars!  Perfect!    And even better…if you don’t yet have My Digital Studio…it’s on sale for 50% off during the Online Extravaganza sale this week.   Check with your demonstrator for more details.  

Hanukkah Happiness Ensemble Digital Download

******

Hope you all have a Happy Thanksgiving tomorrow!

Thank you for hopping along with us.
Your next stop is Andi’s blog, where she is going to show you some more great Hanukkah related projects!

Make sure to come back again and visit on Sunday for Day 5 of our Hanukkah Blog Hop!

Hanukkah 2012 Blog Hop Previous  Hanukkah 2012 Blog Hop Next

Here’s a complete list of the Hanukkah Blog Hoppers in case any links don’t work.

1. Andi Potler
2. Yapha Mason
3. Miriam Permut
4. Jean FitchYOU ARE HERE!

Hanukkah Blog Hop: Day 3

Hanukkah 2012 Blog Hop

*****

Welcome to the first ever Hanukkah Blog Hop! We are so excited to be able to share with you some wonderful Hanukkah related projects. We’ll be posting 2 projects a week on Sunday’s & Wednesday’s until the first day of Hanukkah on December 9th! There are 4 of us participating so that is a total of 9 hop days for a total of 36 ideas!! Are you ready to be Hanukkah project inspired?!   

If you are following the standard order of the hop you’ve arrived from Miriam’s post with her timely and wonderful gift card holder made with Stampin’ Up’s Petite Pocket Die.  Thanks Miriam!  If you’re moving in reverse that’s okay too, as we’re one happy Stampin’ Up circle of friends on this hop.    If you’ve gotten lost along the way check the buttons at the bottom of the post and the general links to the hoppers blogs to find your way back.

We hope you all enjoyed the first 2 days of our Hanukkah Blog Hop! If this is your first visit, go back and visit Day 1 and 2 and hop on through.


Do you ever feel as if you are seeing stars?   That’s been my experience all week!   Stars to fold,  stars to decorate,  to send to friends and of course stars for the Hanukkah Hop!   

While the picture above isn’t mine, it looks very much like what I can see at night from my front deck.  I live out in the country, where lights are few and far between,  at about 1500 feet above sea level.  And after years of living at sea level I now feel as if I can reach up and touch the stars.    Not quite the same as when I lived in New Mexico’s high desert at 7,000 feet but still, they feel close.  And they are inspiring.   That velvety blue sky and God’s original Festival of Lights so often puts me in mind of Hanukkah and the star shine of the candles in the menorah calling us to remembrance and celebration.    

I’m happy today to share these paper stars to complement your own Hanukkah Celebrations.  I hope they will inspire you to create your own.   To send them out to gladden someone’s heart (that is why we create and send our cards right?) or decorate your home with them in some fashion.  


Jewish Celebrations in Night of Navy

All images copyright Stampin’ Up!
All materials used are Stampin’ Up!

The smaller star is a story in itself.  The tutorial for the large star I found showed only the one size and I was determined that the big star needed a little brother (Hanukkah is in large part about family right? :D).   Search as I might, and I discovered quite a few other people were looking too, I couldn’t find the cutting or scoring dimensions for a smaller equilateral triangle (the base shape of the construction) so had to drag out my very rusty math skills and the wonderful 1/4″ grid found on the new Stampin’ Trimmer by Stampin’ Up! 

After a bit of trial and error I figured it out.  I did discover though that a small star like the one shown here has very little space inside for holding treats or texts so works best as an ornament or an embellishment  for another card or larger project.  That being the case I mounted it on the circle punched image from Jewish Celebrations (found in the Holiday Catalog). 

Now I just have to decide whether I want to hang it from a thread (our Stampin’ Up Bakers Twine or Linen Thread would work nicely), add it to a banner or maybe even add to a wreath or other decoration for my front door.   Hm…might even make several and string them all together in a  banner like the one Andi showed us last Wednesday.  You did see that banner right?  If not click on the day 2 link above at the top of the post.   I should add that these stars look nice from the front or the back so perfect for hanging across doorways or other areas where both sides will be seen.

And here’s the inside of the larger star when it’s unfolded.  I forgot to take a picture of the little stars interior so you’ll have to come back later in the week when I show more stars and how they were made. 

Supplies:

Stamps: Jewish Celebrations (Holiday Catalog)

Paper: Night of Navy DSP from the Regals Color Collection Designer Series Paper Stack, Very Vanilla & Night of Navy Cardstock, Brushed Gold Cardstock

Ink: Night of Navy Classic ink

Punches: Extra Large Oval, Decorative Label, 1″ Circle,  2-1/2″ Circle, Boho Blossom, 1-1/4″ Scallop Circle (Holiday Catalog) 

Other: Simply Score, Stampin’ Trimmer, Gold Glimmer Brad (Basics Glimmer Brad Collection), glue dots and dimensionals, stampin’ sponge.

Note: All stamped images used Night of Navy ink.  Some stamped off for a lighter shade.  The large star will fit inside a 6″ Square envelope.  The diameter is approx. 5-5/8″.   The small star fits in a 3″ square envelope and has an approximate diameter of 2-3/4″.  The star folds tuck in so the star will hold itself closed making it perfect for either a card or an ornament.

***********

Come back throughout this week for the unfolding details (sorry, I couldn’t resist :D).   To see different stars, their details, close up pictures and of course their insides.  These are fold cards after all so what can be folded…can also be unfolded.

Hop stars straight from the desk.

I’m beginning to think I could fold these guys in my sleep.  

Want to make your own?   Here’s the basic video from a sister demo Cindy Elam.  Here’s your chance to view the new Stampin’ Trimmer from Stampin’ Up in action!    Nice view of the Simply Score too!

If you’ve gotten the  folded star bug now, I  found another very cool Origami Star of David here but discovered my fingers weren’t quite nimble enough to make it.

Thank you for hopping along with us.
Your next stop is Andi’s blog, where she is going to show you some more great Hanukkah related projects!

Make sure to come back again and visit on Wednesday for Day 4 of our Hanukkah Blog Hop!

Hanukkah 2012 Blog Hop Previous  Hanukkah 2012 Blog Hop Next

Here’s a complete list of the Hanukkah Blog Hoppers in case any links don’t work.

1. Andi Potler
2. Yapha Mason
3. Miriam Permut
4. Jean FitchYOU ARE HERE!

Hanukkah Blog Hop: Day 1

Hanukkah 2012 Blog Hop

Welcome to the first ever Hanukkah Blog Hop! My sister demos and I are so excited to be able to share with you some wonderful Hanukkah related projects. We’ll be posting 2 projects a week on Sunday’s & Wednesday’s until the first day of Hanukkah on December 9th! There are 4 of us participating so that is a total of 9 hop days for a total of 36 ideas!! Are you ready to be Hanukkah project inspired?!

You should have arrived from Miriam’s blog if all went well with our links.  Wasn’t her first project wonderful!  I can’t wait to see more of her inspiring work over the next few weeks.  All four of us have been sharing our general ideas but every new post will be an inspiring and CASEable surprise for us as well as our readers.  

Here’s my first project that makes use of Stampin’ Up’s new Jewish Celebrations stamp set from the current Holiday Catalog.  When I saw this set I was hooked and couldn’t stop coming up with ideas for it’s use.  With the Shalom greeting and other images it’s not just for Hanukkah.   I’ve added it to my permanent collection on the do not sell ever shelf!    I’m also in love with the new Illuminate Glimmer Ink and the new Silver Dazzling Details, also from the Holiday Catalog!  Perfect for adding shimmer and shine to any Hanukkah project!   And of course our new Midnight Muse In Color is perfect for a holiday that traditionally features blue.

All images copyright Stampin’ Up!

 Midnight Muse Framed Menorah Hanukkah Card

 Color Scheme: Midnight Muse, Whisper White & “Sparkle and Shine”                  

Supplies  

Stamps: Jewish Celebrations

Ink: Midnight Muse Classic Ink, Illuminate Glimmer Ink

Paper: Midnight Muse & Whisper White cardstock

Other: Starburst Jumbo Wheel, Big Shot, Oval Accent Bigz die, Window Frame Framelits & Silver Dazzling Details


Directions 

Tip:  Rremember that the  Midnight Muse In Color ink is one of the new firm foam pads and requires a light touch.  It’s also a very dark and smudge making ink so keep an eye on your hands and wash regularly if needed when working with our Whisper White.  If you find yourself with some boo boo’s – some smaller stamps can be used to cover up smudges. 

1) Score the Midnight Muse card base (8-1/2″ x 5-1/2″)  at 4-1/4” line with the Simply Score then fold and crease with bone folder.

2) Wheel the Starburst jumbo wheel across the Illuminate Glimmer pad a couple of times (moving always in one direction) then wheel across the long side of the card base.  Reink wheel and repeat until base is covered in stars.   Should take two – three swipes.

3) With the Big Shot, cut one Oval Accent die piece in Whisper White for the base layer.  Using two Window Frame Framelits cut a slender frame in Midnight Muse.   Very cool that the Window Frame Framelits mimic some of the shape of the Oval Accent die don’t you think?   One might almost think that Stampin’ Up planned it that way…right?  😀

4) Wheel the Starburst Wheel with the Glimmer ink over the Whisper White piece and the Midnight Muse Frame.  Set aside and let dry for a minute.  Sponge daub Midnight Muse around edges of WW.

5) Stamp Menorah in center of WW Oval Accent piece then adhere MM frame around it.  Stamp Star of David image at top and bottom.  Let dry and add silver dazzling details as desired.  Caution:  The Dazzling Details can smudge the ink if you have to come back in with a less than steady hand.  The trick is to drop it down in a line. 😀

While the Illuminate glimmer ink doesn’t show up well  in the picture on the Whisper White, it does shimmer in real life when you tilt the card in the light.

***********

Thank you for hopping along with us.
Your next stop is Andi’s blog, where she is going to show you some more great Hanukkah related projects!

Make sure to come back again and visit on Wednesday for Day 2 of our Hanukkah Blog Hop!

Hanukkah 2012 Blog Hop Previous  Hanukkah 2012 Blog Hop Next

Here’s a complete list of the Hanukkah Blog Hoppers in case any links don’t work.

1. Andi Potler
2. Yapha Mason
3. Miriam Permut
4. Jean FitchYOU ARE HERE!