Wacky Watercooler July 2016 Blog Hop: Our Third Anniversary Celebration!

Wacky Watercooler 3rd Anniversary Celebration Banner

Welcome to our July Third Anniversary Celebration Blog Hop

Hello and Welcome to the third anniversary of the Wacky Watercooler Blog Hop series.  After three years together I can’t help feeling I should be making Anniversary cards for each of my hopping buddies.  I love my fellow artists and you dear readers as well, for sticking with us, and visiting today!

Who are the Wacky Watercooler Artists?   Most of us are Stampin’ Up demonstrators (or were when we started the hops) who hang out in a back corner of our company chat site and do precisely that…chat.  We’ve shared our ups and downs.  Funny and sad lives and stories for so long that even though most of us only know each other from online or the occasional meet up at conventions or on the phone you’d believe we’ve been neighbors for years!   It’s amazing how close we’ve gotten and how the friendships have grown.  Bless you Internet and Bless you Stampin’ Up!

It’s hard to believe it’s been 3 years since we started the hops.  At the beginning I was the captain and I was honored to lead such a wonderful gang of friends and rubber stamping artists.   Behind the scenes was so much fun (and occasionally challenging) coming to consensus for designs and hop policies as we got started.   We’re all strong minded but with loving spirits so the best of the best always came out in the end.   If you’ve been following us for all that time you know that Heidi is now at the wheel of the bus and is also our able and beloved captain and there have been a few other changes in the line up over the years.   I’m jazzed that so many who were in at the start are still regular contributors and even more that Heidi was able to bring the entire gang from the first hop back together to join the celebration along with newer members of the band to share some inspiration.  If you are as nostalgic as I am you can see the very first hop here.

As usual you can follow this hop in a circle going either direction.  Of course you can also return to the home hop site if you ever get lost along the way.   That site will also, with a bit of scrolling back lead you to any and all of our past hops that you might still find inspiring.   In fact…we’re hoping to lead you there with many of our CASE projects this time around from the original hop.  Enjoy!

Now that you’re here I hope you’ve arrived from  Gail’s blog.   Gail is another dear friend I first met in the Watercooler.  She’s also one of our many (and talented) Canadian stampers.   I seem to be bracketed by my sisters from the north this hop. {grin}   I hope you found her as inspiring as I always do.  While not an original hopper Gail has jumped in with a heart and soul that keeps the Watercooler itself (and our hop) hopping with her original take on life and stamping.

*******

Today’s hop, as part of our celebration has us featuring older stamp sets that are still current on our stamping shelves – a mean feat for some sets to last that long don’t you think?  Two in particular.  Gorgeous Grunge and Wetlands you’ll see as you follow along through the hop.  Of course we may throw in other sets as well to keep it interesting (or ones we hope will still be around in another 3 years).  At least I did.  LOL

Here’s my first celebratory offering.   Appropriate don’t you think that it’s mixed with a set called Picture Perfect.   Beaches and wetlands so often are don’t you think?  A perfect picture?  And also gorgeously grungy?  Sorry…I couldn’t resist saying that. 😀

The secret ingredient is gold.  Check the directions I’ve shared in PDF form and you’ll see touches of gold everywhere that add to the texture.

Picture Perfect Starfish

(click the image for a larger view)

 Picture Perfect Starfish on the Beach - Jean Fitch - Wacky Watercooler Hop 07/21/16

Inside

Picture Perfect at the Beach - Jean Fitch - inside - Wacky Watercooler Hop 07/21/16 - Jean Fitch

A version closer to Penny’s with a wonderful and inspiring sentiment from Rose Wonder.

Picture Perfect Star Fish - Rose Wonder - Jean Fitch

And a detail of the gold embossing that gives the starfish so much life and texture.

Starfish Detail - Jean Fitch

Note:  This lovely design is a CASE of fellow artist Penny Hanuszak who shared the original version on a Watercooler Wednesday Challenge posting a few weeks ago.  Thanks Penny!  I added a sun and different sentiments to change it up just a bit.  Check the post for Penny’s directions or my own PDF below.

Do you have Gorgeous Grunge yet in your stamping arsenal?  It took me a while to add it to mine but now it’s there that speckle image is one I reach for time after time.  Here I’ve also gotten the lined image baptized with ink.  Another popular image for creating roadways and waves in their respective places.

Do you remember that saying that “today is the first day of the rest of my life”.  It was popular as a philosophy and even in song back in the day.   Probably why I fell in love with the Suite Sayings “Forever begins today” sentiment.  Possibly it’s just me but I find it applies to so many occasions.  I’ve left a sentiment off the inside of this so I can decide later on the occasion Forever will be paired with.

Supplies:

Stamps: Gorgeous Grunge, Kinda Eclectic, Picture Perfect, Wetlands, Suite Sayings.

Ink: , Early Espresso, Crumb Cake, Island Indigo, Crushed Curry, Soft Suede, Versamark

Paper:  Soft Suede (5-1/2” x 8-1/2”), Island Indigo (4″ x 5-1/4″), Crumb Cake (3-1/2” x 3-1/2”) for the Starfish, Whisper White (3-3/4″ x 5″, 4″ x 5-1/4″)

Other: Gold Embossing Powder, Heat Tool,  Stampin’ Sponges, Paper Snips, Dimensionals, Glue Dots, SNAIL

Picture Perfect Star Fish-Jean Fitch – PDF directions and dimensions

Tool Tip:  Do you remember this old trick for keeping your sponges organized?  A punch piece folded and stapled to the bit of sponge with the paper and title that reflects the ink color.   I’ve added to it with a plastic cup to keep the sponges in while working with them so I don’t get ink all over the table (or where I don’t want accidents to happen on projects in progress).

Sponges for coloring

***********

Next up is a fun popup Spring Fold card using our stamp and punch combo Grateful Bunch.  I also used the brand new copper embossing powder.  I wish you could see this in person.  Much more coppery!

Pop up Grateful Bunch Spring Card

Grateful Bunch Spring Card - WW Hop 072116 - Jean Fitch

View from the back

Grateful Bunch Spring Card - back - Jean Fitch

Collage that shows you the full front, side and folded flat
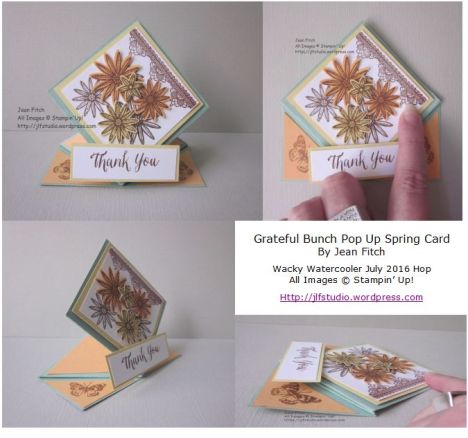
Grateful Bunch Spring Card Collage Image - Jean FitchAs you can see from the pictures the card folds flat for mailing.  The flat size is a 4-1/4″ square so it’s perfect for our regular envelopes.   This version made use of our new Peekaboo Peach In Color.  Another color combo that has a bit more zing a bit less vintage look uses Watermelon Wonder.   My sideline Linda made off with that version before I could take a picture so I’ll have to share that version at a later date.  Smart woman.  The stampers at the Stamp Camp where I debuted this all loved the Watermelon Version and grabbed for those papers.  Myself…I rather like the vintage look of the peach.  A bit Victorian don’t you think?

Supplies:

Stamps: Grateful Bunch, Rose Wonder

Ink: Soft Suede, Mint Macaron, Versamark, Peekaboo Peach

Paper: Mint Macaron (4-1/4” x 8-1/2”), Soft Saffron (2-3/4” x 2-3/4” & 1-3/4” x 1-3/4”), Peekaboo Peach (2-3/4” x 2-3/4” & 1-3/4” x 1-3/4”), Whisper White (2-1/2” x 2-1/2”). Measurements apply only to the colors you choose to use. White and Background color scraps.

Punch: Blossom Bunch

Other:  Stampin’ Trimmer, Bone Folder, Heat Tool, Copper Embossing Powder, Copper Metallic Thread, SNAIL, Glue Dots, Dimensionals.

Here’s the directions in PDF form and if you don’t have a bone folder yet…you’ll want one now!

Pop Up Grateful Bunch Spring Card Hop Version-JeanFitch

And a link to Dawn’s video that showed me how the folds work for the basic Spring Card.  The decorative design is mine (grin):  https://youtu.be/LE5p70Rwx9s

***************************

I encourage you to play with the products that I’ve showcased today.  As you can see, they coordinate with products you may already have or can find in our new Annual Catalog.

*******

That’s it for my share of the hop.  Time to move on over to my friend  Terri’s blog   Terri and I met up online originally and then in person at a Stampin’ Up! convention.  One of my fondest convention memories ever!   We’ve been friends ever since.  So many of her fun, interesting and inspiring projects have landed on my CASE lists over the years that I’m expecting that to be the “CASE” this time around too! {grin}  Can’t wait to  see which of her wonderful projects I’ll be making next!   Terri is another one of the original hoppers.   Take it away Terri and Happy Anniversary!

To follow the hop click on the link below:

next watercooler crock button

Home Button

Previous Button

Save

Save

Save

Save

Save

Save

Save

Save

Save

Save


Save

Save

Save

Save

Save

Save

Watercooler Wednesday Challenge – WWC70 – Sketch of Gratitude

WWC70 – Marsha’s  Sketch Challenge

Watercooler Wednesday Challenge - WWC70 - Marsha's Sketch Challenge

Welcome to this weeks Watercooler Wednesday Challenge.

Today’s challenge is a sketch shared by my dear friend Marsha.  I’m sure it will come as no surprise to her that I had to do something just a tad different.  Instead of a card…I created a box to fill with cards.  I also took a few liberties with the sketch.  As you will see the basic sketch is present but I added an embellishment or two in the shape of extra flowers.  My theory was that flowers = pearls and sequins that others added to their cards.  What to do you think…was I stretching the envelope?  Or the sketch?   Sorry about that Miss Marsha. 😀

As you might have guessed by the title I decided to play with the Grateful Bunch Bundle that first appeared in the 2016 Occasions Catalog and whose components (punch and stamp set) are available as individual components in the new 2016-2017 Annual Catalog from Stampin’ Up!

Expressing gratitude has been much on my mind of late (note to readers…I’m very grateful for you!)

Lately I’ve been finding myself very grateful for my family doctor and the help he’s been in sorting out my chronic health problems.  After working on masculine cards for recent challenges and in anticipation of Father’s Day I’ve been in a masculine creative mood so I thought I’d create something to share my gratitude with my doctor that he and his family could make use of as needed.  After all…who couldn’t use a supply of cards right? 😀

He’s a real upbeat kind of guy who’s always positive, life affirming, big on nutrition and yoga and other forms of creative living.  One who gives as easily as he receives…or so it seems to me.   He even gets up with his little ‘uns when they have a sleepless night (now that’s my idea of a dad).  I’m hoping this  box of cards will reflect all that.

**********

 Grateful Bunch Card Box

Holds several 4-1/2″ square cards

(as always click the pictures to see larger images)

WWC70 - Marsha's Sketch Challenge - Gratitude Card Box - Jean Fitch

WWC70 - Marsha's Sketch Challenge -Gratitude Card Box Side view - Jean Fitch

And here’s one of the cards inside:

Watercooler Wednesday Challenge - WWC70 - Marsha's Sketch Challenge - card for Gratitude Card Box - Jean Fitch

As you can see I kept the card fairly simple but reflective of the box design.  Perfect don’t you think for a coworker who goes above and beyond?  One of the lovely things about a 4 1/2″ square card is that it also fits in a standard envelope.  Saves on postage if mailed.

Watercooler Wednesday Challenge - WWC70 - Marsha's Sketch Challenge - Card Box Set - Jean Fitch

Supplies:

Note:  Several of the items listed are retired as of today.  Sorry about that but at the time of creation they were still active so naturally my hands reached for the things I love!

Stamps: Grateful Bunch, Trust God (retired)

Inks:  Mossy Meadow (retired In Color), Watermelon Wonder

Paper: Mossy Meadow (retired In Color), Watermelon Wonder, Tip Top Taupe, Very Vanilla and Vellum Cardstock  & Timeless Elegance Designer Series Paper (retired).

Punches: Blossom, Corner Rounder, Large Oval (retired), Scallop Oval (retired)

Tools & Adhesives:  Big Shot, Brick Embossing Folder,  Simpy Scored, Paper Snips, Bone Folder, Tear n’ Tape, Dimensionals, Glue Dots, SNAIL.

*********

Fairly straight forward construction details.  The Simply Scored scoring tool is perfect for box construction as well as scoring cards for folding.  So many uses it’s a required tool in my studio that’s for sure.

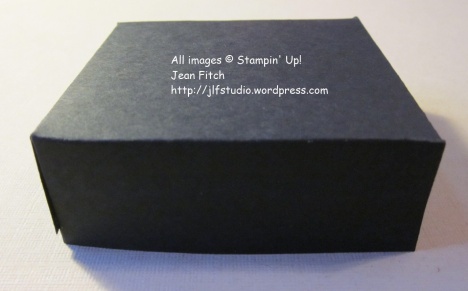
Box was created in the same old fashioned way I outlined in this post.  Creates a 5″ square box to hold my 4-1/2″ square cards and slightly bigger envelopes.

Top: 7-1/4″ x 7-1/4″ square

Bottom: 7″ x 7″ square

Score at 1″ along all four sides for each piece.  Snip up to score line on both corners on opposite sides.  Add pieces of Tear n’ Tape to the corners and fold to the inside.  Burnish with bone folder to activate the adhesive to its strongest stick.

Once the box is completed:

Brick embossed layer – 4-3/4″ square – Stamp leaf stem image in Mossy Meadow on Tip Top Taupe then emboss using Big Shot and the Brick folder.

DSP strip: 1-1/4″ – cut at 7-1/2″ and adhered from center of box with ends cut to measure after adhered to box.

Sentiment layer: 2″ x3″ Corner rounded and stamped in Mossy Meadow with Trust God sentiment.

Scrap Vanilla: Stamp sentiment from Grateful Bunch in Mossy Meadow ink and punch with oval punch.  Sponge edges with sponge dauber and Mossy Meadow ink.   Adhere to Mossy Meadow Scallop Oval punched piece.

Flowers: Stamp flower image in Watermelon Wonder ink on Watermelon Wonder Cardstock and Vellum Cardstock.  Punch with Blossom Punch.  Adhere to box (make extra for cards!)

Hopefully the full assembly is easy to see from the pictures of the finished project.

*********

That’s it for this challenge.  To see the rest of the design teams Sketch Challenge contributions head on over to the Challenge blog website here.   That’s also where you can add your own creation with the linky doodad.  When you add your own design and there are more than three entries, one of you will be a challenge winner or runner up and have the option to place our new badges on your own site.  Of course…you’ll also win bragging rights!

Check here to see the winner of last weeks challenge.  And here to see all the other linky and Artist Team entries.  Check the challenge site for rules on competing for future challenges.

I really hope you will add your own creations this week.  Really…this challenge is an fun one.  After all the design layout is done for you.  All you have to do is grab your colors and stamps and get creating!

I hope you’ll join us next Wednesday for yet another Watercooler Wednesday Challenge.

Jean Fitch in pink


Save

Save

Save

Save

Save

Save

Irish eyes are smiling….WWC59 – Bev’s Green Color Challenge

WWC59 – Bev’s Color Challenge in Green

Watercooler Wednesday Challenge - WWC59 Bev's challenge in green

Welcome to this weeks Watercooler Wednesday Challenge.  Today…Irish eye’s are smiling.  Well really…any eyes that like green…or candy are.

Today my eyes are in fact a tad on the green side.  Must be in anticipation of St. Patrick’s Day fast approaching.  The eyes are also smiling since Reece’s are one of my all time favorite candies!   A fun treat to share with neighbors, bank tellers, doctors and their staff and so on.  In fact…all the people who share my life.

Thanks Bev for the inspiration…and for going all green.  You really made me stretch my imagination.

**********

Jean’s Reece’s Shamrock Hat

Watercooler Wednesday Challenge -WWC59 Bev's Green Color Challenge - Jean's Reece's Shamrock HatFrom the front

Watercooler Wednesday Challenge -WWC59 Bev's Green Color Challenge -Shamrock HatFrom the back


Supplies:

Stamps: None

Inks:  None

Paper: Whisper White, Cucumber Crush, Mint Macaron, Mossy Meadow, Wild Wasabi

Punches:   Itty Bitty Accent Punch Pack (flower), 1-3/4″ Scallop Circle, 7/8″ Scallop Circle, Confetti Hearts Border, Bird Builder

Tools & Adhesives:  Baker’s Twine Combo Pack (Occasions Catalog), Basic Jewel Rhinestones, Two Way Glue Pen, Glue Dots.  Small Reece’s Cup Candy

Details:

Punch your two scallop circles (large one in Wild Wasabi and small in Mint Macaron).  If you want you can emboss with a folder or stamp with any type of background image.

Punch multiple hearts with the Confetti Heart punch from Mossy Meadow cardstock. Arrange the larger hearts into a shamrock shape and glue down to the Mint Macaron scallop circle.  I was lucky enough to have a piece fall out of the punch that I could use as a stem.  If you weren’t so lucky cut a stem piece yourself and glue down.   Attach the two scallop circles with glue dots to Reece’s candy top and bottom.

Tie a length of Baker’s Twine from the Combo Pack – I used the Mint Macaron and Black version.  Tie a bow and trim ends.

Punch leaf branch with the Bird Builder Punch in Cucumber Crush.  Cut down a bit and attach with glue dot to the hat.

Punch two Whisper White flowers with the Itty Bitty Accent punch and add a rhinestone to the center.  Attach flowers to the hat with glue dots.

All done.  Try not to eat!

I suggest you save a few Reece’s cups for inspiring eating during the decorating process.  Hand out the treat hats as fast as possible.  LOL!

*********

Looking for more inspiration for fun, wild and sweet hat inspired treats for little leprechauns and others in your life.  Check out this Google search.

I was inspired in part by another demo’s idea here.  Thanks Julia!   I’m thinking that next time around I’ll a bit more texture by embossing or stamping on the scalloped circles.  Possibly even the flowers or branches.

*********

That’s it for this challenge.  To see the rest of the design teams Color Challenge in Green contributions head on over to the Challenge blog website here.   That’s also where you can add your own creation with the linky doodad.  When you add your own design and there are more than three entries, one of you will be a challenge winner or runner up and have the option to place our badges on your own site.  Of course…you’ll also win bragging rights!

Check here to see the entries from last weeks challenge.  Unfortunately we didn’t have the required three so no winner.  However the 2 entries we had are well worth the look!  Check  here to see all the other linky and Artist Team entries.  Check the challenge site for rules on competing for future challenges.

I really hope you will add your own creations this week.  Really…this challenge is an easy one.  It’s all about the green and the teams entries should, I hope, inspire you with lots of different ideas to try.

I hope you’ll join us next Wednesday for yet another Watercooler Wednesday Challenge.

Jean Fitch in pink


Watercooler Wednesday Challenge – WWC52 – Anything Goes when it comes to Angels

WWC52 – Anything Goes Challenge

WWC52

Welcome to this weeks Watercooler Wednesday Challenge.  Today…Anything Goes.  Don’t you love days like that…when anything is possible?  Well…as far as the challenge goes…today…anything goes!   The rest of your day/week is totally up to you and the other rules in your life.  {grin}

**********

Since anything goes today….I’ve decided to spread my wings.  Literally.

Wings of Love – A Valentine Angel

Version 1

Watercooler Wednesday Challenge - WWC52 - Anything Goes - Jean's Valentine Angel

Version 2

Watercooler Wednesday Challenge - WWC52 - Anything Goes - Jean's Wings of Love Angel

Don’t you love my consistent photography?   Sigh.  That’s what happens when you take pictures on different days with different lighting available.

I’m not sure why, but I love to give my angels brown hair.  I know many artists show them with a more ethereal blonde but I like to think they get to choose their own hair color…or maybe even change it as the whim strikes.  😀

If you’ve seen my other angels you’ll know I generally leave their faces blank, like the Amish and Shaker dolls I grew up playing with.  Today I decided to get brave and try drawing in a face as many others do.  What do you think?  Face or no face?   And which ‘wings of love’ version is your favorite.  I’d really like to know.  One hint about these little winged wonders.  They are so easy to make and  work for any time of the year.  Christmas, Valentines, Easter and so on.  It’s all in the papers and accessories.  Just like the real deal…they work all year long.

Supplies:

Stamps: None

Inks:  Basic Black Journaling pen

Paper: Early Espresso, Very Vanilla, Cardstocks.  Real Red Glimmer Paper.  Gold Foil Paper (candle) .  Under the Tree Specialty Paper (ret.)

Punches: Party Punch Pack (Occasions Catalog),  Itty Bitty Punch Pack (ret. – hair), 1-1/4″ Circle, Word Window

Tools & Adhesives:  Big Shot, Circle Collection Framelit dies, Little Letter Thinlits,  Gold Metallic Thread, Metallic Foil Doilies, Fine Tip Glue Pen, Tombow Liquid Glue, Glue Dots.

*********

I’m trying to decide if I should be worried or not.  The last two challenge projects have had no actual stamping!  Sheesh.   Stampin’ Up may bounce me as a demonstrator if this keeps up.  Of course…I did use Stampin’ Up dies and punches…so they may forgive me.  LOL

In case you are wondering, the primary piece of the angel is a full large scalloped circle die cut.  The largest circle in the Circles Collection Framelits.  It’s cut into thirds (more or less).  The skirt is 8 scallops and the wings are each 11 scallops.  The cross point is about two thirds up to the top of the circle.  I’ll try to take some pictures later this week so you can see exactly what I mean.  The halo is the smaller of the two sizes of metallic foil doilies and the skirt trim/petticoat is a cut down piece of the larger doily.  I give the wings a fold at about the 3rd scallop so that when they are hung up they really do look like the wings are working.  Adds a bit more of a 3D look as well.

*********

That’s it for this challenge.  To see the rest of the design teams Anything Goes Challenge contributions head on over to the Challenge blog website here.   That’s also where you can add your own creation with the linky doodad.  When you add your own design and there are more than three entries, one of you will be a challenge winner or runner up and have the option to place our new badges on your own site.  Of course…you’ll also win bragging rights!

Check here to see the winner of last weeks challenge.  And here to see all the other linky and Artist Team entries.  Check the challenge site for rules on competing for future challenges.

I really hope you will add your own creations this week.  Really…this challenge is an easy one.  Anything you have completed that hasn’t yet been shared online qualifies.  Easy peasy!

I hope you’ll join us next Wednesday for yet another Watercooler Wednesday Challenge.   A little birdy tells me it will be a fun sketch challenge.  Shush..you didn’t hear that from me. 😀

Jean Fitch in pink


Watercooler Wednesday Challenge – WWC46 – Clean and Simple…isn’t always.

WWC46 – Jean’s CAS Masculine Challenge

Watercooler Wednesday Challenge - WWC46 Jean's CAS Masculine Challenge

Welcome to this weeks Watercooler Wednesday Challenge.  My challenge card is Clean and Simple I think you’ll all agree…except…when it isn’t.  On the inside that is.  It’s neither clean…nor simple.  In fact it looks a bit like my tea got out of hand don’t you think?   You know me…I always have to turn a challenge on it’s head in some manner…even when it’s mine!

**********

CAS Pop Out Banner Birthday Card

Watercooler Wednesday Challenge - WWC46 - Jean's CAS Masculine - Pop Out Banner Birthday Card

And here’s the inside with the pop out banner:

Watercooler Wednesday Challenge - WWC46 -  Jean's CAS Masculine - Pop Out Banner Birthday Interior

I loved making this interesting pop out banner interior.  I’m having even more fun picturing the delight of the recipient.   I found this fun technique on a video here.

With this kind of card interior I’m never sure whether to call it a pop up or pop out card.  Either one sounds just a bit risque don’t you think?  Of course adding banner to the title helps with that. 😀

Supplies & Measurements:

Stamps: Happy Birthday Everyone (hostess), Gorgeous Grunge, Sprinkles of Live

Inks:  Cherry Cobbler, Always Artichoke, Soft Suede, Crumb Cake

Paper: Basic Black, Crumb Cake, Very Vanilla

Tools & Adhesives:
Big Shot, Magnetic Platform, Festive Fireplace Framelits (cat), Hearth and Home Framelits (window box die), Stampin’ Trimmer, Snail, dimensionals

Construction Tips:

  1. Die cut your standard card base (after scoring the center fold line) with the window box opening and stamp the flowers from Sprinkles of Life above the box opening.  I used a small mask of copy paper so I could mask out most of the grass section of the stamp.  As an alternative you could diecut the window box out of a darker color paper and then just attach it after stamping the flowers for greater simplicity.   To tell the truth…I didn’t think of that until I had the card mostly finished. 😀   Scoring the card base first before die cutting helps you with correct placement of the die.
  2. Die cut the cat in whatever color you desire.  Having had a black cat who I dearly loved I tend to represent her when I need a cat.  Black is so often a nice contrast to the other parts of the design too.   Wait to adhere the cat until the rest of the card is finished.
  3. Follow the directions for creating the pop out interior in the video noted above.   Two changes to the video were made.  After I had the interior panel finished I trimmed it about 1/8″ in both dimensions (wide and long) so it would better fit inside the card.  Left a bit of a border on all sides when gluing the card interior to the exterior.   Stamp the design on the interior before folding it all up and adhering to the outside card base.  And I placed the Very Vanilla panel behind the die cut window box and stamped the sentiment then adhered it to the interior fold piece so it would show correctly.   That’s one of the reasons that the outer design is so low on the card.  To accommodate the pop out construction.
  4. Once you have inside and outside attached.  Add the cat with dimensionals.  One other possibility…you might want a belly band to hold the card in place if you are hand delivering it.  Otherwise an envelope is fine.   With all the elements you may have to pay a bit of extra postage unless you place it under a heavy book before adding the cat.

*******

Here’s a pinnable picture that shows the outside and inside together.

Watercooler Wednesday Challenge - WWC46 - Jean's CAS Masculine Challenge - Pop Out Banner Birthday Card

**********

That’s it for this challenge.  To see the rest of the design teams CAS Masculine Challenge contributions head on over to the Challenge blog website here.   That’s also where you can add your own creation with the linky doodad.  When you add your own design and there are more than three entries, one of you will be a challenge winner or runner up and have the option to place our new badges on your own site.  Of course…you’ll also win bragging rights!

Check here to see the winner of last weeks challenge.  And here to see all the other linky and Artist Team entries.  Check the challenge site for rules on competing for future challenges.

I hope you’ll join us next Wednesday for yet another Watercooler Wednesday Challenge.

Hugs and Blessings to all my challenge friends and readers and I hope you’ll give all the artists and challenge winners a little comment love.  😀

Jean Fitch in pink

P.S.  Don’t miss my dear friend Marsha’s take on this challenge.   I love all the creations of my fellow artists but Marsha really took the cake with her recreation of the challenge illustration.  Brilliant!


Wacky Watercooler Blog Hop: November Holiday Hop

November 2015 Banner

Welcome to our November Holiday Hop

We’ve gotten to that time of the year when we have holidays and other special days coming up fast.   To reflect that this month we’re bringing you another set of Holiday designs hoping to inspire you to get stamping!  With our talented designers I know you’ll see something to inspire you to get stamping  as deadlines are fast approaching.

Hopefully you’ve arrived from  Christine’s blog.  My friend Christine never fails to come up with interesting and inspiring projects that always land on my CASE list!  Can’t wait to go back and see which of her wonderful projects I’ll be making next!

As usual you can follow this hop in a circle going either direction.  Of course you can also return to the home hop site if you ever get lost along the way.

*******

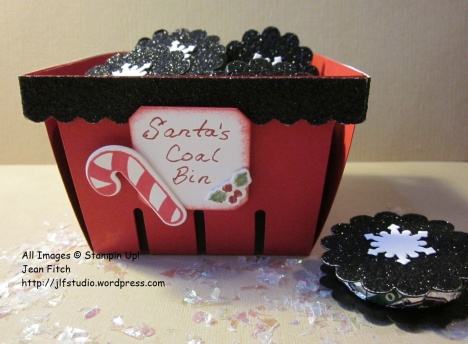
Do you ever wonder what it’s like to be on Santa’s Naughty List.?  Yep…I gave the name capitals.   After all…if Santa thinks you are naughty…well…that’s pretty bad.   Still…Santa being Santa…he has to wrap that coal up just a bit nicely.  And…he’d likely add a bit of sweet to the coal too right?   Even naughty people have a little bit of nice inside…somewhere…I hope.

I’ve had this idea running around in my head ever since the Berry Basket die came out.  And finally…I made it happen.   I think I was waiting for the Black Glimmer paper to arrive to make it perfect.  In in case you are wondering…no…those are not Oreos!

Santa’s Coal Bin duo

Santa's Coal Duo 1

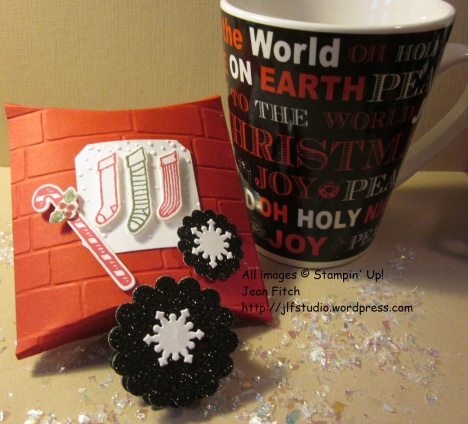
In my mind there just had to be a duo.    The bin where Santa stores the coal and the package it arrives in.   The cup is in there just in case Santa relents just a bit and adds a package of hot cocoa to go with the Pearson Mint Patties (sandwiched between the black glimmer paper coal covers).  You could even add a little packet of marshmallows and a candy cane (for stirring ) for your naughty one.

The images are a tad subtle (not).  The stocking of course indicate what the package goes in and the scallop black glimmer represents the coal (duh) and coming from the North Poke it just seemed likely that a snowflake might have attached itself to the coal.

My thought about the snowflakes was so that Santa could tell the real deal dark and dirty coal (to keep his elves warm) from the candy coal that will hopefully encourage the naughty ones to be a bit nicer in the coming year.

*******

Santa’s Coal Bin and Coal

Santa's Coal Bin - Candy Coals in a Berry Basket - Jean Fitch - Wacky Watercooler November Blog Hop

Supplies:

Stamps: A Little Something, Snow Place

Ink: Real Red Ink Pad, Cherry Cobbler & Old Olive Stampin’ Write Markers

Paper:  Real Red, Whisper White & Basic Black Cardstock & Basic Black Glimmer Paper

Punches: 1-3/4″ Scallop Circle

Other:  Big Shot, Berry Basket Bigz die, Snow Friends Thinlit dies, Square Pillow Box Thinlit Dies, SNAIL ,  dimensionals, glue dots, Sponge Daubers, Simply Scored Board.

As you can likely see the berry basket has a black glimmer paper edging and the mints have black glimmer paper covers (Scallop Punch)  as well as the white snowflake (from the Square Pillow Box die set).   What you might not see quite as well is that I lined the inside of the glimmer paper scallop strip with a real red strip to cover over the white background of the  glimmer papers underside.   I did something similar with the coal covers.   The backside of the glimmer paper being white I punched a second scallop from Basic Black cardstock and adhered it to the back of the glimmer scallop.   If you wanted to hide the candy treat inside you could also run a strip of Basic Black paper around the edging of the mint patty.

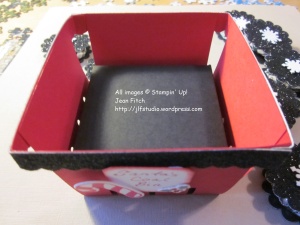
Something else you can’t see is the Basic Black cardstock riser I put in the bottom of the basket:

Berry Basket with Riser Insert

Coal Bin Riser in Place

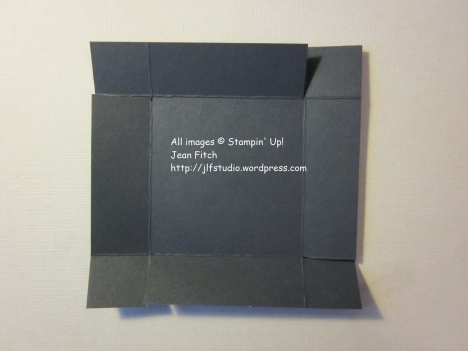
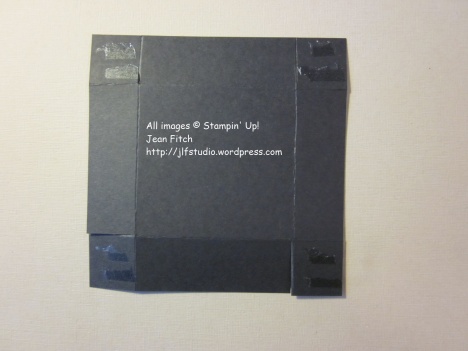
Very simple to make.   Take a 5″ x5″ square of Basic Black and score at 1″ all the way around.  Then clip on one vertical score mark per side up to the horizontal crossing score.  The add glue and fold under and create the mini box top/riser.

Riser Creation Tips

Here are a couple of pictures to help with understanding the riser construction:

Score, fold, cut…

Coal Bin Riser 1

 Add adhesive and fold under and attach….Coal Bin Riser 2

And here’s the riser ready to go in the basket

Coal Bin Riser


***********

Santa’s Coal Packaging & Coal

Santas Coal Bin Package and Cup

Supplies:

Stamps: Festive Fireside, Snow Friends

Ink: Real Red & Always Artichoke Ink Pads, Cherry Cobbler & Old Olive Stampin’ Write Markers

Paper: Real Red, Basic Black & Whisper White Cardstock , Black Glimmer Paper

Other: Big Shot,  Brick Wall Embossing Folder,  Softly Snowing Embossing Folder, Snow Friends Thinlit dies, Square Pillowbox Thinlits, Festive Fireside Framelit dies  , SNAIL , glue dots, dimensionals

***************************

In case you are wondering where I found the cup with the black background (perfect for coal accompaniment…not to mention hot cocoa) it appeared on the holiday specials shelf at Albertson’s.   A mere $1.59.   Pretty cool don’t you think?  Or should that be pretty coal?

Since Stampin’ Up didn’t see fit to make a Santa’s Coal Bin stamp this year (can’t imagine why not since I was planning this idea a year ago…hee, hee.)  I had to improvise with my trusty Cherry Cobbler Marker.   For the more tech minded among you a word processor and Whisper White paper would make a lovely version.   Normally I would have pulled out a punch for my labels but this year the Square Pillow Box die comes with labels in two sizes.  Also comes with a candy cane die and many wonderful bits and pieces to die cut with.

I also drew images and die cuts from Festive Fireside and Snow Pals stamps and dies.   I love how I can reach into my various Holiday Catalog products and find combinations that work beautifully together.   All the more reason to check that retiring list not once but twice…trust me when I say…you are going to want it all!

*******

I encourage you to play with these fun new products that I’ve show today.  As you can see they coordinate with products you may already have or can find in the Annual Catalog.    After all…even the naughty ones on your list might appreciate something fun.  {grin}

*******

That’s it for my share of the hop.  Time to move on over to my longtime friend  Buffy’s blog her wonderfully inspired creations are always fun to see and CASE.  And if you are lucky you may get a peek at her sweet and lovely granddaughter Amelia!

To follow the hop click on the link below:

next watercooler crock button

Home Button

Previous Button

Watercooler Wednesday Challenge – WWC41 – Going 3D – My Paper Pumpkin Flower Card Box

WWC41 – Jackie’s October Sketch Challenge

WWC41 jackie nov 4 sketch

Welcome to this weeks Watercooler Wednesday Challenge.  Jackie threw us another fun sketch to play with this week.  Since Jackie’s Sketch was the perfect jumping off point for my design as viewed from the top my mind renamed it – 3D Paper Pumpkin meets Jackie’s sketch.

Ever since I saw the newest Paper Pumpkin Kit (October 2015) my mind knew those lovely cards needed a box to present to some lucky someone and Jackie’s Sketch gave me the direction.   I don’t know about you but for me this is one of the coolest Paper Pumpkins I’ve played with.  Of course most months I tend to say that.  LOL

**********

WCC41 -Jean's October 2015 Paper Pumpkin Flower Card Box - Jean Fitch

Here’s a close up of the butterfly detail.  I used some bits from the gold leaves to make the antennae and body highlight of the butterfly.

WWC41 - butterfly detail

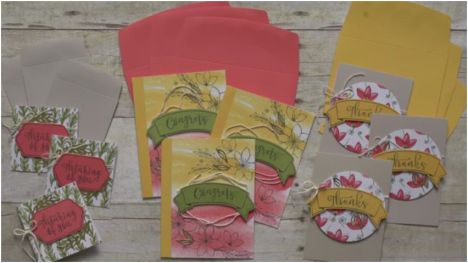
In case you were wondering what pieces I had to play with in Octobers kit here’s a picture:

October 2015 Paper Pumpkin Refill Kit Contents

And here are some of the cards as Stampin Up designed them that could fit in this lovely box:

October 2015 Paper Pumpkin Cards

And the very cool stamps that came with the kit:

Blissful Bouquet October 2015 Pumpkin stamp set

Much as I liked the sentiments in the kits set I needed something a tad smaller that allowed me to place the words on the somewhat narrower banner strip.   I turned to Sheltering Tree.  Another photopolymer set that can be curved on the block and fit perfectly.  I did use the Basic Gray ink that came in the kit.  In person it gives the images a lovely soft look.

I went old school in creating my box from two pieces of paper scored all the way around (more details below).  The same technique crafters have been using for decades (if not longer).   Now that I’ve made one with this design, I can see some possibilities for alterations that I’ll have to try in the future (yes, I CASE myself sometimes)….which of course means I’ll have to get another refill kit or two.  😀

I  love that Stampin’ Up often offers refills for the none stamp and ink components of the kits available for a remarkably low price.   Everything but the stamps and ink spot for $8.00 here in the States.  Not bad for 9 cards and envelopes right?  Of course they are only available while supplies last.  You can see the various past kit refills here.  Add a few more bits from your stash and you’ll be able to get way more cards than that from the components.   I’ve been tracking lots of other stampers alternate creations on my Paper Pumpkin Pinterest Board here.   And if you want to see the kit in action you can view Stampin’ Up’s video about the kit here.   I’ll be sharing various and variations on card designs from the kit over the next little while as I find the time to play with all the bits and pieces.

Of course if you want to get signed up with Paper Pumpkin in time for the November Kit you can do that here.  Just make sure you do it on or before November 10th unless you want to wait yet another month to get in on the fun of Paper Pumpkin.   Each month it’s a new and different kit with stamps, ink and the pieces to make a variety of cards, tags and occasionally something a bit more 3D as well.  More details are available on the Pumpkin site so make sure to click the link above.

Supplies:

Stamps: Blissful Bouquet (October 2015 Paper Pumpkin Stamp Set), Sheltering Tree (sentiment)

Inks:  Basic Gray

Paper: Calypso Coral, Sahara Sand & Vellum Cardstock.  Papers and elements from the October 2015 Paper Pumpkin Kit.

Tools & Adhesives:
Big Shot,  Bold Butterfly dies,  Simply Scored Scoring Board, SNAIL, dimensionals, Sticky Strip

*******

Measurements and Details for the basic box:

The card box is really easy and perhaps old school in this day of special boards and dies.  Two sets of measurements.  One piece for creating the top and one piece for creating the bottom of the box.

Top: 6-5/8″ x 7-7/8″  – Score 1″ on all 4 sides

Bottom: 6-1/2″ x 7-3/4″  – Score 1″ on all 4 sides

After you score each piece at 1″ on all four sides you’ll want to use your bone folder to crease and fold on all the score lines (do each side separately).  Then cut two slits up from the bottom to the crossing score line on both of the longer sides on both pieces.  Place Tear and Tape on both smaller tabs and fit into the long side.   Here’s a basic template.  Click on the picture to see a larger view.

Basic Card Box Template

And the inside:

Basic Card Box interior

If you look in the lower right hand corner you can see where the tab fit into the longer side.  As you may be able to tell, the top (on the right) is just a slight bit larger than the bottom for an easy fit.

**********

That’s it for this challenge.  To see the rest of the design teams creations from Jackie’s Sketch Challenge head on over to the Challenge blog website here.   That’s also where you can add your own creation with the linky doodad.  When you add your own design and there are more than three entries, one of you will be a challenge winner or runner up and have the option to place our new badges on your own site.  Of course…you’ll also win bragging rights!

We had 5 wonderful linky posts this last time so there is a winner and a runner up for the last challenge.   Check out our winners here.  And check this post out so you can see the wonderful additions by all the challenge participants. Check the challenge site for rules on competing for future challenges.

I hope you’ll join us next Wednesday for yet another Watercooler Wednesday Challenge.

Hugs and Blessings to all my challenge friends and readers.

Jean Fitch in pink


Watercooler Wednesday Challenge – WWC36 – Fashion Forward Witch’s Hat

WWC36- 3D – Your Choice

3D challenge 5th week special

Welcome to the Watercooler Wednesday Challenge.   This time around, since there is an extra Wednesday in September, we’re throwing it open for any 3D project of your choice.

**********

This is my take on a fashion forward witch or pilgrim hat. Of course a pilgrim wouldn’t have gone for all that bling so likely would have been kicked out of the pilgrim clan…or possibly burned as a witch (those Puritan Pilgrims were a really cranky lot). So really…it all moves in a circle from pilgrim to witch if she dared to be fashion forward.

WWC 36 -Fashion Forwad Witch Hat - Jean FitchFront of Wedge View

WWC36 - Fashion Forward - Witch Hat side view - Jean FitchSide of Wedge view

This is a really fun triangle box (I think of it as a wedge box myself) that you can fill with the treats of your choice.  Bigger than you might think too.  It tapers from a height of 2″ at the top of the hat down  to the thinnest of wedge at the bottom.  I think of this version as a wedge witch hat.   Last Easter I created a chicken from a similar design and come Christmas will be making a Santa “wedge” as well.   I can see I’ll have to make a seasonal collection to show some time in the future.

A warning about this box…once you get the hang of it and have all your materials laid out they go together quite quickly (about 15 minutes) and are highly addicting. 😀

Supplies & Measurements:

4 ½” x 11” Basic Black Cardstock
1” x 5-1/4” Basic Black cardstock
3/4” x 4” Go Wild Designer Series Paper Stack
¾” x 3/4” Go Wild Designer Series Paper Stack
1-1/4″ x 1-1/4″ Gold Glimmer Paper
10” Gold Cording (Holiday Catalog) &  8″ Gold Sequin Trim
Crop-a-Dile
Scissors
SNAIL Adhesive

Stamps:  No stamping!  Gasp!

To see the basics of how this was made check out Julie Davison’s post  here.  Julie shared this idea with video and a PDF tutorial a couple of years ago and I’ve had it on my CASE (copy and share everything) list since then.  Finally made it!

Something I did a tad differently was to cut my DSP band to 3/4″ x 4″ and I cut my “buckle” as a 1-1/4″ square since I wanted to stick with all current product.  Besides…the square just seemed a tad more high fashion for my fashion forward version. {grin}   The inside Go Wild paper square is a 3/4″ square.

Lovely thing about this box…no real adhesive needed except to adhere the paper strips and buckle.  The sides themselves…no glue!   Once you have your hat (wedge) completed just use a crop-a-dile at the top sides and thread through some ribbon or cording to hold the box together.  Makes it easy to get the treats out without destroying the box.

Go ahead and make some for the pilgrims, wizards or witches in your life.   Of course you can also make one for anyone with a sweet tooth!   And…believe it or not…you can even cram a thin silk scarf into the box.

**********

That’s it for this challenge.  To see the rest of the design teams 3D contributions head on over to the Challenge blog website here.   That’s also where you can add your own creation with the linky doodad.  When you add your own design and there are more than three entries, one of you will be a challenge winner and have the option to place our new winner’s badge on your own site.  Of course…you’ll also win bragging rights!

We had 11 linky posts this last time so there is a winner and a runner up for the last challenge.   Check out our winner here.  And check this post out so you can see the wonderful additions by all the challenge participants. Check the challenge site for rules on competing for future challenges.

I don’t know about you but I’m jazzed about the increasing number of participants in our Watercooler Wednesday Challenge.  You guys are really upping the quality too.  Thanks for playing along.   And I hope you’ll join us next Wednesday for yet another Watercooler Wednesday Challenge!

Hugs and Blessings to all my challenge friends and readers.

Jean Fitch in pink

August Wacky Watercooler Blog Hop: Showcasing Sprinkles of Life and a CASE

August 2015 Banner

Welcome to the Wacky Watercooler

August Blog Hop.

Hopefully you’ve arrived from  the wonderful and always inventive Miss Gail.    As usual you can follow this hop in a circle going either direction.  Of course you can also return to the home hop site if you ever get lost along the way.

Do You love sprinkles, life and stamping?

I do!

Then what better kind of hop than one that features a stamp set that covers all three things!

Sprinkles of Life catalog image

Whether it’s sprinkles of raindrops, sprinkles on a cupcake or a sprinkle of flowers…I love sprinkles.  And life for me includes the joy of stamping.   So of course when Stampin’ Up introduced a new Ronald McDonald set called Sprinkles of Life…and added a matching punch…I fell fast and hard in love with both the stamps and the punch!

I love too that Ronald McDonald House Charities also scores with a $3 donation for each set sold (hint, hint…buy it now!).  If you haven’t heard of RMHC it’s a wonderful endeavor that offers housing and help to families who have children in hospitals in various cities throughout North America.  Some houses even have Stampin’ Up demonstrators who take on various projects in the house including providing cards and stamping events to help lessen the stress.

*******

My first Sprinkles of Life original creation….

 Trees in a Box

Trees in a Box - August 2015 Watercolor Hop - Jean Fitch - Sprinkles of Life stamp set, Tree Builder Punch

This fancy fold is referred to as a Card in a Box.  There are any number of tutorials available though our own Watercooler alum Heidi Weaver has one here.   I’ve adjusted it just a wee bit (making it 5″ tall so I can have some extensions above the back of the box and scoring at 2-3/4″ instead of 3″).

If you are wondering how you mail this…here is the secret of this very cool type of fold.   It folds flat to mail and then pops back out to its 3D loveliness.   Warning…because of the extra thickness you will need to add extra postage.   Oh…and there is an area on the back of the tall back piece where you can leave your message and any watermarking you want to add.

Sprinkles Card in a Box - fold flat - August 2015 WWC hop - Jean Fitch

Here are a few other angles to give you the whole picture:

(click on the pictures to see a larger view)

Sprinkles Card in a Box side - Wacky Watercooler August 2015 Sprinkles of Life hop - Jean Fitch

Sprinkles in a box - detail - Wacky Watercooler August 2015 Sprinkles of Life hop

Note to self…do not work with Red and Green together in future…or else get a proper light box before Christmas!   Turns out those two colors in combination are among the hardest to get an accurate picture of and the background colors for the camera work play a major role as well.   For instance…in the above picture the text is stamped in Real Red…but it looks pink (as in Melon Mambo)!  And the greens are also much darker than they look in the picture.  More Garden Green…less the look of Pear Pizzazz.   The birds actually are pink cardstock but with Real Red ink to provide the outline.

Supplies:

Stamps: Sprinkles of Life

Ink: Real Red, Garden Green, Early Espresso

Paper:  Wild Wasabi, Real Red, Pink Pirouette, Whisper White, Crumb Cake, Early Espresso

Punches: Tree Builder, Scallop Oval

Other: Big Shot, Simply Score, Paper Snips, SNAIL, Tombow multipurpose adhesive glue, Dimensionals, glue dots.

***************************

My second Sprinkles of Life original creation….

Flipping for Sprinkles Card

Flipping for Sprinkles - August 2015 Wacky Watercooler Hop - Sprinkles of Life - Jean Fitch

Flipping for Sprinkles - inside - August 2015 Wacky Watercooler Hop - Sprinkles of Life - Jean Fitch

This is my version of Clean and Simple…sort of.  Not much in the way of layers…and pretty much just ink and paper.

A tad hard to tell (though if you click the picture you’ll get a better view) but the hello from the Greetings Thinlits is doubled with two colors.  The outline at the back is Soft Suede and the top layer is Early Espresso.  Can you tell my hankering for chocolate came out in this card.  All that’s missing is a caramel filling. 😀   And once again… it’s hard to tell that the flowers & text are Real Red.   And the greens are also darker.

Supplies:

Stamps: Sprinkles of Life, Trust God

Ink: Real Red, Soft Suede, Crushed Curry, Garden Green, Wild Wasabi

Paper:  Real Red, Whisper White, Soft Suede, Early Espresso

Punches: 2″ Circle, 2-1/2″ Circle

Other: Big Shot, Large Polka Dot Embossing Folder,  Greetings Thinlits, SNAIL or Tombow multipurpose adhesive glue, Glue dots.

*******

And lastly… we are also CASEing (Copy & Share Everything) the new Annual Catalog yet again… a popular feature of our hops.

The Stampin’ Up 2015 catalog image for my CASE is this one:

2015 Annual Catalog page 18 - Watercolor Thank You

2015 Annual Catalog page 18   –   Watercolor Thank You

And here’s my altered version:

(click to view a close up)

Watercolor Thank You CASE the catalog - 2015 August Wacky Watercooler Hop - Jean Fitch

The concept and layout is still basically the same but the colors, textures and an extra layer are all mine. 😀 I moved from the originals Crumb Cake to Tip Top Taupe.  And from flowers to hexagons for my background.   I love working with the new In Colors and of course black and silver are the perfect accompaniments to the subtle colors in the collection.

Supplies:

Stamps: Watercolor Thank You

Ink Memento Tuxedo Black

Paper: Tip Top Taupe, Mint Macaron Cardstock.  Pretty Petals Designer Series Paper Stack

Punch: Banner Triple

Other: Big Shot, Circle Collection Framelits, Honeycomb Embossing Folder,  Silver Metallic Baker’s Twine, SNAIL, Dimensionals.

**Thanks Stampin’ Up for creating such wonderful catalog samples and super tools to CASE with!**

*******

And thank you for coming along for the hop ride.  That’s it for my stop on the hop.  Time to move on over to Miss Jaylin’s, she’s a young demo wanna be with a creative outlook and sweet projects she puts together from her demo grandmother’s stash of materials.

Thanks for Hopping with the Watercooler Gang!

Jean Fitch in pink

To follow the hop click on the link below:

next watercooler crock button

Home Button

Previous Button

WCC30 – A Cup of Cheer in 3D

  WCC30 Susan’s 3D Challenge

Welcome to a new Challenge.

This time around we are doing 3D!


WCC - Susan's 3D Project

 **************

Whatever trips your trigger as a friend of mine likes to say…if it has several sides or depth to it…you’re in.   And we hope you will join us in submitting your very own 3D creation here.

Here’s my simple 3D treat holder:

WCC30 - Susan's 3D Challenge - Jean Fitch

And a side view so you can see how it all fits together.

WCC30 - A Cup of Cheer - Side View - Jean Fitch

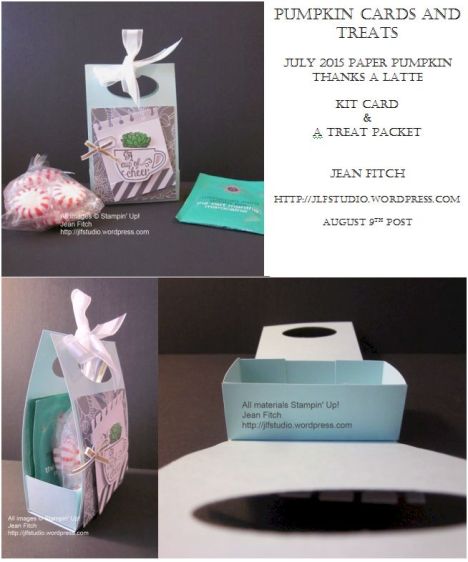
Do you remember this little treat or card holder?  People have been making them for over a decade (possibly more).   Perfect for little gift cards just under 3″ wide and about 3″ – 4″ tall.    Or in this case a little package of teas and sweets…perfect for someone recovering from a cold or flu or other malady.

I’ll let you in on a secret that I discovered years ago…the tea in the picture is Moroccan Mint tea from STASH.  That tea is a wonder drug all on it’s own.  Whether for morning sickness or the upset stomach and dizziness you get from chemotherapy this stuff is magic!   And I can guarantee you that it tastes just like the mint tea that I had in Morocco back in 1975.   The only brand I’ve found that does.  I’m not sure if it’s the lemongrass or the blend of various mint teas or the combination but this stuff is powerful…and very good tasting.   Fun to suck on a peppermint too and hold it in your teeth while you drink the tea through it.   Just don’t let the mint go down the wrong way.  Yeah…been there…done that.

And yeah…I should probably add the disclaimer that I’m not a doctor and take my suggestion with a grain of sense and salt.  It may not work for everyone as I’ve described but I’ve given it to many, many people for whom it did work and used it myself.   And no…I don’t work for STASH or get a commission.  LOL

Are you wondering yet where the stamps and several of the papers came from?   My latest (July) Paper Pumpkin is the source.  Three wonderful sentiments, the cup, tea bags, steam and the plants that you’ll be able to use when the kit contents are gone.    Have you tried that monthly pumpkin delight yet?  Trust me…you will want to.   Especially…because…drum roll please…you can get two months right now for 50% off!

Contact your demonstrator (I’m available if you don’t have one already Click the highlighted text to sign up :D) and ask them about the 50% off offer.   It’s available until September 10th.   Want the August Kit…sign up by August 10th…get going…what are you waiting for…today is the 9th!!!

Here are a few other views of the inside with it open and treats removed.

 Click on the images to see a larger view


WCC30 - A Cup of Cheer interior

WCC30 - Cup of Cheer - inside box

Supplies:

Stamps: My Paper Pumpkin July 2015 Kit – Thanks a Latte

Ink:  Early Espresso, Cucumber Crush

Paper: Pool Party, Paper Pumpkin Kit papers and stickers

Punches: Large Oval

Other:  Clip from kit, 1/8″ Gold Ribbon, Whisper White Organza Ribbon, Small Cellophane bag,  tea bags, Stampin’ Trimmer, Dimensionals, SNAIL

It’s a fairly simple construction that you can adapt to any size.   In this case a 3″ x 11″ strip of cardstock that is scored at 4-1/2″ and 6-1/2″.  Use the large oval punch to create the handles near the top.   The small box is 4″ x 5″ and scored at 1″ all the way around on all sides.  Cut along the score line up to the other score line on two sides at both ends.  Fold and crease along score lines and adhere tabs as needed to form the box.   Adhere bottom of box to the inside score area of the long cover piece.  Decorate…tie some ribbon to hold the handles in and fill with your desired contents.

Thanks a Latte Treat Packet


************************

Please join the rest of the design team over at the Challenge blog website here to see the rest of the teams designs and to add your own with the linky doodad.  When you add your own design and there are more than three entries, one of you will be a challenge winner and have the option to place the winner’s badge on your own site.  Of course…you’ll also win bragging rights!

That’s it for this challenge.   You can see the winner for the linky added projects for the last challenge here.  It was a hard choice as all the entries were wonderful.  If you haven’t looked already…take a look here.  You’ll be inspired.   I also hope this time you’ll join in the fun and grab a friend or two as well and get creating!  Check the challenge site for rules on competing for this and future challenges.

Hugs and Blessings to all my friends and readers.

Jean Fitch in pink