Watercooler Wednesday Challenge – WWC72 – Balloons That Shake Rock and Roll to Celebrate

WWC72 – Jean’s In Color Color Challenge

Watercooler Wednesday Challenge Graphic - WWC72 Jean's In Color Color Challenge - new in colors

Welcome to this weeks Watercooler Wednesday Challenge.

Today I’m asking you to play along with Stampin’ Up’s newest batch of In Colors.  A fun set that has a color name that includes my favorite material…Denim!   I’m not sure that denim qualifies as dapper but since the name includes denim…I’ll take it!

Create your own design or CASE (copy and share everything) from the challenge artists or wherever you find your inspiration.  Play with all 5 colors or with the 3 or 4 favorites you have in your studio.  Are you feeling Flirty?  Seeing Sugarplums in your dreams?  Down with Denim?  Whatever your preference grab 3 or 4 (or more) and get down and inky.  On your mark…get set…go!


**********

 Balloon Punch Shaker Card

(as always click the pictures to see larger images)

Watercooler Wednesday Challenge - WWC72 - Jean's In Color Color Challenge - Jean Fitch - Bitty Balloon Punch Shaker Card - Thoughtful Banners Stamp Set

Here’s a close up of the shaker element:


Watercooler Wednesday Challenge - WWC72 - Jean's In Color Color Challenge - shaker detail - Jean Fitch

And the inside of the card.

Only needs a name and a word or two to be good to go.  And gives proof that I used all 5 of the new in colors!

Watercooler Wednesday Challenge - WWC72 - Jean's In Color Color Challenge - Bitty Balloon Punch inside of card - Thoughtful Banners Stamp Set

Can you tell I’m not letting go of the small retired balloon punch?  Yep…it’s just too perfect.   Especially for adding to the shaker bits.  Covers up a few little inky boo boo’s too.  Nope…not saying where they are.  {grin}

Supplies:

Stamps: Thoughtful Banners, Build a Birthday

Inks:  Dapper Denim, Emerald Envy, Flirty Flamingo, Peekaboo Peach, Sweet Sugarplum

Paper: Dapper Denim, Emerald Envy, Flirty Flamingo, Peekaboo Peach, Sweet Sugarplum, Thick Whisper White Cardstocks.   Window Sheets.

Punches: Bitty Balloon from the Party Punch Pack (retired from the 2016 Occasions Catalog)

Tools & Adhesives:  Big Shot, Lots of Layers Framelit Collection,  Metallic Sequins Assortment, Foam Adhesive Strips,  SNAIL.

Technique:  Shaker Card

Cost without envelope: Approx. 40¢

*********

I’ve gotten so addicted to shaker cards lately.  With the new foam adhesive strips they are just so easy.  Now when an idea strikes I can grab the strips and go!  My only limitation?  Keeping enough sequins and window sheets on hand!  Of course if the sequins run out I can use my various punches (especially the confetti stars and hearts punches) to create what I need.

Not sure how a shaker card goes together?  Stampin’ Up has created a video that explains the role of the strips and the basic idea here.   I did a couple of different steps on mine.  I used the Embossing Buddy to take down the stickyness of the sides of the strips (or I would have if I had remembered that step.  LOL) and…I built my shaker on the top of the card base front instead of on the inside of the card.  I feel that makes a neater presentation and adds a bit of height/texture to the card itself.  However you do it…it’s a fun presentation for the recipient.   If you choose the top down approach you’ll add the strips to the back side of your shaped cover/window combo.  Stamp on your card base and pile the shaker bits on top of the stamping and place the window combo piece directly on top.  One other tip…before you add the window sheet piece and strips you can flip the cover piece so the backside is facing up and use that “window” as a mask to stamp your images through without getting ink on the front side.  Easy peasy once you get the hang of it.   I’ll try to put a pictorial tutorial together so you can see the basic steps.   Probably will be a week or two for that since the Watercooler gang has a Blog Hop coming up this Thursday.  Stay tuned for that Hop…it’s shaping up to be a doozy what with all the new product available to play with.  And…there will be another shaker card creation I’ll be sharing during the hop (see the method to my madness with the lateness of the tutorial now?).

*********

That’s it for this challenge.  To see the rest of the design teams In Color Color Challenge contributions head on over to the Challenge blog website here.   That’s also where you can add your own creation with the linky doodad.  When you add your own design and there are more than three entries, one of you will be a challenge winner or runner up and have the option to place our new badges on your own site.  Of course…you’ll also win bragging rights!

Check here to see the winner of last weeks challenge.  And here to see all the other linky and Artist Team entries.  Check the challenge site for rules on competing for future challenges.

I really hope you will add your own creations this week.  Really…this challenge is an easy one.  Grab your colors and play!

I hope you’ll join us next Wednesday for yet another Watercooler Wednesday Challenge.

Jean Fitch in pink


Save

Watercooler Wednesday Challenge – WWC70 – Sketch of Gratitude

WWC70 – Marsha’s  Sketch Challenge

Watercooler Wednesday Challenge - WWC70 - Marsha's Sketch Challenge

Welcome to this weeks Watercooler Wednesday Challenge.

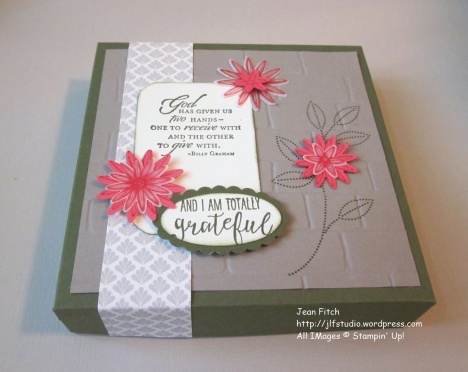
Today’s challenge is a sketch shared by my dear friend Marsha.  I’m sure it will come as no surprise to her that I had to do something just a tad different.  Instead of a card…I created a box to fill with cards.  I also took a few liberties with the sketch.  As you will see the basic sketch is present but I added an embellishment or two in the shape of extra flowers.  My theory was that flowers = pearls and sequins that others added to their cards.  What to do you think…was I stretching the envelope?  Or the sketch?   Sorry about that Miss Marsha. 😀

As you might have guessed by the title I decided to play with the Grateful Bunch Bundle that first appeared in the 2016 Occasions Catalog and whose components (punch and stamp set) are available as individual components in the new 2016-2017 Annual Catalog from Stampin’ Up!

Expressing gratitude has been much on my mind of late (note to readers…I’m very grateful for you!)

Lately I’ve been finding myself very grateful for my family doctor and the help he’s been in sorting out my chronic health problems.  After working on masculine cards for recent challenges and in anticipation of Father’s Day I’ve been in a masculine creative mood so I thought I’d create something to share my gratitude with my doctor that he and his family could make use of as needed.  After all…who couldn’t use a supply of cards right? 😀

He’s a real upbeat kind of guy who’s always positive, life affirming, big on nutrition and yoga and other forms of creative living.  One who gives as easily as he receives…or so it seems to me.   He even gets up with his little ‘uns when they have a sleepless night (now that’s my idea of a dad).  I’m hoping this  box of cards will reflect all that.

**********

 Grateful Bunch Card Box

Holds several 4-1/2″ square cards

(as always click the pictures to see larger images)

WWC70 - Marsha's Sketch Challenge - Gratitude Card Box - Jean Fitch

WWC70 - Marsha's Sketch Challenge -Gratitude Card Box Side view - Jean Fitch

And here’s one of the cards inside:

Watercooler Wednesday Challenge - WWC70 - Marsha's Sketch Challenge - card for Gratitude Card Box - Jean Fitch

As you can see I kept the card fairly simple but reflective of the box design.  Perfect don’t you think for a coworker who goes above and beyond?  One of the lovely things about a 4 1/2″ square card is that it also fits in a standard envelope.  Saves on postage if mailed.

Watercooler Wednesday Challenge - WWC70 - Marsha's Sketch Challenge - Card Box Set - Jean Fitch

Supplies:

Note:  Several of the items listed are retired as of today.  Sorry about that but at the time of creation they were still active so naturally my hands reached for the things I love!

Stamps: Grateful Bunch, Trust God (retired)

Inks:  Mossy Meadow (retired In Color), Watermelon Wonder

Paper: Mossy Meadow (retired In Color), Watermelon Wonder, Tip Top Taupe, Very Vanilla and Vellum Cardstock  & Timeless Elegance Designer Series Paper (retired).

Punches: Blossom, Corner Rounder, Large Oval (retired), Scallop Oval (retired)

Tools & Adhesives:  Big Shot, Brick Embossing Folder,  Simpy Scored, Paper Snips, Bone Folder, Tear n’ Tape, Dimensionals, Glue Dots, SNAIL.

*********

Fairly straight forward construction details.  The Simply Scored scoring tool is perfect for box construction as well as scoring cards for folding.  So many uses it’s a required tool in my studio that’s for sure.

Box was created in the same old fashioned way I outlined in this post.  Creates a 5″ square box to hold my 4-1/2″ square cards and slightly bigger envelopes.

Top: 7-1/4″ x 7-1/4″ square

Bottom: 7″ x 7″ square

Score at 1″ along all four sides for each piece.  Snip up to score line on both corners on opposite sides.  Add pieces of Tear n’ Tape to the corners and fold to the inside.  Burnish with bone folder to activate the adhesive to its strongest stick.

Once the box is completed:

Brick embossed layer – 4-3/4″ square – Stamp leaf stem image in Mossy Meadow on Tip Top Taupe then emboss using Big Shot and the Brick folder.

DSP strip: 1-1/4″ – cut at 7-1/2″ and adhered from center of box with ends cut to measure after adhered to box.

Sentiment layer: 2″ x3″ Corner rounded and stamped in Mossy Meadow with Trust God sentiment.

Scrap Vanilla: Stamp sentiment from Grateful Bunch in Mossy Meadow ink and punch with oval punch.  Sponge edges with sponge dauber and Mossy Meadow ink.   Adhere to Mossy Meadow Scallop Oval punched piece.

Flowers: Stamp flower image in Watermelon Wonder ink on Watermelon Wonder Cardstock and Vellum Cardstock.  Punch with Blossom Punch.  Adhere to box (make extra for cards!)

Hopefully the full assembly is easy to see from the pictures of the finished project.

*********

That’s it for this challenge.  To see the rest of the design teams Sketch Challenge contributions head on over to the Challenge blog website here.   That’s also where you can add your own creation with the linky doodad.  When you add your own design and there are more than three entries, one of you will be a challenge winner or runner up and have the option to place our new badges on your own site.  Of course…you’ll also win bragging rights!

Check here to see the winner of last weeks challenge.  And here to see all the other linky and Artist Team entries.  Check the challenge site for rules on competing for future challenges.

I really hope you will add your own creations this week.  Really…this challenge is an fun one.  After all the design layout is done for you.  All you have to do is grab your colors and stamps and get creating!

I hope you’ll join us next Wednesday for yet another Watercooler Wednesday Challenge.

Jean Fitch in pink


Save

Save

Save

Save

Save

Save

Watercooler Wednesday Challenge – WWC68 – Angel on Deck

WWC68 – Libby’s Color Challenge

Libby's Color Challenge

Welcome to this weeks Watercooler Wednesday Challenge.

Today we not only have a new challenge…but we also have a new guest artist.  Yay.   Fiona Whitehead has come out to play with us today.  Fiona has entered several challenges here in the Watercooler and we were all so wowed by her talent we just had to arrange a playdate!   Thanks Fiona for joining us and taking up the challenge as a guest designer.  Looking forward to seeing what you have for us today.

Also today…Libby gave us another “official” chance to play with the retiring set of in colors.  I’m still not sure how I’ll survive their retirement.  Sigh…there are just some colors that reach in and grab your soul.    Of course being the color fanatic that I am I just had to accept the challenge to work with all five outgoing colors.  Libby told us we only had to use 3 but then she added…we could use more if we wished.  So….yep…I wished!

See if you can find all five in my creation below.

**********

 In Colors Baby Wipe Technique Part 2

(as always click the pictures to see larger images)

Watercooler Wednesday Challenge - WWC68 - Libby's Color Challenge

Here’s another somewhat lighter picture.  The actual real life card is somewhere in between.  For some reason the digital camera picks up more white space than actually appears on the card and muddies the colors a bit more than they really are.  Loving the bit of textured look the watercolor paper gives the colors and the embossing.

On another topic.  Do you know how hard it is to type watercolor in the same post as watercooler.  Boy is that a challenge!

WWC68 - Libby's Color Challenge Natural Light watermarked

Supplies:

Stamps: Kinda Eclectic (gold leaves)

Inks:  Blackberry Bliss, Hello Honey, Lost Lagoon,  Mossy Meadow, Tangelo Twist, Versamark

Paper: Blackberry Bliss Cardstock, Watercolor Paper, Gold Foil

Punches: None

Tools & Adhesives:  Big Shot, Big Shot Die Brush, Botanical Builder Framelit dies, Heat Tool, Gold Embossing Powder,  Basic Jewel Pearls, Gold marker to color pearls, Fine Dimensionals, Glue Dots, SNAIL.

*********

Believe it or not this inking is a retread of a baby wipe pad I made several weeks ago for the April Watercooler Blog Hop you can see here.  I stored the “ink” pad I created in an old acrylic clamshell stamp case and it’s still juicy!

Of course the colors have melded and melted together a bit more.  Not the same defined stripes I had before.  But…that worked to my advantage with the technique I used.

I just spritzed the watercolor paper then placed it over the “pad” and tapped around it with my fingers. Moved it and tapped some more. Kept repeating until I got the look I wanted. Dipped the edges a bit to get a nice line of color along them and then gold embossed the leaf image from Kinda Eclectic in a few places.   Cut the fern looking leaves and some flowers from the Botanical Builder dies attached…colored the pears and added those.   Now I just need to find my Trust God stamp set so I can add the God Bless You sentiment.

This card is intended for a very special young lady who gave me the perfect gift on a day when I very much needed it.   Saving that story for another day as it’s time to hop on my way to a bit of a rest so I’ll be bright and bushy tailed for a new class at my local health center this afternoon.

*********

That’s it for this challenge.  To see the rest of the design teams In Colors for Libby’s Challenge contributions head on over to the Challenge blog website here.   That’s also where you can add your own creation with the linky doodad.  When you add your own design and there are more than three entries, one of you will be a challenge winner or runner up and have the option to place our new badges on your own site.  Of course…you’ll also win bragging rights!

Check here to see the winner of last weeks challenge.  And here to see all the other linky and Artist Team entries.  Check the challenge site for rules on competing for future challenges.

I really hope you will add your own creations this week.  Really…this challenge is an easy one.  Grab your colors and play!

I hope you’ll join us next Wednesday for yet another Watercooler Wednesday Challenge.

Jean Fitch in pink


Watercooler Wednesday Challenge – WWC65 – Anything Goes Has Rose Wonder Blues

WWC65 – Anything Goes Challenge

Watercooler Wednesday Challenge - WWC65- Anything Goes

Welcome to this weeks Watercooler Wednesday Challenge.  Today Anything Goes.  Don’t you love days like that…when anything is possible?  Well…as far as the challenge goes…today…anything goes!   The rest of your day/week is totally up to you and the other rules in your life.  {grin}

**********

Since anything goes today….I decided that some die cuts that have been sitting on my desk needed a bit of sponging.   Heidi got me going with our Spring CAS challenge last week and I had seen a fun design by Leonie Shroder last winter that got me going.   Nothing much simpler than a bit of sponging and then add the sponged die cuts to the card.   Made me feel as if I was Spring Housecleaning what with cleaning odds and bobs from my desk and throwing in a bit of sponging to boot.

Rose Wonder Blues

(as always click the pictures to see larger images)

Watercooler Wednesday Challenge - WWC65 - Anything Goes - Floral Sponging

Hm…just occurred to me…this card would make quite a nice Mother’s Day card don’t you think?  Or just about any occasion with an appropriate change in sentiment.

Supplies:

Stamps: Rose Wonder, Suite Sayings

Inks:  Night of Navy, Rose Red, Pink Pirouette, Melon Mambo, Perfect Plum, Blushing Bride, Soft Sky, Pacific Point, Pear Pizzazz, Old Olive

Paper: Soft Sky, Whisper White (thick and thin), Shimmer White Cardstocks

Punches: None

Tools & Adhesives:  Big Shot, Rose Garden Thinlit Dies, Big Shot Brush and Pad, Sponge Daubers, 2-Way Glue, Snail, Basic Jewel Pearls

Technique:  Sponging on Shimmer Paper

Cost per card: 48¢ + envelope – as shown without pearls

PDF Directions Created by Jean:  Watercooler Wednesday Challenge – WWC65 – Rose Wonder Blues with Shimmer Paper

*********

I’m happy to note that both stamp sets used here (Rose Wonder & Suite Sayings) and the Rose dies will be available in the new Annual Catalog going live in June.  They’ve turned out to be popular with me…and my customers.   But why wait until then.  The Rose Wonder stamps and dies are being offered now in the Occasions Catalog at 15% off.  Can’t beat that deal.

*********

That’s it for this challenge.  To see the rest of the design teams Anything Goes Challenge contributions head on over to the Challenge blog website here.   That’s also where you can add your own creation with the linky doodad.  When you add your own design and there are more than three entries, one of you will be a challenge winner or runner up and have the option to place our new badges on your own site.  Of course…you’ll also win bragging rights!

Check here to see the winner of last weeks challenge.  And here to see all the other linky and Artist Team entries.  Check the challenge site for rules on competing for future challenges.

I really hope you will add your own creations this week.  Really…this challenge is an easy one.  Anything you have completed that hasn’t yet been shared online qualifies.  Easy peasy!

I hope you’ll join us next Wednesday for yet another Watercooler Wednesday Challenge.

Jean Fitch in pink


Wacky Watercooler Blog Hop: April’s In Color Filled Hop

 April 2016 Banner

Welcome to our April Blog Hop

This month we are focusing on the retiring In Colors as well as a special “CASE the Watercooler” feature.

Hopefully you’ve arrived from  Marie’s blog.  I love Marie’s creative work as well as the name of her blog.  Tanglewood Cottage just sounds like some place I want to settle in with a cup of tea, a good book and creative and crafty work.  The perfect description I’m sure.

As usual you can follow this hop in a circle going either direction.  You can return to the home hop site if you ever get lost along the way.

*******

First up is a duo with gold in common but shown in different color ranges.

Golden Number of Years

Golden Number of Years - Wacky Watercooler April 2016 Blog Hop - Jean Fitch - Number of Years and Something to Say stamp setsTwo cards for the price of one picture. {grin}   I was running out of the Mossy Meadow version of the paper and decided to see what else would work with this design.  I rather like the look of the Basic Black Designer Series Paper from Botanical Garden.  A very Asian look I thought. One of my favorite design types.

Golden Number of Years (Shiny Version)

Golden Number of Years (shine version) - Wacky Watercooler April 2016 Blog Hop - Jean Fitch - Number of Years and Something to Say stamp sets

I threw in the shiny version picture so you would have a better idea of just how shiny the the gold really is in person and with a bit of light at the right angle.  Either way the look of the cards feel very elegant to me.   Who knew the wild Botanical Garden paper could have such a nice and restrained pattern in it.  Very Saville Row don’t you think if these papers were material for suits?

The card is a tent fold that stands up and has a delicate frame created with our Oval Collection Framelits.  Sadly those Framelits are on the retiring list.  So are the Itty Bitty Accent punches and the Something to Say stamp that I used to create the flowers.  The Botanical Garden paper is going too.   Thankfully the Number of Years and it’s matching set of dies are staying!  Whoop. Whoop!

So if you want to recreate this exactly and don’t have these items…time to start shopping!

Supplies:

Stamps: Number of Years, Something to Say (flower)

Ink: Versamark

Paper: Mossy Meadow, Sahara Sand, Basic Black, Tangelo Twist & Botanical Garden Designer Series Paper

Punches: Itty Bitty Accent Pack

Other:  Big Shot, Oval Collection Framelits, Large Numbers Framelits, Heat Tool, Gold Embossing Powder, SNAIL ,  dimensionals, glue dots.

Technique: Heat Embossing & Frame and Window Die Cutting.

With all the variety of occasions in this stamp set you can easily imagine Birthday or Anniversary as two appropriate occasions for this card.  Add the sentiments now or add them later on the inside.  Either way…Happy is the perfect word for the front.

**********

CASEing our fellow artists has become a popular feature on many of our hops so of course…we couldn’t resist doing it yet again.

I had my wish granted with Bev as my CASE subject.  I so enjoy cruising her blog and seeing her creative use of color and design mixed with her caring and all embracing spirit.  I always end up with food for thought as well as creativity that reaches into my soul and changes me.  In a good way. 😀

Here’s the card from Bev that I’ve CASEd and a link.

Bev's bouncing Brayer - WWC54card

If you want to get a taste of Bev’s outlook that will set you thinking here’s another post that really caught my mind and heart.

CASEing Bev with a Party!

Make a Wish Birthday Card - April 2016 Watercooler Blog Hop - Jean Fitch - Perfect Pennants

Yes…I know that’s not the usual way of spelling casing.  But…when I CASE (copy and share everything) I use the word case in capitals in a different way so the add-ons change as well. {grin}

Here’s the inside:

Make a Wish Birthday Card interior - Watercooler April 2016 Blog Hop - Perfect Pennants & Party Wishes

Thanks Bev for the inspiration.  This was a fun one!

Supplies:

Stamps: Perfect Pennants, Party Wishes (Occasions Catalog)

Ink: Blackberry Bliss, Mossy Meadow, Lost Lagoon, Tangelo Twist, Hello Honey (yes…all the retiring In Colors!)

Paper: Blackberry Bliss, Whisper White & Gold Glimmer Paper

Punches:  Itty Bitty Punch Pack (star)

Other:  SNAIL , glue dots, dimensionals

Technique: Baby Wipe Inking

The Baby Wipe Technique is a fun one and the color choices are only limited by your imagination.

It works by placing lines of color using reinker drops one by one on a folded up pad of two Baby Wipes and then placing your stamp across the lines of ink.    I’m storing the pad I created in an acetate box that closes tightly so I can come back over the next few days and create other designs with the same pad.  A fun and inexpensive way to play.   If you are a tad perfectionist you may want to take out your Stamp-a-ma-jig and place your long banners exactly.  I’m a more seat of the pants stamper so I eye it and enjoy the variations that happen since I can live with surprises and a bit of imperfection.

I love that all 5 of the retiring In Colors work so well together.  Very regal looking colors don’t you think?   I also found that the mix of stamp sets Perfect Pennants (annual catalog) and Party Wishes (occasions catalog) worked perfectly together.  My heart is still trying to get over the fact that both these sets are disappearing from my catalogs.  Really Stampin’ Up?  They’ve had their run?  Sigh.  I know I’m supposed to embrace change but it’s so hard when I love a set so much.  Check them out…truly…you’ll want them too.  That image from Party Wishes that says…a party without cake is just a meeting…caught me from day one of the Occasions catalog.

***************************

I encourage you to play with and purchase  these fun retiring products that I’ve shown you today.  As you can see they coordinate with products you may already have or can find in the Annual Catalog also with the upcoming new catalog as well.  But don’t wait too late if you don’t have them yet.  They are moving fast from available to fully retired and gone.  Sob!

***************************

That’s it for my share of the hop.  Time to move on to my Watercooler friend  Priscilla and her wonderfully inspired creations.  Her sweetness as a friend infuses her work too.  I know you will love her and the projects.

To follow the hop click on the link below:

next watercooler crock button

Home Button

Previous Button


Watercooler Wednesday Challenge – WWC63 – Jean’s Birthday Garden

WWC63 – Kath’s Color Challenge

(if you live other places in the world it might be Kath’s Colour Challenge)

Watercooler Wednesday Challenge - WWC63 - Kath's Color Challenge

Welcome to this weeks Watercooler Wednesday Challenge.  Today…we’re playing with soft Spring colors as well as one that makes your mouth water.  {grin}  I don’t know about you but my mouth is watering for watermelon after a day of playing with the color and typing the name.  Thanks Kath for the craving and the colors!

**********

After playing with the Number of Years stamp set at my last Stamp Camp I just had to bring it out one more time for these lovely soft colors.  And with my sister-in-laws birthday this month it was the perfect time to create a lovely Spring birthday card just for her.

Jean’s Birthday Garden

Watercooler Wednesday Challenge - WWC63 - Kath's Color Challange - Jean's Birthday Garden - Number of Years and Happy Birthday EveryoneOutside

Watercooler Wednesday Challenge - WWC63 - Kath's Color Challenge - Jean's Birthday Garden - interiorInside

Supplies:

Stamps: Number of Years, Happy Birthday Everyone, Papillon Potpourri

Inks:  Pear Pizzazz, Blushing Bride, So Saffron, Watermelon Wonder & Wink of Stella Gold

Paper: Pear Pizzazz, So Saffron, Watermelon Wonder, Whisper White Cardstocks

Punches: Itty Bitty Punch Pack (flower), Bitty Butterfly

Tools & Adhesives:  Basic Jewel Rhinestones, Glue Dots.

Cost: 44¢ per card. Assuming you have all the ingredients. 😀    Extra for envelope.

*********

I love quick and simple cards.  With the exception of a couple of stamping oopsies that meant I had to recut some paper this was one of those 15 minute cards.  It really helps to take that extra few seconds to mount the stamps so the text is straight and level on the block!  Duh!   And now that I have the design down and all the equipment in place it would be more of a 5 minute card for creating duplicates.

One trick is to stamp the first set of leaves/stems (love that it’s all combined in one image stamp) in the middle of the row and then stamp to the left and right with some of the image a bit lower and off to the sides.  I also found that stamping the sentiment in the top corner first gave you a better idea on where and how high to stamp the leaves/stems image.  Originally I stamped the greeting in the left upper corner but well…did I mention that oopsie thing when the stamp wasn’t correctly on the block?  As they say…paper has two sides…but of course Watermelon Wonder is a fairly dark color and does show through.  So when I flipped the card over it was prudent to change the text to the right hand side.   Not really a big deal and gave me a chance to add the butterfly to balance the overall design.  Gotta love the mother of invention right?   The Gold Wink of Stella (love those Stella pens.  So easy to use) was used to add centers to the flowers and a bit of dash to the punched flower as well.  You can see on the inside stamping that I also played a bit with it on the stamped flowers as well.  I couldn’t find my Clear Wink of Stella pen or I would have added a bit more sparkle.  Now that it’s stopped hiding (of course it waited until the picture taking and posting) I’ll add a bit of bling before dropping it in the mail to my lovely SIL.

One other subtle bit of color I love is the very narrow Pear Pizzazz mat.  It adds just the right punch of color separating the vivid Watermelon Wonder and the plainer Whisper White.  Pity I forgot to replicate that on the inside.  Ah well…there is always a next time.   After all…this is the base design for one of the cards at my next Stamp a Stack on April 23.  If you are in the area I hope you will join us.  You can find us at the Central Point Presbyterian Church at 456 W. Pine St.  Central Point, Oregon.

*********

That’s it for this challenge.  To see the rest of the design teams Color Challenge contributions head on over to the Challenge blog website here.   That’s also where you can add your own creation with the linky doodad.  When you add your own design and there are more than three entries, one of you will be a challenge winner or runner up and have the option to place our new badges on your own site.  Of course…you’ll also win bragging rights!

Check here to see the winner of last weeks challenge.  And here to see all the other linky and Artist Team entries.  Check the challenge site for rules on competing for future challenges.

I really hope you will add your own creations this week.  Really…this challenge is an easy one and you can start stocking up for those Spring Summer occasions ahead.

I hope you’ll join us next Wednesday for yet another Watercooler Wednesday Challenge.

Jean Fitch in pink


Pictorial Tutorial for Vines and Flowers Flap Card – WWC61

Hi friends.  And yes…if you are reading this tutorial post then I count you friends.  After all…would I have put this much work into something like this if you weren’t? LOL

And yes Miss Patti this tutorial required munchies to get through.  The crunchy kind! And Miss Marsha…Happy Birthday (yesterday)…and yes…I pulled an all nighter to get it done. {grin}

Here’s the original picture from my Watercooler Wednesday Challenge post (WWC61):

Watercooler Wednesday Challenge - WWC61 - Anything Goes - Botanical Multifold1- Jean Fitch

And the stitched picture everyone seems to be pinning. (Thanks for that)

Watercooler Wednesday Challenge - WWC61 - Botanical Accordian Flap Card - Jean FitchSupplies:
Stamps: Birthday Blooms, Botanical Blooms, Suite Sayings, Trust in God
Ink: Elegant Eggplant, Versamark, Wisteria Wonder, Mint Macaron
Paper: Mint Macaron, Whisper White, Elegant Eggplant, Wisteria Wonder, Garden
Green, Daffodil Delight
Other: Big Shot, Botanical Builder Dies, Heat Tool, Gold Embossing Powder, Pearls,
Tombow Liquid Glue, Snail, Glue Dots

Here’s a PDF with the directions and the pictorial tutorial added:

Pictorial Tutorial -Vines & Flowers Accordion Flap Card – Jean Fitch from Watercooler Wednesday Challenge (WWC61)

And here’s the pictorial Tutorial.  All pictures…few words…except what’s on the pictures (a first for me figuring out doing all that).   NOTE: You’ll likely have to click on the pictures to read the words.  I’m afraid I haven’t yet figured out how to allow for correct sizing on my blog.  The printable tutorial you can download from above is readable.

And first and foremost…THANK YOU STAMPIN’ UP for creating such an awesome bundle of products like the Botanical Garden series.  Too freakin’ wonderful as some of my cool friends would say.  😀    If you love it as much as I do (and don’t have it yet) I hope you’ll run right over to my sidebar and click on the Order SU online button and order yours today.  You won’t regret it!

Pictorial Tutorial

WWC61 Tutorial - Botanical - Vines & Flowers Flap Card - Jean Fitch

WWC61 - Tutorial Botanical 3

The Key Idea

WWC61 - Tutorial Botanical 4

WWC61 - Tutorial Botanical 5

This is the first really tricky point.
Making sure you get the Mint Macaron card base with die
entering the Big Shot with the correct leading edge side.

WWC61 - Tutorial Botanical 6

WWC61- Tutorial Botanical 7

WWC61 - Tutorial Botanical 9

WWC61 - Tutorial Botanical 11

Here’s that key idea again lest you forget….


WWC61 - Tutorial Botanical 4

WWC61 - Tutorial Botanical 12

WWC61 - Tutorial Botanical 13

WWC61 - Tutorial Botanical 15

WWC61 - Tutorial Botanical 16

WWC61 - Tutorial Botanical 10

Ta Da!  You’ve spaced it correctly!


Watercooler Wednesday Challenge - WWC61 - Anything Goes - Botanical Multifold2 - Jean Fitch

WWC61 - Tutorial Botanical - Flower Bits and Pieces

WWC61 - Tutorial Botanical Bits and Pieces 2

One more fun tip!

WWC61 - Tutorial Stencil Tip

And once again the finished card picture….

Watercooler Wednesday Challenge - WWC61 - Anything Goes - Botanical Multifold1- Jean Fitch

I know I promised you some alternate examples with some of the step ups I shared last Wednesday.  But that truly will have to wait for another day (over the weekend most likely).

I shot my wad (don’t you love military-isms that have made it into common usage?) on the tutorial and ran out of time for the alternates.  The pieces are cut (YaY!) they just have to be Stamped, embossed and assembled.  Sounds like a fun and restful weekend project right?  While the neighbors sweet long haired kitty comes for a visit? 😀

Hm…you know…I just realized…it’s April Fool’s Day.   Yikes!

I promise…no fooling in this tutorial.  It really does work.

Happy Fooling…and stamping.

Hugs and love.

Jean Fitch in pink

P.S.  No Foolin’ … Don’t forget to check out this weeks Weekly Deals:

Weekly Deals Graphic - generic - 032916-040416

Watercooler Wednesday Challenge – WWC61 – Anything Goes with Botanicals

WWC61 – Anything Goes Challenge

WWC61 - Anything Goes

Welcome to this weeks Watercooler Wednesday Challenge.  Today…Anything Goes.  Don’t you love days like that…when anything is possible?  Well…as far as the challenge goes…today…anything goes!   The rest of your day/week is totally up to you and the other rules in your life.  {grin}

**********

Since anything goes today….I’ve grabbed a recent creation for my last Stamp Camp which focused on the Botanical Builder Framelit Dies and a fun fold that I’ve been playing with that lent itself perfectly to the vine die in that set.  Perfect for Easter or birthdays and other occasions now that Easter is past.

Botanical Accordion Flap Fold

(as always click the pictures to see larger images)

Watercooler Wednesday Challenge - WWC61 - Anything Goes - Botanical Multifold1- Jean FitchFront

Watercooler Wednesday Challenge - WWC61 - Anything Goes - Botanical Multifold2 - Jean FitchFirst Flap

Watercooler Wednesday Challenge - WWC61 - Anything Goes - Botanical Multifold3 - Jean FitchAll Flaps Open

Left simple so it can be personalized for the person receiving it.

Watercooler Wednesday Challenge - WWC61 - Botanical Accordian Flap Card - Jean FitchPin version and reminder of all flaps and folds.

Supplies:

Stamps: Birthday Blooms, Suite Sayings (alternate Easter text)

Inks:  Elegant Eggplant, Versamark

Paper: Elegant Eggplant, Mint Macaron, So Saffron, Wisteria Wonder, Whisper White

Punches: None

Tools & Adhesives:  Big Shot, Big Shot Die Brush, Botanical Builder Framelit dies, Heat Tool, Gold Embossing Powder,  Gold Metallic Thread, Basic Jewel Pearls, Fine Tip Glue Pen, Tombow Liquid Glue, Glue Dots.

*********

The touches of gold – the dots and the metallic thread swirl behind the flower really add a nice bit of sparkle as do the pearls in the flower centers.  To add another touch of gold you could add a bit of tombow glue to the flower centers then gold emboss that.  Or use a gold alcohol marker to change the pearls to gold.

Another step up idea that glitters would be to add the string of hearts image from Birthday Blooms gold embossed to the far right edge of the Mint Macaron fold running vertically.  Or add more gold sets of dots on the Mint Macaron flap.  so many possible ideas once you put your thinking cap one.

One of those very simple fold ideas (once you wrap your head around the two card bases being interleaved together – thus the accordion in the title) that makes for a wonderful surprise for the recipient and kudos to you for your skills. 😀

Whether you go soft or bold in your colors trust me when I say the results will be wonderful and set you smiling at your own brilliance.  lol

In the interest of disclosure I should note that Pinterest as well as our Stampin’ Up! Demonstrator Showcase was the source for my initial jumping off point.  Accordion Cards with a decorative edge seem to be popular now that we have that wavy vine to work with.  I changed the order of the folds and a bit of decorative ideas as well.  Gotta love a community of artists that provide inspiration for a CASE right?  Right!

CASE = Copy and Share Everything

Check back Friday and I’ll have a PDF with directions and a picture or two of the set up so you can get a handle on the accordion and die cutting part of the process.

*********

That’s it for this challenge.  To see the rest of the design teams Anything Goes Challenge contributions head on over to the Challenge blog website here.   That’s also where you can add your own creation with the linky doodad.  When you add your own design and there are more than three entries, one of you will be a challenge winner or runner up and have the option to place our new badges on your own site.  Of course…you’ll also win bragging rights!

Check here to see the winner of last weeks challenge.  And here to see all the other linky and Artist Team entries.  Check the challenge site for rules on competing for future challenges.

I really hope you will add your own creations this week.  Really…this challenge is an easy one.  Anything you have completed that hasn’t yet been shared online qualifies.  Easy peasy!

I hope you’ll join us next Wednesday for yet another Watercooler Wednesday Challenge.   A little birdy tells me it will be an exciting challenge that resembles a childhood game.  Shush..you didn’t hear that from me. 😀

Jean Fitch in pink


Irish eyes are smiling….WWC59 – Bev’s Green Color Challenge

WWC59 – Bev’s Color Challenge in Green

Watercooler Wednesday Challenge - WWC59 Bev's challenge in green

Welcome to this weeks Watercooler Wednesday Challenge.  Today…Irish eye’s are smiling.  Well really…any eyes that like green…or candy are.

Today my eyes are in fact a tad on the green side.  Must be in anticipation of St. Patrick’s Day fast approaching.  The eyes are also smiling since Reece’s are one of my all time favorite candies!   A fun treat to share with neighbors, bank tellers, doctors and their staff and so on.  In fact…all the people who share my life.

Thanks Bev for the inspiration…and for going all green.  You really made me stretch my imagination.

**********

Jean’s Reece’s Shamrock Hat

Watercooler Wednesday Challenge -WWC59 Bev's Green Color Challenge - Jean's Reece's Shamrock HatFrom the front

Watercooler Wednesday Challenge -WWC59 Bev's Green Color Challenge -Shamrock HatFrom the back


Supplies:

Stamps: None

Inks:  None

Paper: Whisper White, Cucumber Crush, Mint Macaron, Mossy Meadow, Wild Wasabi

Punches:   Itty Bitty Accent Punch Pack (flower), 1-3/4″ Scallop Circle, 7/8″ Scallop Circle, Confetti Hearts Border, Bird Builder

Tools & Adhesives:  Baker’s Twine Combo Pack (Occasions Catalog), Basic Jewel Rhinestones, Two Way Glue Pen, Glue Dots.  Small Reece’s Cup Candy

Details:

Punch your two scallop circles (large one in Wild Wasabi and small in Mint Macaron).  If you want you can emboss with a folder or stamp with any type of background image.

Punch multiple hearts with the Confetti Heart punch from Mossy Meadow cardstock. Arrange the larger hearts into a shamrock shape and glue down to the Mint Macaron scallop circle.  I was lucky enough to have a piece fall out of the punch that I could use as a stem.  If you weren’t so lucky cut a stem piece yourself and glue down.   Attach the two scallop circles with glue dots to Reece’s candy top and bottom.

Tie a length of Baker’s Twine from the Combo Pack – I used the Mint Macaron and Black version.  Tie a bow and trim ends.

Punch leaf branch with the Bird Builder Punch in Cucumber Crush.  Cut down a bit and attach with glue dot to the hat.

Punch two Whisper White flowers with the Itty Bitty Accent punch and add a rhinestone to the center.  Attach flowers to the hat with glue dots.

All done.  Try not to eat!

I suggest you save a few Reece’s cups for inspiring eating during the decorating process.  Hand out the treat hats as fast as possible.  LOL!

*********

Looking for more inspiration for fun, wild and sweet hat inspired treats for little leprechauns and others in your life.  Check out this Google search.

I was inspired in part by another demo’s idea here.  Thanks Julia!   I’m thinking that next time around I’ll a bit more texture by embossing or stamping on the scalloped circles.  Possibly even the flowers or branches.

*********

That’s it for this challenge.  To see the rest of the design teams Color Challenge in Green contributions head on over to the Challenge blog website here.   That’s also where you can add your own creation with the linky doodad.  When you add your own design and there are more than three entries, one of you will be a challenge winner or runner up and have the option to place our badges on your own site.  Of course…you’ll also win bragging rights!

Check here to see the entries from last weeks challenge.  Unfortunately we didn’t have the required three so no winner.  However the 2 entries we had are well worth the look!  Check  here to see all the other linky and Artist Team entries.  Check the challenge site for rules on competing for future challenges.

I really hope you will add your own creations this week.  Really…this challenge is an easy one.  It’s all about the green and the teams entries should, I hope, inspire you with lots of different ideas to try.

I hope you’ll join us next Wednesday for yet another Watercooler Wednesday Challenge.

Jean Fitch in pink


Watercooler Wednesday Challenge – WWC55 – Cuppa Friendship meets Jean’s Color Challenge

WWC55 – Jean’s Color Challenge

Watercooler Wednesday Challenge -WWC55-Jean's Color ChallengeWelcome to this weeks Watercooler Wednesday Challenge.  And a belated welcome to our four new challenge artists.  Even though I didn’t participate last week I had a chance to view last weeks team projects with the rest of you and had my socks knocked off.  I hope you enjoyed them too. Thankfully my ring (see above in the picture or in my jewelry box :D) was made of sterner stuff and stayed around for this weeks challenge. {grin}

This week some of my favorite soft and Southwestern style colors are the theme.   Just like those in one of my favorite Southwestern style rings.  Don’t you love it when you look down and there is your palette for the next color challenge ready and waiting on your hand?   Easy Peasy.    Of course taking the picture was a tiny tad more interesting and eventually a gift from God.

Given the Southwest theme that hit my creative eye you might be expecting cactus or sand or horses or other such themes so I hope you won’t be disappointed.  What I most remember from my time in New Mexico, many decades ago, are soft and well worn calico type prints along with deep rich velvets, denims and silver.  Lots of silver.  On the table, in the jewelry and so on.  And tea…lots and lots of tea.  Both hot and iced depending on the time of year and the temperatures.  Where I lived in Deming it could get to 115º (or hotter) in the shade in Summer and well below freezing in winter.  We were after all sitting at about 7,000 feet high. 😀

I hope you’ll grab your own favorite cuppa while you continue reading.

**********

Cuppa Friendship

Watercooler Wednesday Challenge -WWC55 - Jean's Color Challenge - Cuppa Friendship - Jean Fitch

I love that the dies have everything you need for “tea”.  The teapot, a variety of cups, a creamer and silverware.  Not to mention fun bits to decorate the cups and teapot.  The only thing missing is a sugar bowl and I suppose you could put sugar in the “creamer” and use a spoon to serve it right?  Another cool thing…even if you opt not to get the bundle with the stamps the dies work quite well all on their own.  Of course…the stamps add a bit of sparkle to working with the dies and the matching designer series paper stack a bit more to the combination too.  😀

Supplies:

Stamps: A Nice Cuppa, Six-Sided-Sampler (sentiment)

Inks:  Basic Gray (sentiment and tea bag)

Paper: Very Vanilla, Perfect Plum, Tempting Turquoise, Mint Macaron Cardstock.    Silver Foil Paper (spoon and steam images) .  Pretty Petals Designer Series Paper Stack.

Punches: Word Window, Hearts Confetti, Curvy Corner Trio

Tools & Adhesives:  Big Shot, Cups & Kettle Framelit dies, Linen Thread, Dimensionals, Tombow Liquid Glue, Glue Dots.

*********

Couldn’t get any simpler than this.  Really.  We all know how to stack a set of cups right?  We know how to punch a corner and glue down paper layers?   I did do a few simple tricks to make my picture a bit more believable and make assembly a tad easier.

  1. When cutting the cups out of DSP I made two.  One cut from one side of the two sided paper and one cut from the other.  This gave me flexibility in what order I wanted to stack.  I knew what pattern I wanted but when you flip a two sided paper…you may not get the pattern you want.   Cutting extra also gave me a headstart on my next card design too!
  2.  I wanted the silver to look a bit distressed or like hammered silver…a theme in New Mexico for many reasons.   So…after die cutting the spoons I put them back on the cutting pad, put a rough piece of paper on top and used my most cut up cutting pad too.  that gave a worn, hammered/distressed look to the silver.  Much more interesting than the flat shiny look.  And as a bonus…it flattened the little dots that the dies often leave behind on the paper.
  3. I used my thumbs to add a bit of roundness to the bowl of the spoon.  And while we are talking spoons….I added more than one to the stack.  After all…many of my friends need sugar or milk in their tea and we don’t all want to share a spoon.  So a stack of cups really do need at least a couple of spoons.  Notice that I’m assuming this is probably a stack of used cups…the friends have moved on from drinking to chatting now that they are relaxed.
  4. I used a piercing tool to punch a hole in the tea bag tag and added a bit of linen thread with a knot behind the tag and a glue dot on the end behind the cup as well as on the tag itself.

*********

Now that we’ve had our “cuppa” for this challenge….

It’s time to move on and see what the other artists have done with my ring’s colors.   To see the rest of the design teams  Color  Challenge contributions head on over to the Challenge blog website here.   That’s also where you can add your own creation with the linky doodad.  When you add your own design and there are more than three entries, one of you will be a challenge winner or runner up and have the option to place our new badges on your own site.  Of course…you’ll also win bragging rights!

Sadly we didn’t have enough entries last week to declare a winner but you can look here to see the one linky and Artist Team entries.  Check the challenge site for rules on competing for future challenges.

I really hope you will add your own creations this week.  Really…this challenge is an easy one (even if all you do is punch shapes using the various colors and stick them down with a sentiment so I hope the soft colors will draw you in.

I hope you’ll join us next Wednesday for yet another Watercooler Wednesday Challenge.

Jean Fitch in pink