The Wacky Watercooler March Blog Hop – Anything Goes!

Wacky Watercooler New Catalog(ue) Blog Hop

Welcome everyone to the Wacky Watercooler March Blog Hop.   This month…Anything Goes!   If it’s current we’re featuring it.   The Wacky Watercooler people are an international crew so don’t be surprised if you see a few different spellings and price guides along the way.   The Occasions Catalog & Sale-a-Bration are still going and if you want some inspiration along those lines check out our last couple of hops here and here.

If you are moving in hop order you’ve arrived from the very talented Heidi Weaver’s blog.   Heidi’s always the first on my list to check every day – her projects never fail to excite me.  You’ll definitely want to go back and check her past posts after the hop.   If you are working in reverse order weren’t your socks knocked off by Jeanne’s  wonderful projects?  Jeanne is our American living in Germany addition to our Watercooler Hop schedule as well as a dear friend I discovered through stamping and hers is another blog to investigate after the hop for sure!   Her cooking and family stories and what can I say…wacky style will keep you scrolling for hours.

However you are viewing the hop we’ve built it in a circle so you can join and hop on and off at will.   If you get lost just click the hop banner or the home watercooler to get back to our hop home site with the list of participants.    You may want to keep an eye on that site in between blog hops as we have plans to post somewhat regularly there too.

*****

Here’s my first entry.

Petite Petals Blessed Easter Duo

Petite Petals Easter Duo - watermarked

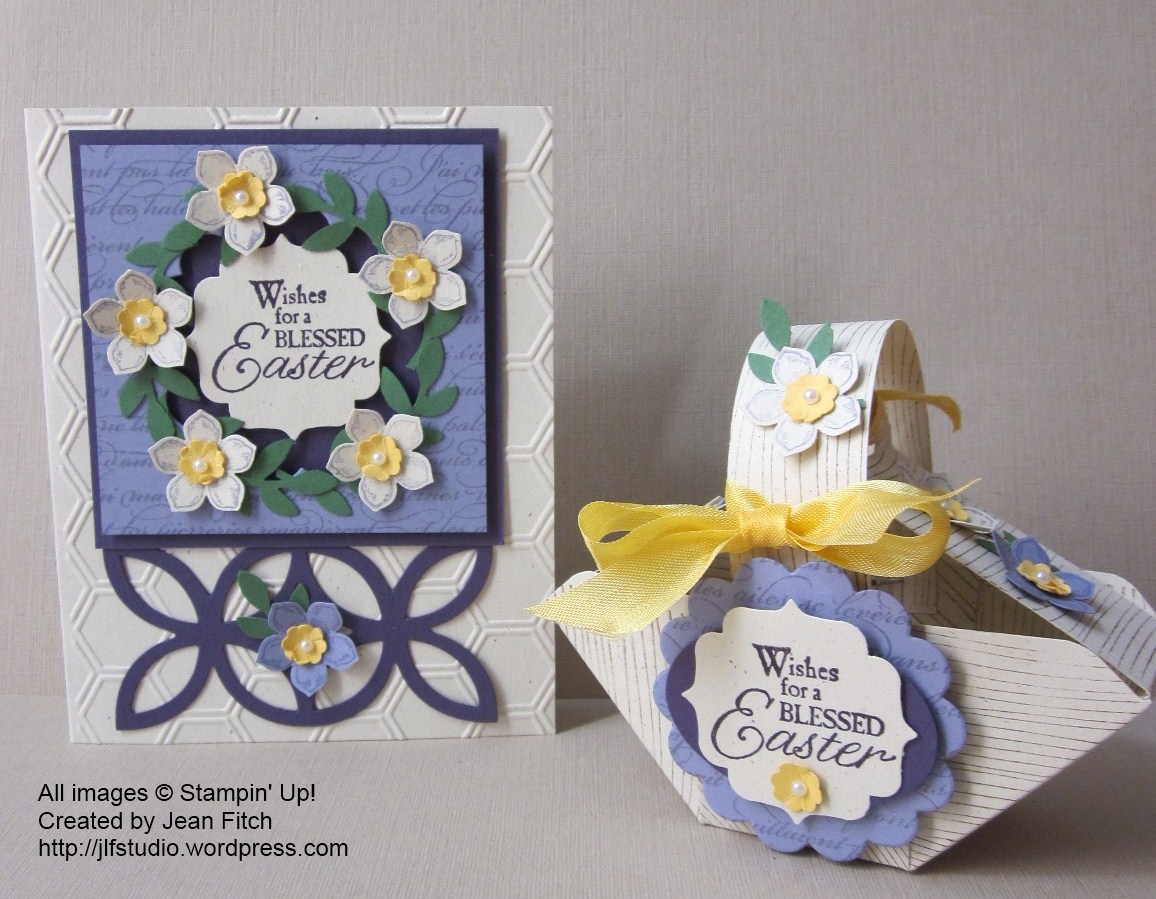
And a couple of close ups:

Petite Petals Blessed Easter Card - watermarked

Blessed Easter Petal Basket - watermarked

Have I mentioned that I love the new Stampin’ Up!  Envelope Punch Board?   Yep…it’s my latest heart throb.  I can’t stop making and inventing things with it.   I’ve even created a Pinterest Board here with a steadily growing set of projects to CASE.    And that lovely punch board makes this basket so very, very easy!   The little basket is a CASE more or less from a fellow demo and you can find more information in this pin.   This is another one of those projects that I’m prepping a tutorial for and that you’ll find yourself wanting to make over and over for many occasions.

Supplies:

Stamps: Petite Petals, Blessed Easter, Woodgrain (basket), En Francais

Ink: Wisteria Wonder, Elegant Eggplant, Soft Suede (basket)

Paper: Naturals Ivory, Garden Green, Elegant Eggplant, Daffodil Delight, Wisteria Wonder

Punches:  Scallop Tag Topper , Bird Builder  (for the branch), Petite Petals, Label Bracket , Extra Large oval

Other: Big Shot, Lattice Die, Honeycomb Embossing Folder, Circle Thinlit Card Accessory dies,  mini silver brads, Daffodil Delight Ribbon – Seam Binding & Stitched Grosgrain, Piercing Tool, Pearls Basic Jewels,

*****

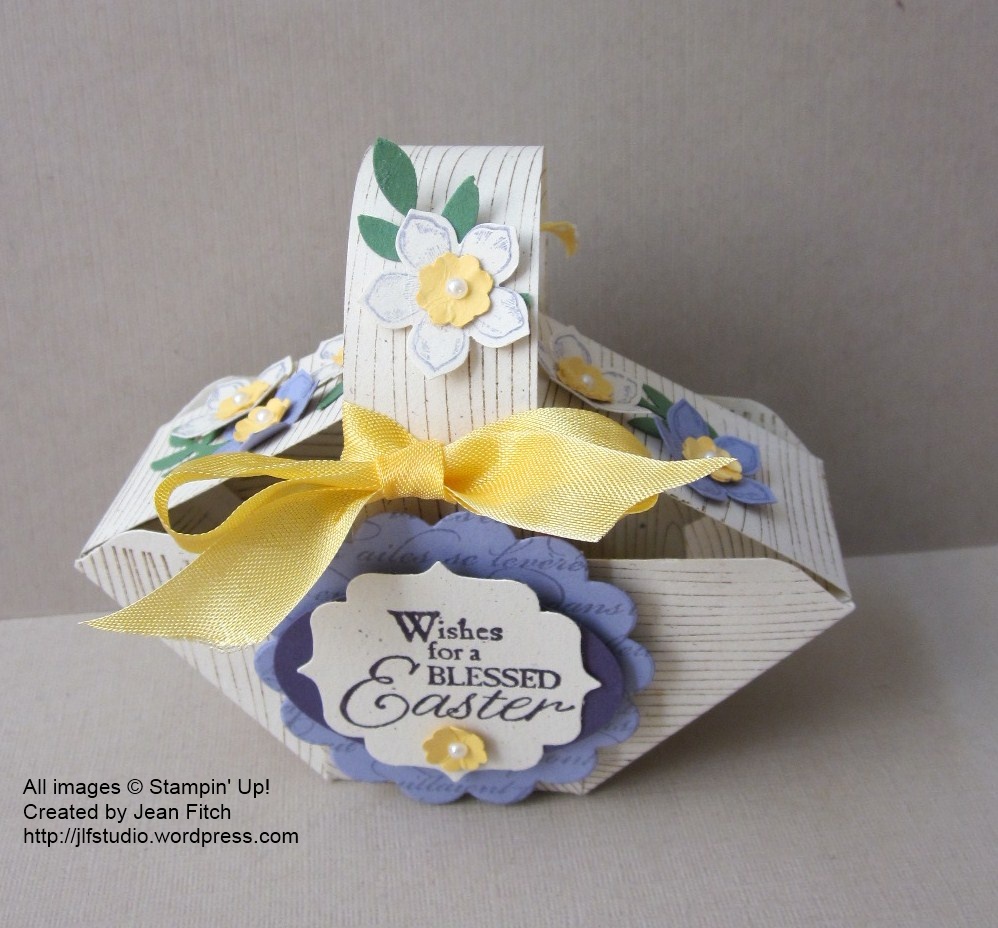
Here’s another Lattice Cross  project and a link to a quick tutorial/template  for the cross part of it.

This time I’m also using the Scallop Tag Topper punch  that would also fit as part of the grouping above.   Can you tell I’m in love with the Petite Petals punch & stamp set?   Not to mention the En Francais background stamp?   I’ll have a picture tutorial available for this little darling next week.  Just one more picture to take and it’s done!  I think you’ll be surprised at just how easy this box is to make.  Trust me when I say you’ll soon be addicted!   I think you’ll also see this hop that I’m hooked on the Scallop Tag Topper Punch as well.

Tag Topper Lattice Cross Box - watermarked

Supplies:

Stamps: Petite Petals, En Français (background), Teeny Tiny Wishes

 Paper: Pear Pizzazz, Naturals Ivory, Wisteria Wonder, Garden Green, Elegant Eggplant, Daffodil Delight

 Ink: Garden Green, Elegant Eggplant, Wisteria Wonder

 Punches: Scallop Tag Topper, Petite Petals, Itty Bitty Punch Pack (scallop Circle), Bird Builder (leaves), Banner (tag end)

 Other: Big Shot, Lattice Bigz die, Simply Scored Board, Paper Snips, Sticky Strip, Adhesives, Daffodil Delight Seam Binding, Pearl Basic Jewels.

*****

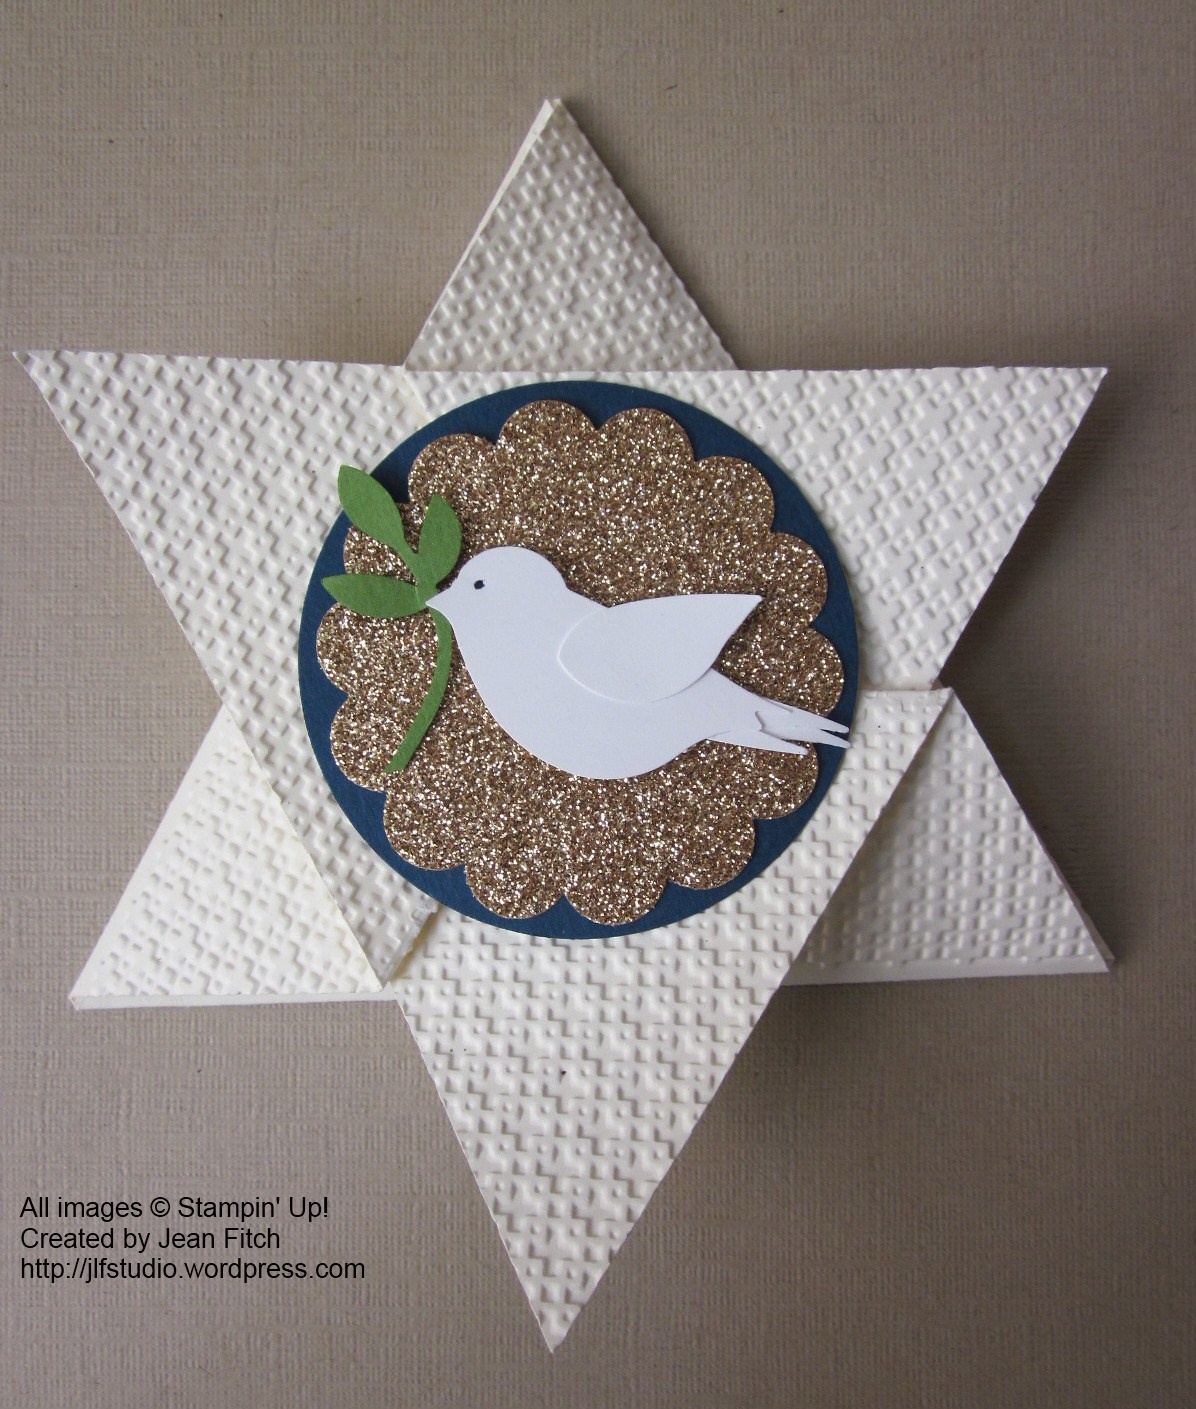
  Next up is one I’m sending out at Passover this year.   If you remember the Hanukkah Hop from a couple of years ago you’ll remember that I love these Star Fold cards.  This time around I wanted the look and texture of  matzo bread – a traditional accompaniment to a Seder meal.   And the dove with olive branch is another potent symbol for this celebration.   Just as Judaism predates and provides a foundation for Christianity so this year Passover is preceding Easter by just a few days.  Appropriate don’t you think?  I’ll be sharing more about this card later next week so if you want to see the inside and find links to a tutorial (the Hanukkah Hop link has a basic tutorial link) check back.

Star Fold Chag Sameach - watermarked

Supplies:

Stamps: Jewish Celebrations (interior)

Ink: Midnight Muse (interior)

Paper: Very Vanilla, Garden Green, Whisper White, Midnight Muse Cardstock.  Champagne Glimmer Paper

Punches: Bird Builder, 2-1/2″ Circle, 2-3/8″ Scallop Circle

Other: Big Shot, Square Lattice Embossing folder, Simply Scored Scoring Tool, Dimensionals

*****

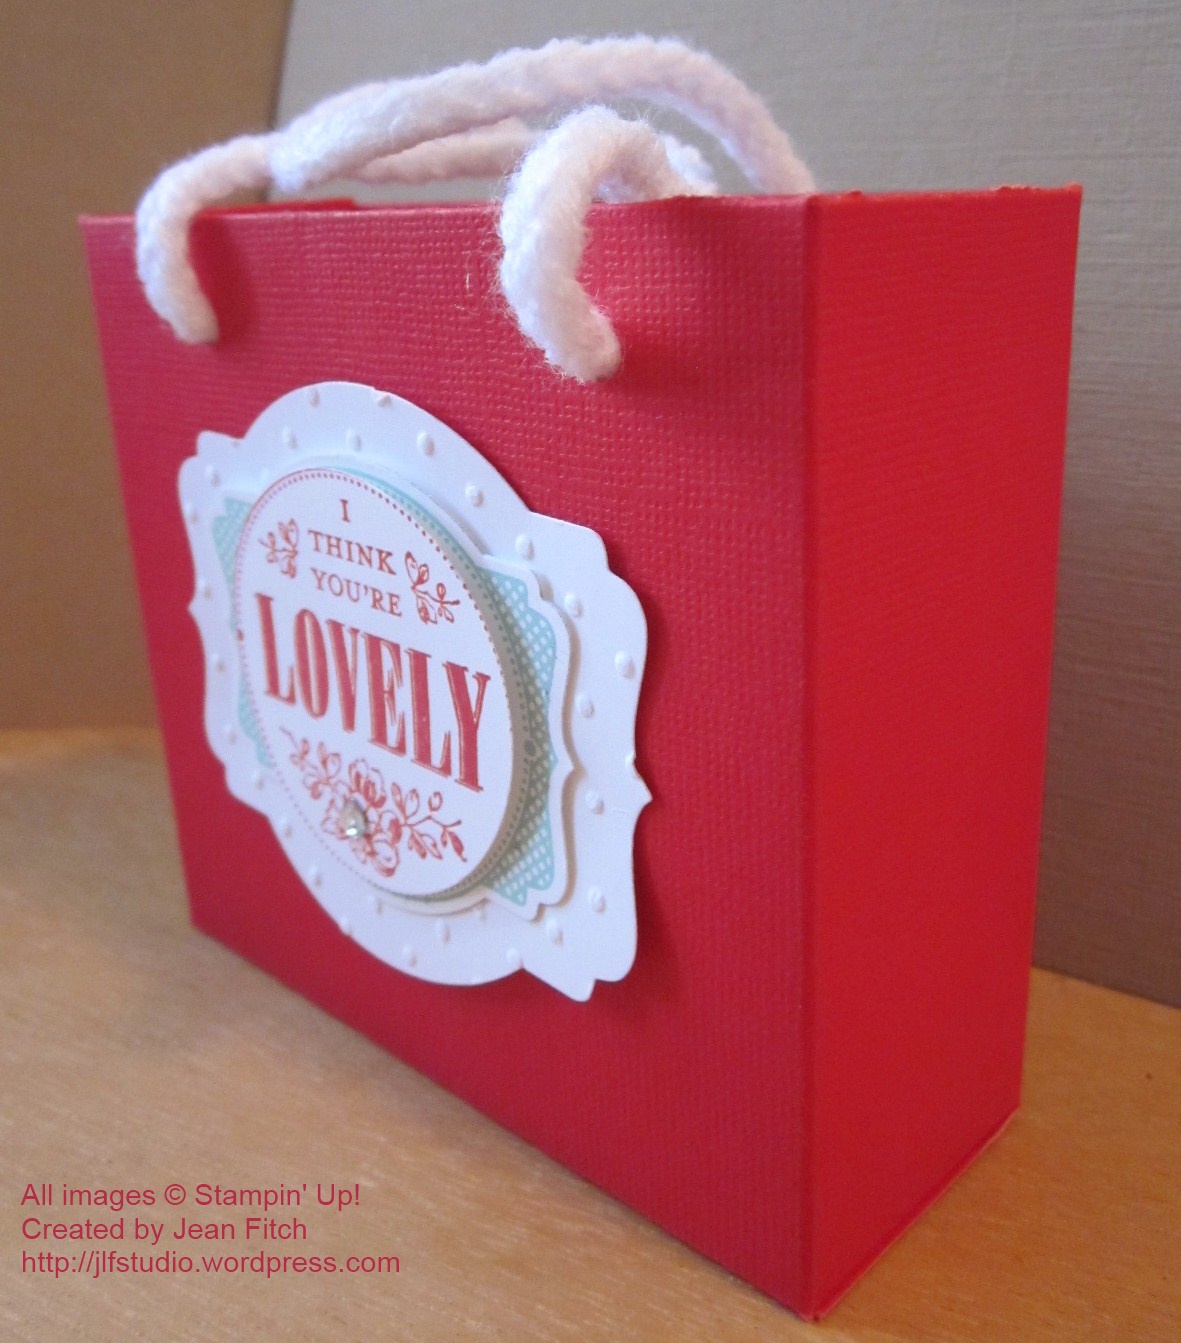
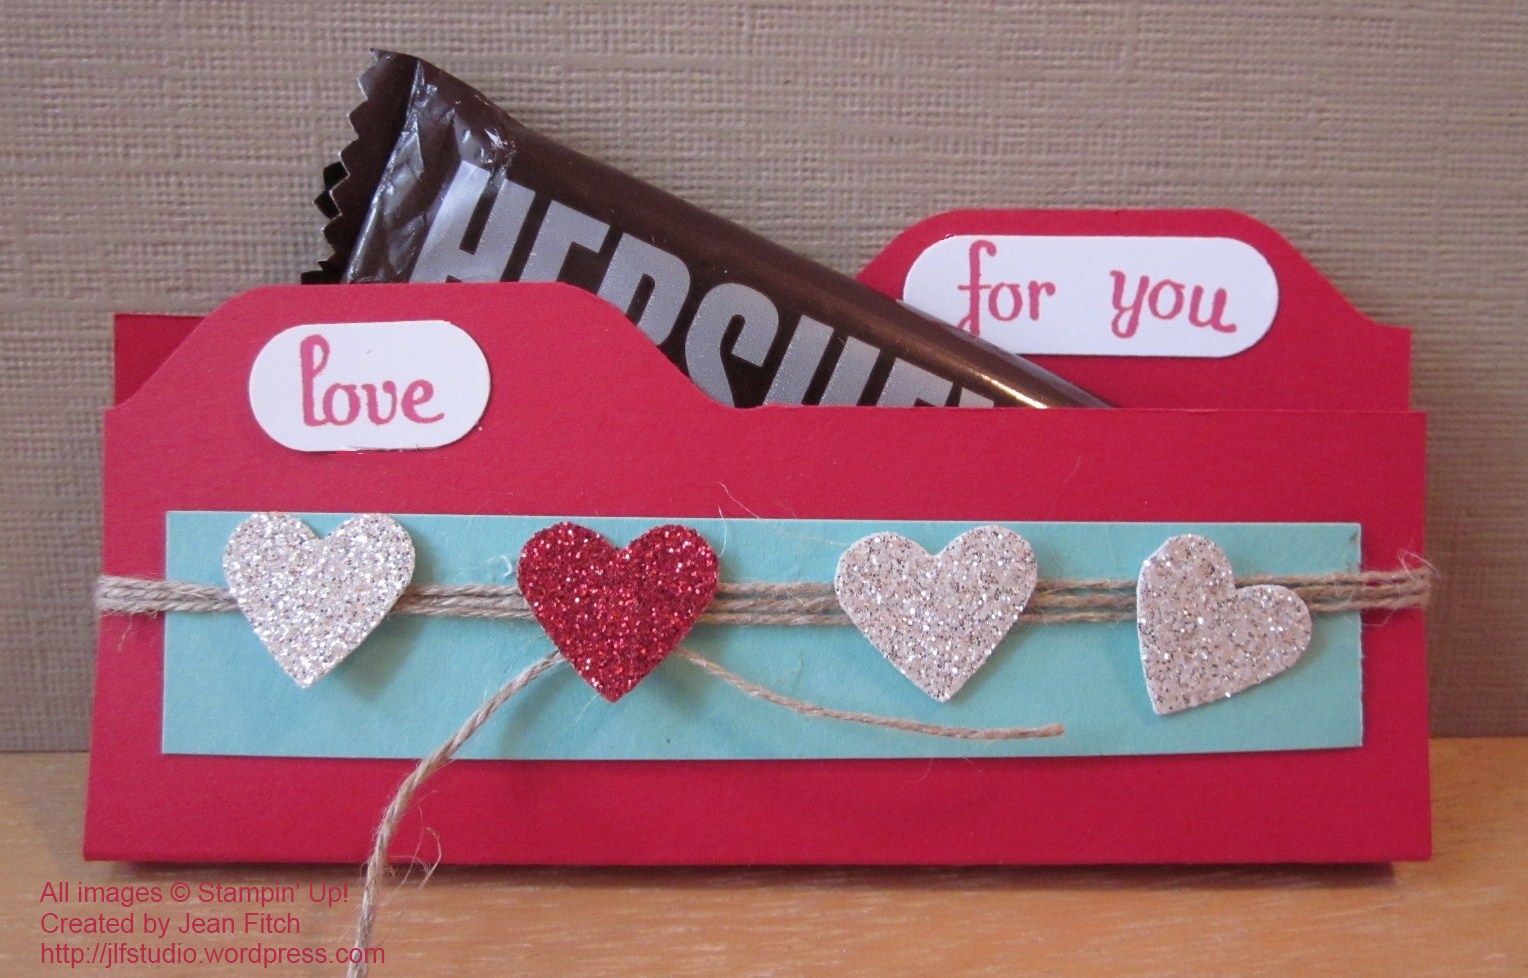
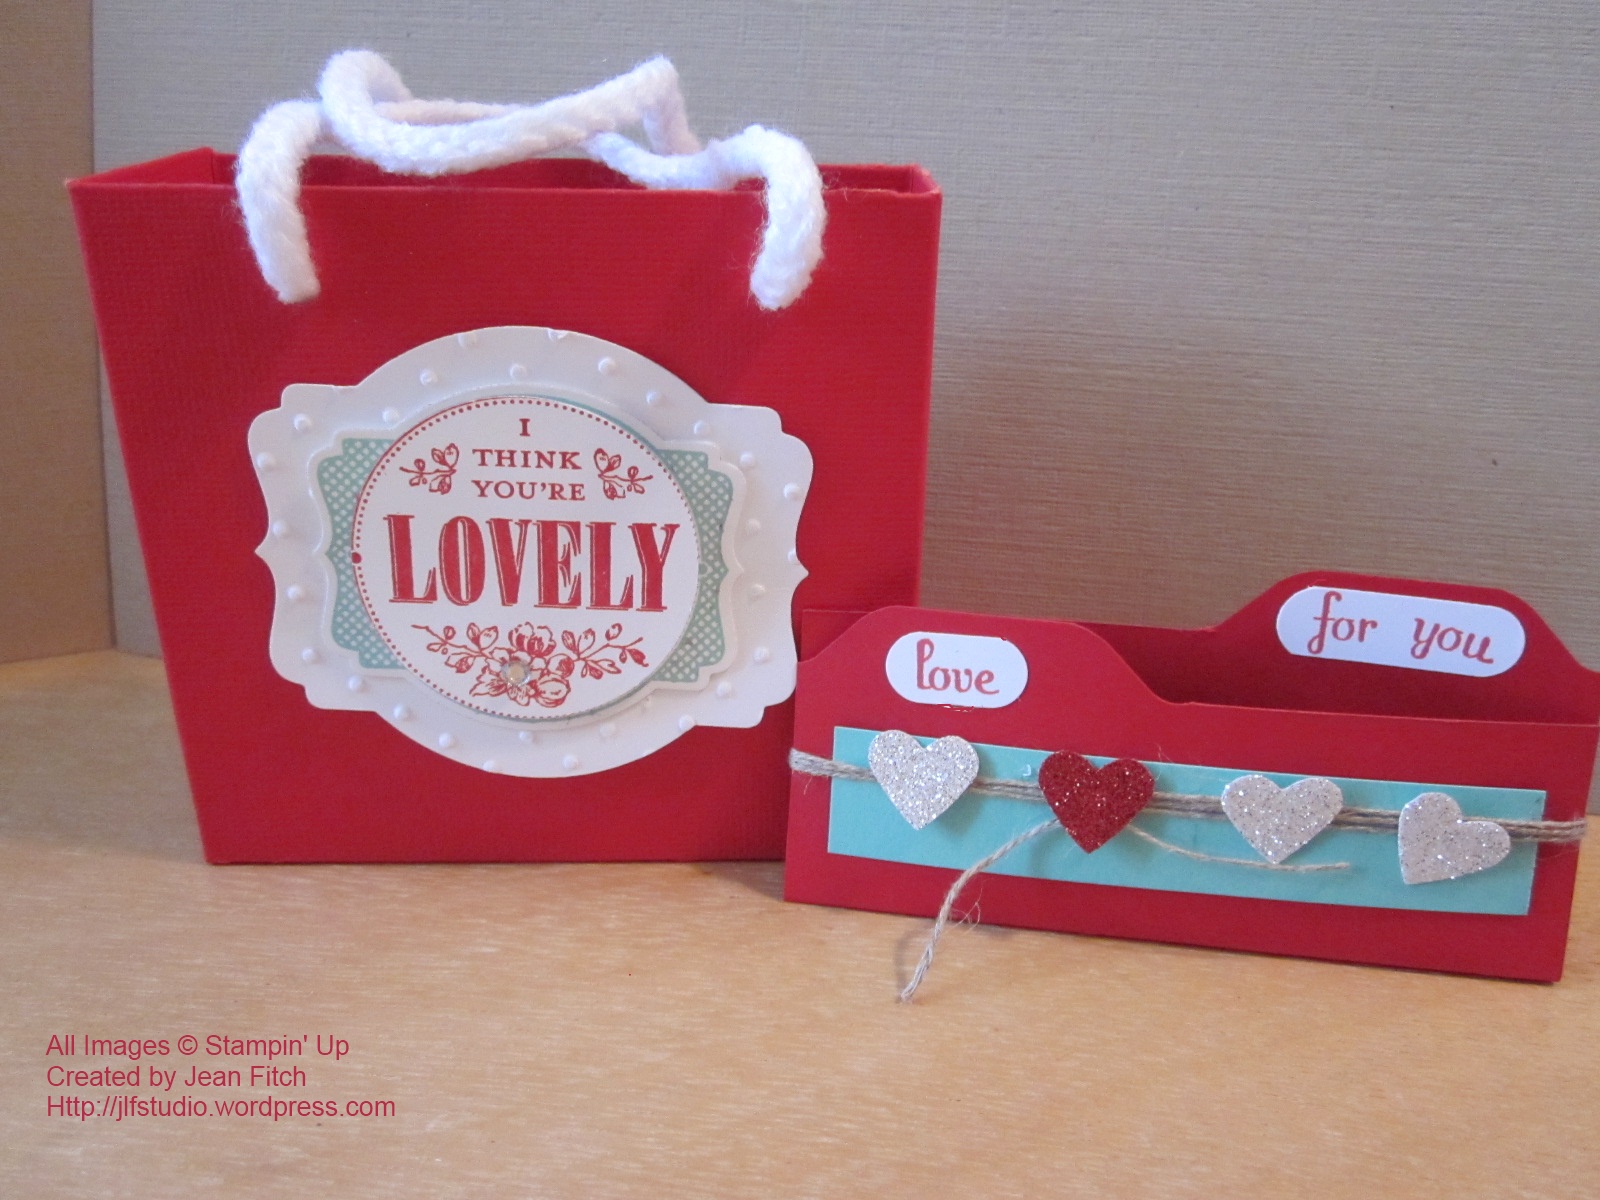
And lastly a quick look at a gift card/business card holder I’ve just created.  I’ll have more details for this in a follow up post next week.  Just thought you’d like a quick peek.

Chick Card Holder all in one - watermarked

Chick Gift Card Holder in pieces - watermarked

Needless to say…I’m working on a tutorial for this one too.  Since I just invented it last night it may just take another week to get it to you.  Still…in plenty of time for Easter.

Supplies:

Stamps: Teeny Tiny Wishes

Ink: Stazon Black, Crushed Curry (inked on the Honeycomb embossing folder)

Paper: Whisper White, Daffodil Delight, Real Red, Basic Black, Gumball Green, Pumpkin Pie

Punches: 2-3/8″ Scallop Circle, Petite Petals, Small Heart, Owl Builder (heart & eyes), 1″ Square, Scallop Tag Topper, Bird Builder, Extra Large Oval, itty bitty punch pack

Other: Big Shot, Ovals Collection Framelits, Circle Card Thinlit accessory dies, Honeycomb embossing folder, Argyle embossing folder, Polka Dots Embossing Folder.  Whisper White 3/8″ Taffeta Ribbon, Daffodil Delight 1/4″ stitched Grosgrain Ribbon

*****

That’s it for my post for this third Watercooler Hop of 2014.   Hop along now to see the rest of the fabulous hop entries and look for our Wacky Watercooler crew in the coming months as we create more new hops for your viewing and crafting pleasure.   Click the watercooler buttons to find your way and may your Season of Sale-a-Bration (January 28th-March 31st) be filled with creativity, inspiration and of course lots of FREE new stamping stuff!

Home Buttonnext watercooler crock buttonPrevious Button

Wacky Watercooler Project PDF available

Hi All,

I’ve had a few requests for a PDF of the recent hop projects I showed here.   So cut and paste to the rescue as well as Open Office and its PDF generator and you’ll find pictures, supply lists and a few basic tips for completion to add to your CASE files.  Hope that answers the requests.

 Wacky Watercooler 2014 SAB Blog Hop – Jean’s Projects – PDF file

Hope too, you had a wonderful Valentine’s Day and fun time hopping with the Wacky Watercooler Crew.

Here’s a review of the projects:

Mini File Folder Treat Holder - Wacky Watercooler SAB Blog Hop You're Lovely Banner Card - Wacky Watercooler SAB Blog Hop You're Lovely Gift Bag-Box - Wacky Watercooler SAB Blog HopDon’t forget you can order any needed materials and earn your Sale-a-Bration rewards in my online store here.

Hugs & Blessings – Jean

The Wacky Watercooler February Sale-a-Bration Blog Hop

Wacky Watercooler New Catalog(ue) Blog Hop

Welcome everyone to the Wacky Watercooler February Sale-a-Bration Blog Hop.   We’re an international crew so don’t be surprised if you see a few different spellings and price guides along the way.  To clear up any confusion…here in the States it takes a $50 purchase to earn a FREE Sale-a-Bration item…the pricing in other parts of the globe may vary so don’t be surprised if you see different listings in different catalogs from different countries during the hop.

While we also have a nearly new Occasions Catalog(ue) as you saw in last month’s hop, today’s hop is focusing on Sale-a-Bration and all it’s awesome FREE goodies!   Whoo hoo!  Who doesn’t love FREE…right?  If you haven’t seen the new Sale-a-Bration (SAB) catalog take a quick gander then jump right back into the hop.  With all the inspiring hop projects you’ll see you’ll also want to keep a pen and order form handy so you can create your very own versions of what you see this weekend…and…earn FREE products while doing so!

SAB brochure imageClick image to download the brochure

You’ve never before seen such a full Sale-a-Brations Catalog.  Lots of inspiring samples, additional offers for hostesses and recruits and a few suggestions for other catalog products that will get you to that $50 goal.  If you like the bundle listed there is even a simple and single order number…if you already have some of those items just add the items individually to create the “bundle” you do want to earn your FREE items.

Something else to note…if you fall in love with the new Decorative Dots embossing folder or the new Banner punch don’t despair if you forget to opt for those.  Both of those cool new products will be available for sale in the upcoming 2014-2015 Annual Catalog

Here’s the U.S.  2014 Occasions Catalog you might like to select your $50  incremental purchases from so you can earn your FREE SAB merchandise.  Of course any of our currently offered products and merchandise promotions will help you earn your way to FREE SAB product.

2014 Occasions Catalog

Occasions Stampin’ Supplies  (PDF)

Revised Holiday Carryover List (PDF)

If you are moving in hop order you’ve arrived from the very talented Jackie’s Jack Otter Stamp blog.   I love the title of her blog…love Jackie too – her blog title really gives you a sense of her fun side.  You’ll definitely want to go back and check her past posts after the hop.   If you are working in reverse order weren’t your socks knocked off by Susan’s wonderful projects?   Susan is a wonderful new addition to our Watercooler Hop schedule as well as a dear friend I discovered through stamping and hers is another blog to investigate after the hop for sure!

However you are viewing the hop we’ve built it in a circle so you can join and hop on and off at will.   If you get lost just click the hop banner or the home watercooler to get back to our hop home site with the list of participants.    You may want to keep an eye on that site in between blog hops as we have plans to post somewhat regularly there too.

*****

As I mentioned last hop… in this new year…I’m keeping it fresh & simple with designs you can create quickly and cleanly…you can even prep some pieces ahead so when you are ready to sit down and create it will literally only take you minutes.   Today’s trio of hop projects illustrates that perfectly.  With February being notorious for crisp clear colors like red and white (well Valentine’s as well as Winter probably has something to do with that color set) I’ve chosen to go Real Red, Whisper White and a hint of one of our latest In Colors – Coastal Cabana.  All three projects work well together as a set or for individual uses.  The designs also adapt themselves to pretty much any color scheme all year round.

Edited to Add:  I’ve had a few requests for a PDF for this set of projects so I’ve put together a very basic collection of the pictures, supply lists and basic tips.  You can download it here.

*****

You’re Lovely Treat Bag/Box

You're Lovely Bag - watermarked

Box measures: 4″ x 3-1/2″ x 1-1/2″

First up is a sweet little box/bag.  Practical too as you can get 2 box/bags out of a single sheet of 12″ x 12″ cardstock or Designer Series Paper.  I found the perfect tutorial on a fellow demo’s blog and of course quickly pinned it to my Pinterest Simply Score Board.  You can see it here.  Thanks Jill for taking the math work out of this fun creation.  Just score, fold, adhere, add handles and go.   I’ve substituted the Sweater Trim from the Clearance Rack (yes those reduced price purchases also qualify you for free merchandise from SAB) for the Cotton Ribbon Jill used.   This size is so handy for a variety of treats and gifts that you may want to keep several on hand in a variety of colors ready for quick decoration for any occasion.   I like to keep them folded flat but scored and then just add Sticky Strip for a quick construction and decoration.

You're Lovely Bag Side View - watermarkedSide view of the bag/box

Supplies:

Stamps: You’re Lovely (SAB) 133575 wood and 133578 clear

Ink: Coastal Cabana, Real Red

Paper: Whisper White and Real Red Core’dinations Cardstock

Other: Big Shot,  Deco Labels Collection Framelits, 1 ¾” Circle Punch, Stampin’ Dimensionals, Basic Rhinestones, Whisper White Sweater Trim (Clearance Rack), Simply Scored, Bone folder, Crop-a-Dile.

*****

You’re Lovely Banner Style Card

You're Lovely Banner Card - watermarked

You're Lovely Banner Card - points down - watermarkedShown points down so you can see the banner effect.

I’ve had my eye on a creating a banner style card for some time now.   It’s filled my thoughts, my sketches and even my dreams…lots of them.   With hop, it seemed today was the day!   Now that I’ve done one I can see more in my future.   Lots of fun and very easy.  I’m also hoping that having made one my dream self will be satisfied that I won’t forget how to do these.

Details:  Measure to the halfway point on your card, make a mark.  Then draw a line straight up from that mark to the height you want for your banner indent.  Then using either your trimmer or long bladed pair of Craft Scissors cut from the corner point to that end point of your indent mark.   Do that for both sides and Voila!   A banner card.   A bit of contrasting color on the inside so the banner points show up clearly and you are ready with your banner card base.  Add decoration and there you have it.  A simple but effective design anyone of any gender will enjoy.

One note about embossing the front of the card.  Some folders including the Square Lattice will shrink the front edge of your card back just a bit so you may want to wait to score the card’s fold until after you’ve embossed the front end unless you enjoy fixing boo boo’s with the trimmer.  Uh huh…ask me how I learned this tip.   Sigh….

Supplies:

Stamps: You’re Lovely (SAB) 133575 wood and 133578 clear

Ink: Coastal Cabana, Real Red

Paper: Coastal Cabana, Real Red, Whisper White, Fresh Prints Designer Series Paper Pack

Other: Big Shot, Square Lattice Embossing folder,  Deco Labels Collection Framelits, 1 ¾” Circle Punch, Stampin’ Dimensionals, Basic Rhinestones, Whisper White 3/8″ Taffeta Ribbon, Simply Scored, Bone folder.

*****

Last and perhaps simplest yet….a mini file folder that holds a Hershey’s treat.   If it’s Feb. 13 and your darling daughter or son just asked you for Valentine’s treats for school this may be your life saver.  Otherwise it’s a nice treat to drop in a lunch or place on a coworkers desk.   Nice on a pillow too! 😀     If you want to kick it up a notch you could run the Coastal Cabana piece through the Adorning Accents mini hearts embossing folder.  Of course I thought that might be just a bit too precious for the boy this folder is destined for.

Mini File Folder Treat Holder

Chocolate File Folder - watermarked

Hershey's File Folder - watermarked

Pairs beautifully with either the coordinating card or  bag:

You're Lovely Card and Mini Chocolate Folder - watermarked

You're Lovely Bag & Chocolate File Folder - watermarked

Supplies:

Stamps: Fabulous Phrases

Ink: Real Red

Paper: Real Red, Whisper White & Coastal Cabana Cardstocks.  Silver & Red Glimmer Papers.

Punches: Small Heart & Word Window

Other: Envelope Punch Board (#133774), Linen Thread, Hershey’s bar (or other similar sized)

*****

Have I mentioned that I love the new Stampin’ Up!  Envelope Punch Board?   Yep…it’s my latest heart throb.  I’ve even created a Pinterest Board here with a steadily growing set of projects to CASE.

Here’s the quick and simple details for the Mini File Folder Treat Holder.  Start with a 4″ square piece of cardstock and score at 2″ & 2-1/4″ in one direction.   Fold and crease with a bone folder.   Open out flat and using the Envelope Punch Board, place the left edge of the paper centered in the opening and punch.  Then slide the edge over to the 2″ marking and punch again.   Flip to the other end of the paper and repeat for a second tab.   Then use your Stampin’ Trimmer to trim the excess cardstock by aligning the bottom of dips/troughs of the punched sections along the cutting line.   Fold up around the candy bar.  Use Linen thread (Washi Tape works too) to wrap around and secure the candy in the folder.   Decorate as the spirit moves you.   Better be fast though so you don’t succumb to the lure of the chocolate within the folder.  To be on the safe side it helps to have a few extra bars around than you need to complete your project.  Unless of course your willpower is much, much greater than mine.  😀

Note:  After I completed my project I discovered another demo had made a fun video showing much the same thing (don’t you love it when great minds think alike?) and that might help you see the steps.  Our measurements and candy choice are different but sometimes seeing the process makes it easier to follow a description.  You can find my pin of Becky’s post and video here.  Just click the Pinterest pin’s picture and you’ll be right where you can see it all.

*****

That’s it for my post for this second Watercooler Hop of 2014.   Hop along now to see the rest of the fabulous hop entries and look for our Wacky Watercooler crew in the coming months as we create more new hops for your viewing and crafting pleasure.   Click the watercooler buttons to find your way and may your Season of Sale-a-Bration (January 28th-March 31st) be filled with creativity, inspiration and of course lots of FREE new stamping stuff!

Home Buttonnext watercooler crock buttonPrevious Button

It’s a Big Shot Christmas – quick neighbor gifts that sparkle

December is underway which means Christmas isn’t far away.  Time to get to my crafting for special friends and neighbors.   The Online Extravaganza may be over but there’s still plenty of sparkle and deals to be found in the two current Stampin’ Up Catalogs.   Some probably to be found on your own desktop too!  Would you believe I’m planning to gift some friends and neighbors with scraps!  Yep.  The many projects I’ve been working on and that are in the queue to share with you produced a lot of scraps and here’s a couple or three items rescued from the scrap heap.

My Big Shot Christmas mini gift set. Two cards (3″x3″) and a small ornament. Ornament is cut with the Bigz XL Flower Folds die from aluminum flashing from Lowe’s.  Layered with some netting then a snowflake from Northern Frost decorative strip die a small Real Red scallop circle from the Itty Bitty Punch set and a rhinestone.  This smallest flower from the die was another scrap!  A left over from the tea light holders we made sometime back that have been kicking around.  I knew they’d come in handy.    Snowflake was left from some recent holiday projects as well.  Those of you attending recent events probably recognize the flake.  I’ve had everyone punching out and die cutting the little bits for weeks and months now!   Love that die!    Ribbon is some retired Stampin’ Up gingham run through an eyelet placed with a crop a dile.  The ribbon was a Clearance Rack buy from a year or so again (love those retired SU bargains) but since I was looking for a Folk country feel with a bit of bling and polish it was the perfect counterpart to the silver embossing and glimmer paper.  Sadly Stampin’ Up no longer sells eyelets either but my drawer is still filled with them and without an eyelet the Flashing will cut the ribbon in no time.  Makes for a more finished look as well.  Taking pictures of this card had me realizing just what my sister bloggers have been talking about.  The glimmer and shine of Stampin’ Up’s Silver glimmer paper is of such high quality that the average camera just can’t help being overwhelmed!  Makes it almost impossible to see the Versamarked watermark on the Cherry Cobbler paper peeking out through the glimmer bird frame.

Cards use the Holiday Collection Movers and Shapers  bird die.  One is Whisper White run through the Snow Burst Folder on a background of French Script (retired version of En Francais) embossed in silver layered on Night of Navy with Silver cording from 2 Holiday Mini’s ago (those reels were so large they last forever – hee,hee).   Second card uses the glimmer paper negative left from another 20 swap projects.   Have you figured out that I have a bird and flake thing.   My swap buddies have come to expect wings on any card I send in.   One of these days they’ll all faint when nary a feather they see.   Won’t be anytime soon that’s for sure – LOL.    You can’t see it but French Script was watermarked with Versamark on the under layer piece of Cherry Cobbler then layered onto another 3″ x 3″ of Night of Navy.  More cording was tied across the top.

Nice little neighbor gift or even a his and her card set, for a friend with the ornament. I thought it was fun to create and  group these with the birds facing towards each other. Will present in a Fancy Favor Box or small Pizza type box with another die cut bird on the the box.  A Fancy Favor Box could also be a luminary making a fourth gift as well as a holder…still figuring that part out.   Only 23 more days to do so though so better see what else is on the scrap heap.

Paper:   Whisper White, Night of Navy, Cherry Cobbler & Silver Glimmer Paper(available in the Holiday Mini and slated to expire January 3)

Ink:  Versamark

Stamps:  French Script (retired version of En Francais)

Big Shot:     Big Shot,  Bigz XL Flower Folds die,  Holiday Collection Movers and Shapers die, Northern Frost Decorative strip die,  Snow Burst Impressions Folder 

Other:  Silver cording (ret. SU), Gingham ribbon (SU retired), rhinestone jewels, netting (fabric store), Silver Embossing powder, Heat Tool, Itty Bitty Punch Pack

If you sense me giggling right about now…you’d be right.  I have a secret and it’s killing me.  There’s another bird in my future and it’s winging its way from the future.      A future promotion that is.  And I can’t show you the die!   December 1st was a wild day as tens of thousands of Stampin’ Up demonstrators rushed to place their preorder for the Occasions mini promotion that begins  January 4th for the rest of the world.    As a demo we get a month’s jump on the rest of the Stampin’ Up fanatics (another good reason to join my team don’t you think?) in the world.  The oohing and aahing as we discussed our purchase strategy with one another online in the demo only and marvelously inspiring Stampin’ Connection was so much fun I forgot to sleep.    Now for the good news…My die will be here Monday…squeal!!   

Wonder what Wicket will think about “another” bird in the house.   This one however can bite back if she gets funny with it.   Shortly after that…while I can’t show you the die…I can…show you what I make with it!   And not only that…you may just grab a glimpse of future Sale a Bration product in action too!    That’s the double surprise SU hit us with last week.   Demo’s don’t have to wait for the Sale A Bration to start on January 24th we started earning them with our preorder purchases as of yesterday!    And should I mention Stampin’ Up ran some contests over the last couple of months and thousands of demo’s will be receiving free stamps, brads and more (yep…arriving Monday as well! ) as well as a chance at a few more stamp sets next week.   If you get a call from me then…do me a favor…pick up the phone and lets talk…you know I’ll share the loot at stamp camps and workshops so we can all have some fun with new rubber!    There’s never been a better time to be a demo than this very week.   Does SU know how to celebrate Christmas (and paranthetically my birthday in January) or what!  Yep…or what for sure and for the next several weeks!!    

Now of course I don’t want to distract you or I from the Holiday Mini that’s currently current.  There’s still a lot of terrific bargains and inspiring product found there and not only is Christmas still in the offing but so is Valentines and the need for the glimmer paper among others great craft product…and yeah…I ordered a bit of that holiday mini magic too that will be coming on Monday as well.   I’ll be showcasing that too before the mini expires  Jan 3rd.   I hope Mr. UPS is in shape…he’s going to get a work out!  Hard to believe its coming all in one 25 or 30 pound box!   Could be a Mary Poppins thing going on in that desceptively simple looking cardboard box.    You’ll be seeing some new color tones here too as I finally start playing with more of the In Colors.  Both sets are featured in the Occasions and Sale a Bration so get those colors warmed up and ready you’ll be using them for sure come the new year if you aren’t already.

One last detail about today’s project.  If you sign up and prepay for the Dec 10th Holiday Gift Camp my partners and I will be running the two 3 x 3 cards will be your bonus project!  We have mini houses, aluminum garden markers, joyful banners and more on the menu so come and enjoy for only $20 and a wonderful potluck lunch.   Email and Paypal will take care of your sign up so you can tuck some of these fun scraps into someone’s stocking or other gift.  If you can’t be there in person I’ll be happy to send you a kit with the directions you’ll need and most of the pieces prepped for you to put it all together in the comfort of your home.  Just add shipping to the basic fee.  I’ll even tuck in an ornament  for your very own tree.

So don’t forget to check your crafting area and scrap heaps.  There’s bling and gifts to be found in those there piles

Hugs and blessings as we begin our second week of Advent this Sunday. – Jean

It’s officially the holidays…have you punched something yet?

Today I have a quick punch tip/trick for you.  And knowing that the holidays are stressful for so many I thought I’d offer you an alternative style of punching to soothe and inspire you.   As a crafting enthusiast social worker friend of mine says…punch paper…not people. ☺

Here’s a PDF flyer with the above information on it.  One for you and one to share with a friend.  Or if you are a demonstrator you can print and share with customers.

Lace Ribbon Border Punch Trick Flyer  – PDF flyer with 2 copies per page

Okay, bad joke in the title I know, but I couldn’t resist, especially since I had a punch trick to share with you.   And it is Black Friday after all with all the pushing and shoving to get the best deal.    The crowds and bad behavior was one more reason I stayed home and shopped online in my jammies with Stampin’ Up’s Online Extravaganza!    I also played with the bits and pieces from the picture above.  Don’t you love it when you can get one punch to work with another to create something wonderful.  I love my new little blossoms/snowflakes from the center of the Lace Ribbon Border punch.   I can see my next experiment will be to play with the open spaces the flowers left behind.

*****

Lately I’ve been getting fascinated with Redwork all over again.  If that’s not something you are familiar with there is a  summary here that I found using Google.   Whether in embroidery or quilt form its a fun, nostalgic crafting idea.   So of course I had to create a paper version – probably the first of many – LOL.   When I first learned the basics of redwork embroidery my Mom insisted on the KISS principle.  Keep it simple, unembellished and the only deviation she herself made was to use an ivory or vanilla background instead of the more traditional white.   Easier on the eyes and less glare I guess.   Whatever the reason that’s my prefered background too as you can see – ignore the brown matting if you can…that’s the only way I can get my scanner to show a vanilla background.   Although now I come to think of it.  I could have used just a vanilla layer on a Cherry Cobbler base…hm…note to self…try that variation tomorrow.

This card also included another experiment for me.  Heat embossing with a new embossing powder.  Stampin’ Up in the new catalog came out with a new Cherry Cobbler embossing powder that was a perfect accompaniment to my redwork inspired design.   I wish my scanner had picked up the shine of this awesome new option.    Can you tell I’m in love with all things Cherry Cobbler?  Yep, my all time favorite of the additions to the color family from last year.  And of course the perfect color for Fall and Christmas and probably Valentines too!  Really…I’ll find a way to even make it work for Easter!    And if you like the look of the “Noel” image you can find that in the Many Merry Messages stamp set that’s currently on sale for 50% off during the Online Extravaganza that ends November 30th.  

In case you’re wondering where the little tree came from.   No Stampin’ Up doesn’t have a new punch.   They do however have a new die.   The Stocking Accents die from the Holiday mini has a number of fun accent pieces you can use with the new Stocking die or all by themselves.   Lately I’ve been cutting them out of felt and creating fun ornaments but that’s a post for another day.


 Stamps:  Many Merry Messages (on sale for 50% off during the Online Extravaganza)

 Ink:  Versamark

Paper: Very Vanilla & Cherry Cobbler Cardstock

Other:  Lace Ribbon Border Punch, 3/4″ Circle Punch, Big Shot, Stocking Accents Die, Cherry Cobbler Embossing Powder, Heat Tool.


Stocking Accents Die #124099 $17.95 Many Merry Messages #116586 $17.48 while on saleMany Merry Messages #116586 $17.48 while on sale


Many Merry Messages #116586 $17.48 while on sale

If you decide to stay home and shop with Stampin’ Up you can click my shop online button in the sidebar or any of the highlighted Online Extravaganza text.  The sale runs until November 30th and you can order online through my website, email me your order or host your own workshop to take advantage of the savings.   There are glimmer brads and ribbon I was itching to add to my card on sale but of course that wouldn’t have been in keeping with the simplicity of redwork design.   Ah well…another day…another set of rules will allow me to play with sparkle and shine.   How about you…have you punched anything today?

Hugs and blessings – Jean

Stampin’ Up! Gift Card and Tea Bag Holders….Tis the Season!

Hi All,

Winter has arrived here in Southern Oregon with chilly temps, lots of rain, hail and something that’s a cross between snow and hail!  So naturally with Christmas just around the corner and Valentines coming soon after (with my birthday in between – LOL!) my mind is thinking Tea and gifts!  Tea to warm up and creating fun gift card holders for that most modern of all Christmas Gifts.   So much easier to wrap but boring if just tucked inside an envelope.  Gotta keep the fun going right?  Besides with the right holder you can hang them on a tree or tuck in a stocking to keep things interesting.  At the bottom of the post I’ve added links to some documents I created with lots of creative links for Tea Card Holders and Poems and also a gazillion kinds of Gift Card Holders.  Enjoy!

Here’s a tea bag  and gift card holder all made from the same Big Shot die  from my last couple of stamping events.

Tea Bag Holder using the Baskets and Blooms die – Works for Gift Cards too!

Couldn’t print the cardstock with an appropriate verse (don’t you hate it when the printer announces its out of ink the day of an event)  so I  hand wrote a schmaltzy quick one with a marker.  The idea was CASE’d from a swap from Regionals my Upline Cheryl brought home.  See the swap at the end of the pictures.  As an alternative a creative stamper from our event used the Peace, Love, Joy stamp from All Holidays in place of the tea verse and that looked absolutely lovely as well.

In CASEing the tea bag holder I switched out the DSP to cardstock watermarked with the Simple Snowflake stamp and created a mini tag with two newer punches.  Ever since I figured out a way to showcase our new little oval punch I can’t stop making variations on this tiny tag.  LOL!   Love the original creators use of the Bitty Buttons as a faux Build a Brad and now I’m addicted to that as well!  Both these options are perfect for the frugal crafter on a budget.

Tip: And one of the things I love about the Big Shot and its sturdy steel rule dies…. its possible to cut paper for more than one of these baskets at a time.  I used my Table top Cutter to cut an 8-1/2″ x 11″ standard sheet of Stampin’ Up Cardstock into fours (same as if creating card fronts for swaps).   Then stacked all four pieces together, placed over the lower basket image on the die and ran through the Big Shot with the usual sandwich.   Voila…two gift card baskets ready to put together!   That little feature sure saved me some time when prepping for the events showcasing this little gift holder!

Supplies for the tea bag holder version:

Stamps:  Simple Snowflake (single stamp), Itty Bitty Bits (tea cup), Tiny Tags (4you)

Paper:  Crumb Cake, Cherry Cobbler, Very Vanilla Cardstock, Nite Owl DSP (from the Holiday Mini)

Ink:  Cherry Cobbler, Crumb Cake (daubed around the edges),Versamark, Cherry Cobbler Marker

Other:  Big Shot, Baskets and Blooms die, Medium Oval Punch (I think of it as small – lol), Jewelry tag punch, Decorative Label Punch , Snowflake Punch, Itty Bitty circle punch, Piercing tool and Mat Pack, Itty Bitty Buttons, Tinsel Trim, Linen Thread, glue dots, dimensionals, Sponge Dauber, Sticky Strip, Dazzling Diamonds and two way glue pen (doesn’t show up in the picture).

***

The layered background to the Decorative Label piece  is another Decorative label punch piece cut in half and postioned above and below the full punch piece.  The Tinsel trim with its wire core makes getting the tea bags in and out very easy.
 
The snowflake bitty button piece was created by stamping the tea cup image from Itty Bitty Bits on a scrap piece of Very Vanilla Cardstock, punching with the Coordinating Itty Bitty punch then attaching with a glue dot to the back of the button.  Attach the button piece to the snowflake punch piece with a glue dot then attach the completed snowflake/button piece to the holder with a dimensional.  Easy Peasy.   I did discover that the round punch and button were the easiest though with the coordinating punches and buttons in the Itty Bitty collection you can use the scallop or flower shape too – they’re just a bit trickier to line up correctly!
 
****
 
Here’s the Gift Card Version with two slight variations as offered at Decembers Christmas Gifts Stamp Camp


And here’s a bit of a close up that shows the gift card in place as well as the back side of the holder.  I’m noticing that the Dazzling Diamonds on the mini tag aren’t showing up in either picture.  Must be the scanner!   I was also very pleased when designing this to find that the Merry Christmas Postcard stamp fits completely onto the basket!  It looked so much larger in the Holiday mini catalog.  Very cool too that it also coordinates with the Bells & Boughs stamp set I used too (note it also coordinates with the Christmas Collage stamp and the Deck the Halls Paper and Fabric).  Have to say too that once again I’m enamored of the Tinsel Trim (boy do I hope Stampin’ Up adds that to the permanent line up).  Provides bling and ease of opening and closing all in one lovely package.
 

Gift Card Holder - front


Gift Card Holder Back

Supplies for the gift card holder version:

Stamps:  Merry Christmas Postcard (Holiday mini single stamp), Bells & Boughs (Holiday mini), Peaceful Season (Holiday Mini Hostess set – to from stamp image), Short & Sweet (snowflake)

Paper:  Crumb Cake, Cherry Cobbler, Very Vanilla Cardstock

Ink:  Cherry Cobbler, Crumb Cake

Other:  Big Shot, Baskets and Blooms die, Medium Oval Punch (I think of it as small – lol), 1/2″ circle punch,  Piercing tool and Mat Pack,  Tinsel Trim, Linen Thread, Cherry Cobbler Seam Binding,  Sponge dauber, Sticky Strip, Dazzling Diamonds and two way glue pen (doesn’t show up in the picture).

****

Overall a very quick project.  Die cut the baskets, sponge dauber with Crumb Cake ink around the basket and the handle opening.  Stamp the images, create the little hanging tag with punch and stamp and add a little dazzling diamonds to the snowflake (and anything else that strikes your fancy) with a two way glue pen and Voila a gift holder (or 2) in under 10 minutes.  Inexpensive too.  Depending on the bling and embellishment factor you can make these for between 30 and 60 cents apiece!


****

And the Tea Bag Holder Shoebox Swap from Portland Regional that started it all.

Here’s the lists of links for both Gift Cards and Tea Bag Holders (poems too to go with them):

Gift Card Holder ideas

Tea Bag Holder Poems – templates – tutorials

And a template for a basic teabag holder:

Tea Bag Holder Template

****

Time to get a cup of tea and start creating more of these little darlings.   Makes the perfect little hostess gift, teacher gift or gift exchange item.  Fun to hand out to just about anyone and won’t dent the pocket book (depending on the size of the gift card of course – LOL!)!

Hugs and Holiday Blessings – Jean

Merry Christmas and Holiday Blessings!

Tightwad Tuesday Announcement: Watercolor Wonder Crayons are Back….YaY!!

Watercolor Wonder is Back!!!!

(and so are the crayons! :D)

Hi All,

Back in grade school I would beg my Mom for a new box of crayolas at the beginning of every new school year (not to mention everytime we passed the crayon aisle!) and not just any box…the big one!!   Now I get to play with an even better product…Watercolor Wonder Crayons!   These little darlings not only color like a crayon but when water or blender pen is applied they convert to watercolors!  The effects are amazing!   And if you already have the old set of colors Stampin’ Up is ready to hook you up with a Color Renovation Color Conversion kit that will get you four new tins and all the new colors you’re missing.  

So Stampin’ Up is feeding my fetish for art supplies just like I used to use in grade school!   Well…not just like….LOL…these are better…way better! 

Here’s why:

■ Water soluble and easy to blend, allowing for an unlimited range of shades
■ Coordinate with Stampin’ Up!’s exclusive colors
■ Artist-quality, highly-pigmented crayons
■ Available in color collection assortments
■ Contains 10 crayons per package (except New Color Kit which has 17)
■ Can also be used without water to color images

So why all the excitement about the crayons?

Stampin’ Up announced today that after a 6 month wait the Watercolor Wonder Crayons are finally back in stock and available for order.   An unexpected factory move by the supplier and the need to recertify for the expected Stampin’ Up level of quality among other issues has had many of us champing at the bit…and now, finally, joyfully,  all color groupings and the new Color Renovation Conversion Kit are available!   YaY!!

Tightwad Tuesday is celebrating for sure.  These little lovelys last a long…long…long…time!  And with the many uses and techniques available, using these little darlings is a frugal crafters delight.  

Here are your choices and order numbers.  

  • 120949 New Color Kit  – to see more information about this option check this post 
  • 119802 Subtles
  • 119803 Regals
  • 119804 Brights
  • 119805 Neutrals

Given the wait and the number standing in line to purchase you’ll want to get your order in early lest you end up on the backorder list if the blitz is as big as I’m expecting.  You can purchase any and all forms of the Crayons here in my online store. 

Oh and if you get your online order in before midnight tonight (the 30th) you can still take advantage of the online spectacular prices and possible free shipping!!  Can’t get more frugal than free right?  Double Yay!!

Here’s a technical note Stampin’ Up shared with demonstrators:

When you and your customers receive your Watercolor Wonder Crayons, you may notice that some of the crayon sleeves feature old artwork on them. This does not affect the quality of the crayons; we simply need to deplete inventory of crayons with the old artwork before we use crayons featuring the new artwork.

*****

Wondering what to do with your Crayons once you have them in your studio?   Watch the Video then check the list of tutorials and resource links below.

*****

Watercolor Wonder Crayons Resources

http://www.youtube.com/watch?v=OqU-3kOMrzU – Stampin’ Up’s Training/Technique video – Shannon West

http://www.youtube.com/watch?v=HlpbZy4bG_A – techniques using clear mount stamps and WWC

http://www.youtube.com/watch?v=KHBG9QaqskE&feature=related – video – Stamping with WWC – direct to stamp method

http://www.youtube.com/watch?v=jdXyt20HdVg&feature=related – video – melted crayon technique

http://www.youtube.com/watch?v=YG8JWG6zJfA – Video – WWC Color Wash Technique

http://www.youtube.com/watch?v=DPbHRIMNcqA&feature=player_embedded – Dawn’s 411 on WWC

http://mariestamps.wordpress.com/2007/07/16/money-saving-tip-make-your-watercolor-wonder-crayons-last-longer  – make your own palette and thrift tip with WWC

http://www.craftcritique.com/2008/08/watercolor-crayons-from-stampin-up.html – review from years past

http://theserenestamper.blogspot.com/2010/10/watercolor-wonder-crayons.html – photo tutorial on using WWC

http://dianagibbs.typepad.com/stampin_with_di/2010/07/nothings-worsea.html – convention tip for WWC – use the block!

http://www.splitcoaststampers.com/resources/tutorials/wet_watercolor_crayons – SCS tutorial – wet watercolor crayons

http://www.splitcoaststampers.com/resources/tutorials/shimmering_watercolor_crayons – SCS tutorial – Shimmering Watercolor Crayons – Shimmer Paint will work in place of the Pearl-ex

http://www.splitcoaststampers.com/resources/tutorials/canvasstamping – SCS tutorial – Stamping on Canvas and WWC

http://www.splitcoaststampers.com/resources/tutorials/mulberry_batik   – Mulberry Batik with WWC

http://www.splitcoaststampers.com/resources/tutorials/watercoloring_with_watercolor_crayons – SCS tutorial Watercoloring with WWC

http://www.splitcoaststampers.com/resources/tutorials/color_wash – another version of watercolor wash

Picked up a tip from a non SU site that started the coloring process by stamping a line art image to be colored using Versamark and then embossing with BLACK embossing Powder.  This gave a raised relief image to color.  Not only kept the color where you wanted it but gave an artist quality to the image itself.  Very Cool!

*****

Happy Coloring!

Hugs & Holiday Blessings – Jean


Frugal Friday checks out Stampin’ Up’s “Artistic Etchings”…One stamp set two very different looks!

Hi All,

Welcome back to Frugal Friday.  Today I’m looking at a favorite set of mine that definitely fits the frugal bill in both price and utility.   To see a full list of frugally priced under $20 stamp sets and wheels check out the lists in my Scribd files or the links in the right hand side bar.  There is a list for the Idea Book & Catalog and a separate one for the Holiday Mini.

I’m a big fan of the new Vintage trend that Artistic Etchings represents.  Lots of possibilities for out of the box thinking and creating.  And when it comes to frugal stamping that versatility is a key factor.  When one stamp set that is moderately priced to begin with can be used in multiple ways for multiple occasions you know you have a winner.

Tip: When looking at new stamp sets I try to find at least 5 different ways to use a set.  If I can accomplish that goal then I know I’ve found a “keeper”.   I also make a point of creating projects (or at least sketching them out) with every stamp in the set when I get it so I can discover the utility of each image.

 Here are two very different looks created by my friend and Stampin’ Up partner Cheryl for some of our recent events.

First up: 

From our September Stamp Camp. Ignore the Kraft looking sheet in the background – I used that for contrast so the Very Vanilla Cardstock would show up on my scanner.

Stamps:  Artistic Etchings, En Francais,  Perfect Punches

Card Stock: Very Vanilla, Basic Black

Ink: Basic Black, Crumb Cake, Cherry Cobbler

Punches:  1 3/8”x 5/8” Oval Punch, 1 ¾”x 7/8” Oval Punch

Other: Big Shot, Vintage Wallpaper Embossing Folder, Sponge Daubers (for Crumb Cake ink), dimensionals

While the Thanks image looks like its a combination of stamps or Designer paper it’s really the one image from Perfect punches that creates the awesome background and text all in one image!   A little judicious antiquing with Crumb Cake (AKA – Kraft) ink adds to the dimensionality of the image.   Note:  The circle medallion image was stamped before the texturing with the embossing folder.   Some stampers at the Camp also included other images from the set (Crown, key, etc. some in Marina Mist) that added to the collage feel of the card.  They also had a choice of Embossing folders for different textures.

Note:  If you are looking for other ornament ideas the Crown and the “bar pin” image fit perfectly inside the Ornament punch shape and even the circle medallion looks pretty cool.   If you used an ornament punch shaped stencil you could create a fabulous background paper of scattered ornaments across the page with many of the images from this set.   The key even fits sideways!

***

And Second a very different look:

Artistic Etchings as a Christmas Ornament!   This particular card is a CASE of Ann Clemmer’s very inventive card – you can see her blog here.  Even though it’s quite simple it still packs a great deal of punch and was a favorite at this months Christmas Stamp a Stack.

Stamps: Artistic Etchings, Lovely as a Tree,  A Cardinal Christmas (greeting)

Ink: Riding Hood Red, Versamark, White StazOn

Papers:  Riding Hood Red, Cherry Cobbler, Sahara Sand,

Other: Modern Label Punch, 1-3/4″ Circle Punch, Silver Embossing Powder, Embossing Buddy, Heat Tool, Dimensionals, Scissors

*****


Artistic Etchings

Clear Mount: #120573,  $14.95

Wood Mount: #118517,  $18.95

An old-world cathedral, a street café in the shadow of the Eiffel Tower, the stately decorum of a royal palace—these are the types of images invoked by our Artistic Etchings set. Add its vintage look and feel to your cards and scrapbook pages to set a romantic, nostalgic mood. Available both in wood-mount and clear-mount.

Set Quantity: 6

Combines wonderfully with textured embossing folders like Vintage Wallpaper and Finial Press and many more.   I’ve even thought that the round medallion would work to approximate a Mandala (Buddhist mystic wheel image), a Sioux shield maybe placed behind the Buffalo from the In Wilderness stamp set.  The longer lacy image reminds me of one of my Grandmothers favorite pins.   And of course all the images will work alone or together to create wonderful One Sheet Wonders or background papers.

From simple to complex the possibilities are endless.

Links:

SCS Gallery: http://www.splitcoaststampers.com/gallery/showgallery.php?si=%22Artistic+Etchings%22&x=29&y=13

Stampin’ Addicts Gallery: http://www.stampinaddicts.com/gallery/showgallery.php?cat=3384

 ***

http://stampcrave.blogspot.com/2010/10/z-fold-accordion-card.html

http://thequeensscene.blogspot.com/2010/07/day-2-of-artistic-etchings-collection.html

http://melissahuie.blogspot.com/2010/07/vintage-collage-card.html

http://www.youtube.com/watch?v=qp7fWHLH3zc – Video

http://www.youtube.com/watch?v=28PpwnJtNpw&feature=mfu_in_order&playnext=1&videos=fKSsF7_J3aA  – video

http://pattystamps.com/pattys_stamping_spot/2010/07/artistic-etchings-sneak-peek.html

http://ilinacrouse.blogspot.com/2010/06/artistic-etchings-and-newsprint-new.html

http://www.iteachstamping.com/2010/09/using-stampin-ups-artistic-etchings-in-a-different-way.html  – Video for another type of Ornament card

http://www.stampsnwhatnot.com/my_weblog/2010/07/artistic-etchings-by-stampin-up-ah-paris.html

http://www.peanutsandpepperspapercrafting.com/2010/06/stampin-up-artistic-etchings-sneak-peek.html

http://www.angelasargeant.com/blog/stampin-up/vintage-style-artistic-etchings/

http://dreamingaboutrubberstamps.com/simple-saturday-artistic-etchings-and-love-letter

http://stampingwithlisa.com/featured-demo-of-the-month-part-2-3

http://stampingwithlisa.com/artistic-etchings

http://www.tiffanyscardtique.com/2010/07/artistic-etchings.html

http://stampingjo.com/stamping-ideas/artistic-etchings-stamp-set-with-a-vintage-flair/

http://www.northshorestamper.com/2010/10/artistic-etchings-class-card.html

*****

I hope you’ve enjoyed this look at a favorite stamp set.   Kudos to those original stampers who first saw an ornament in a crown and circle image.  I love the creativity of my sister Demo’s.

Hugs and Blessings – Jean

Quick Tip: Embossing Folders and Chipboard


Note added later:  I’ve discovered a very freaky thing.  The computer world and my blog seem to be playing tricks.  One time I log on the pictures show the correct embossed and debossed images.  The next hour the images appear to be the reverse of what they are marked.  Not sure how its doing that.  When I scanned the images something similar happened.   The initial picture looked correct as to what parts of the design were raised and what impressed into the paper.  Then when I would open them up in a viewer the design areas were reversed!  However when I first posted them on the blog they showed up as they should.  Now they are alternating.  Anyone know what’s up with that??

Hi All,

Turns out embossing folders and chipboard are the perfect ingredients for a new playtime!  What inspired that…besides my insatiable need to play with my Big Shot?

I was scanning the various forums on Stampin’ Connection the other day and came across a question from fellow (probably that should be sister – lol) demo Carol Markley (hi Carol!).  What’s Stampin’ Connection you ask?  A very cool online community sponsored by Stampin’ Up and available to Stampin Up Demonstrators only.  Another great perk when you join the team!

Question by Carol Markley:

Patty’s Stamping spot shows a convention demonstration using the lattice embossing folder with chipboard.  I have tried several different “sandwiches” and they are all either too thin or too thick.  Anyone have success with this?

***

Quick answer to Carols question…Yep!  

I played with that concept this morning.  And in case you’re interested, here’s what I came up with.

Chipboard #1 - Embossed

***

Chipboard #2 - Debossed

Each Big Shot seems to take sandwiches somewhat differently and of course it also depends on the chipboard used. I didn’t have any of our SU Longboard Chipboard on hand so I used a cereal carton for my “chipboard” – the poor woman’s version don’t you know – LOL!

Here’s the sandwich that worked for my Big Shot machine (from the bottom of the stack up):

Multipurpose platform set to Tab 1
cutting plate
Vintage Wallpaper folder (I don’t have the lattice one yet) with chipboard inserted
Cutting Plate

I did this twice and the first time it went through quite easy and impressed well. The second time it was stiffer going through and when I examined the piece I think that was because there was a a slight bit of extra paper adhering to a glued spot of the box top I’d grabbed to play with. Though it still embossed okay it was a good reminder to check my piece carefully for flaws.

Since the SU chipboard is thicker I would suggest using the bottom no tab setting and then adding cardstock shims until the sandwich feels right for your machine.   While the machines have a 3 year warranty (yay!  SU and Sizzix) you really don’t want to break yours …so play carefully my friends.

I also played with brayering ink on the folder and trying both embossing and debossing depending on which side of the folder was inked. Very cool effect.  Thanks for getting me thinking along these lines  Carol.

Oh and in case you’re wondering.  Embossing is what happens when you have a raised image and Debossing is when you have a recessed image.   It’s pretty much all about which side of the paper you use when you are using an embossing folder – something you can get away with as long as there is no text to show up in reverse.  If text is involved than an embossing folder does just that…embosses.    The new Letterpress plates from the Holiday mini are a great debossing tool when you want text as well as image impressed into the paper.

****

Now, after this playtime,  I have an idea for creating storage folders for my embossing folders. Cut a card sized piece of cereal box (5-1/2″ x 8-1/2″) score halfway and emboss the front and back just like I would a card front and back using the folder to be stored! Then attach a Round tab punch piece with the folder name on it and Voila! A very cool storage device that will sit nicely in a box or basket. Might have to play with the folder sizing and maybe make it a wee bit bigger.    Once I get one completed I’ll post a picture.

That’s it for today.   Hope you enjoyed this quick tip and a fun new way to use the Big Shot.

Hugs and Blessings – Jean

Stampin’ Up’s Clearance Rack Blitz: Killer Sale…up to 80% off


The Clearance Rack Blitz is on!

(click on the picture to go to my site then click Shop now and select Clearance Rack for the best prices)

The Stampin’ Up Elves have been busy and want to help you get started on your Christmas Creations early so they’ve searched the warehouse for the product that got forgot and flooded the Clearance rack with amazing deals to set you on your way.

From October 5–18, Stampin’ Up is adding over two hundred more discontinued items–some at up to 80 percent off–to the Clearance Rack portion of the online store.

Things to know about the Clearance Rack Blitz:

  • Orders for Clearance Rack items should be placed through my Online Store.
  • Qualifying orders are eligible for hostess benefits/Stampin’ Rewards.
  • While the Blitz last from October 5–18, some items, depending on availability, may be made available in the Clearance Rack in the future. 
  • Note:  Some items though are only available in tiny quantities so don’t wait to order.
  • All discontinued items are available only while supplies last.
  • All sales of discontinued items are final.

Paper, ink, Big Shot dies, embellishments and more at ridiculous prices and guaranteed to be out the door in the blink of an eye.

I’m available for consultations if you need help placing your order or deciding which items will suit you and your projects best.

Happy Shopping and aren’t you glad the Elves brought Christmas a wee bit early……..

Blessings – Jean

(This post will remain at the top for the next week or so.  To see current posts please scroll down)