Guest Artist goes Grunge!

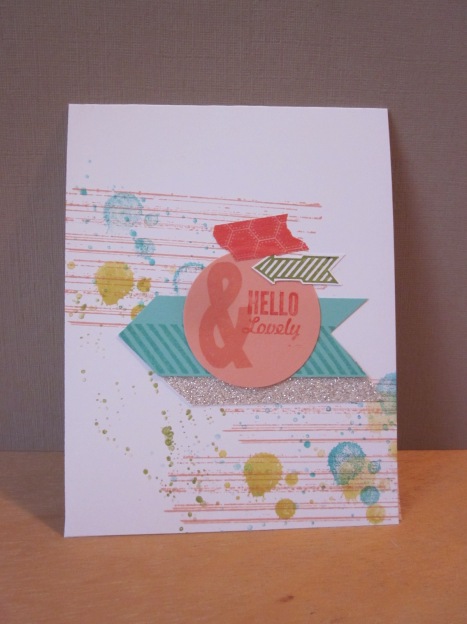
Yep…Linda is back as my guest artist again and this time she does Grunge…Gorgeously!

Check it out.  This was Linda’s second project from our most recent Stamp Camp.  Don’t you wish you could have been there to make one for yourself?   We have a gift camp coming up this Saturday if you’d like to join us.  We’ll make several gift type projects so you can get a jump on your holiday gift planning.

For this project Linda took her inspiration from one of the make and takes from the 2013 Stampin Up Convention.  Linda was lucky enough to attend this year’s 25th Anniversary Convention and brought back lots and lots of ideas and has been busy sharing the inspiration and excitement of her experiences in Salt Lake City.  She also brought back some loot for Cheryl and I in the form of Memento Mall goodies.  Don’t you love friends who bring you gifts from a trip?  Very special.  Will have to dedicate a post just to that sometime soon!   something else she brought back was hundred’s of swaps!   Lucky Linda now has loads of inspiration for those days when the mojo runs dry.  As you can see from this card though…her mojo is just fine!


Gorgeous Grunge - Linda Miller


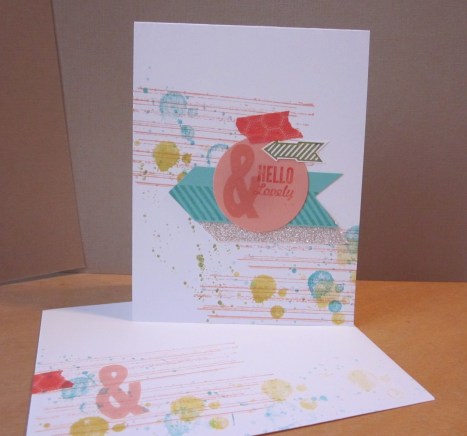
Here it is paired with a gorgeously grungy envelope too!

Gorgeous Grunge Combo - Linda Miller

Linda has been kind enough to hook us all up with her supply list and directions.

Supplies:

Stamp Sets: Gorgeous Grunge, Hello, Lovely

Card Stock: Whisper White, Crisp Cantaloupe, Coastal Cabana, Silver Glimmer

Ink: Bermuda Bay, Crisp Cantaloupe, Coastal Cabana, Old Olive, Summer Starfruit, Calypso Coral Classic Pad and Marker

Accessories: Whisper White Baker’s Twine 9”, Very Vintage Designer Button, Epic Day This & That Designer Washi Tape, Glue Dots, SNAIL Adhesive, Bone Folder, ” 1 ¾” Circle Punch, Paper Snips, Stamping Sponges, Stamp-a-Ma jig, Simply Scored. Sticky Strip.

Instructions:

  1. Score standard Whisper White card base at 5 ½” with Simply Scored and crease fold with bone folder.
  2. Cut Coastal Cabana Cardstock into an arrow using Paper Snips. Stamp ½ of arrow lengthwise with the stripe stamp inked with Coastal Cabana onto arrow and then adhere Silver Glimmer paper to the back of the arrow to create the border. (may need to use a little Sticky Strip to get it to hold)
  3. Adhere to card front.
  4. Stamp off the spatter images from Gorgeous Grunge in Bermuda Bay and Summer Starfruit ink on scrap paper, then stamp on the card front and envelope without re-inking the stamp.
  5. Ink the “Hello, Lovely” sentiment from Hello Lovely using a Calypso Coral Stampin’ Write marker and stamp onto Crisp Cantaloupe CS.  Stamp & sign in Crisp Cantaloupe ink and then punch circle out with 1 ¾” Circle punch. Adhere onto card front. (Can use Stamp-a-ma-jig to line up).
  6. Stamp the small arrow in Old Olive ink on Whisper White CS, then cut out the image using Paper Snips. Adhere to Circle on Card front.
  7. Hold the Whisper White  Baker’s Twine on the Coastal Cabana Classic Stampin’ Pad using a Stampin sponge, then pull the twine through the ink to add color.
  8. Pull twine through Button and tie a bow. Then adhere Very Vintage Button onto card front with Glue Dot.
  9. Tear off Epic Day This & That Designer Washi Tape and adhere it to the card and envelope.

10. Stamp sentiment inside.

11. Don’t forget to decorate your envelope.


Thanks Linda!  Grunge never looked so good!

Until next time….

Hugs and blessings – Jean

P.S. If you missed Linda’s last excellent project you can find it here.


Stamp Camp Revisited and a Guest Artist

Today’s post features a guest artist.  My Stampin’ Up partner and sideline Linda Miller.   Linda has been a Stampin’ Up demonstrator for over a decade and her talent shows through in all her projects.    Linda, myself and our wonderful upline Cheryl do monthly events together here in the Medford/Central Point area.  Lots of fun with local stampers who are also friends.  And best of all Linda herself comes as part of a team.   Linda’s Mom Jean comes and runs our regular potluck for us in between overseeing the Church garden.  Her additions to the potluck (this time of year featuring garden produce) and her oversight of the kitchen is a real labor of love.   Love of her daughter and daughter’s friends and love of stamping and cards.   I’ve been blessed to find myself another “other mom” in Jean.  And a sister of the heart in Linda (Cheryl too for that matter).   Wonderful how many hands make light work isn’t it?

Here’s Linda’s latest project from our last Stamp Camp:

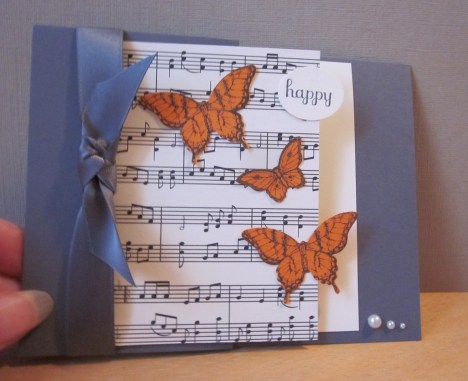
A lovely fancy fold card that you see closed here:

Papillon Potpourri Zfold closed - Linda Miller

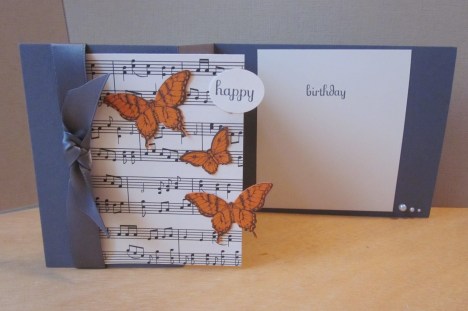
And open here at it’s full extension:

Papillon Potpourri Zfold - Linda Miller
A variation on a Z fold card.  The ribbon is a retired Basic Gray one but everything else is current.  And don’t you love the pearl accents?  Adds to the elegance of the card.   This is one card that is designed to make the heart sing!   Yep…a bad pun what with the musical notes on the designer series paper.  Simple and quick to make – always my favorite type of card.  You can find a tutorial for a somewhat similar Z fold here.

Supplies:

Stamps:  Papillon Potpourri, Fabulous Phrases

Ink: Basic Gray & Pumpkin Pie

Paper: Basic Gray & Very Vanilla Cardstock, Modern Medley Designer Series Paper (the music).

Other: Elegant Butterfly & Small Butterfly punches,  Basic Jewel Pearls, Adheseives, Ribbon

One note:  If you don’t have the Modern Medley DSP you can always use the Music Notes Wheel to create your very own musical score.  In fact several wheels would work in this design.

If you have any questions for Linda about her project you can contact her through her Demonstrator Business Website here.

Thanks again Linda for being a guest artist.

Hugs and blessings to you all and may you find your own heart taking wing and dancing to the music – Jean


Bermuda Bay is back and just as beautiful the second time around.

When Bermuda Bay was first introduced as a new in color it took me awhile to warm up to it.   Now in the interval it was gone I’ve fallen in love with Pool Party and other greeny blue type colors and wished Bermuda Bay was back so it could play with newer colors..   Request approved!    Now Bermuda Bay is back and beautiful in my adapted eyes.   Funny how sometimes we have to miss a color to appreciate it when it’s back don’t you think?   And now it’s back with friends in it’s color spectrum.   Have you seen it layered with Coastal Cabana and Pool Party…gorgeous.

Today to celebrate I thought I’d show a card my upline Cheryl shared at a recent Stamp a Stack.   One can never have too much Bermuda Bay right?  A calm ocean of color just waiting for someone to dive in and swim.

Coastal Cabana Punch Card

All images © Stampin’ Up!

Supplies:

Stamps: Label Love, Fabulous Phrases

Ink: Bermuda Bay

Paper:  Bermuda Bay Textured Cardstock (no longer available but we have something similar now in the Core’dinations paper), Bermuda Bay Cardstock, Naturals White Cardstock, Silver Glimmer Paper.

Punches: Artisan Label, Small Heart, Decorative Label, 1″ Circle

Other: Big Shot, Top Note Bigz die, dimensionals & snail adhesive

*****

Gotta love all that monochromatic layering.  A little stamping, a little punching and quick pass through the Big Shot and you have lovely Bermuda Bay goodness to send on its way.   Wish you could see this in person as the colors and papers glow and sparkle.  Makes me want to take a trip to Bermuda!

Something else this card does is highlight one of the deals in the New Annual Catalog.  A bundle with bundle pricing.   Save 15% when you purchase the Artisan Label punch and the Label Love stamp set in their bundle configuration.

Want to save even more?  Click and download the lists of bundles found throughout the Annual Catalog and the new Holiday Catalog just released last week.  If you are a demonstrator reading this, feel free to borrow and distribute these flyers to your own customers.

Bundled Product Flyer PDF of bundles with pictures and ordering information

2013 Holiday Catalog Bundles Flyer – PDF of Holiday Catalog Bundles

Hugs and happy stamping – Jean

Halloween Wreath and a Guest Artist

Hi all,

Have you jumped on the rosette/lollie/accordion flower bandwagon yet?   By whatever name you call them these little darlings are taking over the web!     Maybe it was the introduction of Stampin’ Up’s new Holiday Mini with its very cool wreath depicted on page 6 or maybe it was the introduction of the new Simply Scored that makes it so easy to create these little darlings.   Whatever it was, a very good friend of mine has jumped on and I’ve learned a lot from her.   So…..

Today I have a special treat.   A guest artist has dropped by my blog to share her wonderful project.   Patti Leeke is another Stampin’ Up!  demo, a fellow llama and more than that…a wonderful friend.  Currently living in Tennessee Patti shares her crafting talents with friends, family and customers.   Stamping has been her passion for the last short while and I hear tell she even stamps out on the ice floes while her husband is ice fishing!   And let me tell you she isn’t a one trick gal by any means.   She’s as famous for her humor and good heart as her crafts.  Every day she sends me howlers in my inbox as well as telling stories on the various forums we both frequent and where we met around a virtual watercooler.   Trust me when I say…there is never a dull moment no matter where she is!  

Recently I saw Patti’s Halloween wreath on our private Llama site and was so impressed.   Well I was impressed with her work that’s for sure and even more that she had posted something online.  Hee,hee.   Knowing her love hate relationship with computers and they with her (boy can she tell some hilarious stories that beat my own crazy computer experiences) and since I’ve yet to convince her to take up blogging, I asked if I could share her work with fellow stampers on my blog.   Being the terrific llama gal pal that she is she said yep!  Go for it.   We even collaborated on an outline to share with you.

Here’s the wreath and the following are pics of the various components.  

I might add that one of the things Patti taught me with this project is that stamping and a variety of punch creations can add a lot to the basic rosette.  Somehow that hadn’t occurred to me as most of what I’d seen was a layered effect with buttons and die cuts etc.   I should also note that some of the color shades are a tad funky due to the miracle of digital cameras.   It seems I’m not the only one afflicted with one that looks perfect on the little LED screen and then transforms once its downloaded onto the computer!

Little Witch Rosette

Boo Rosette

Three Hanging Spiders Rosette

Big Button Rosette

Bat Rosette

Jack-O-Lantern Rosette

Button Rosette

House of Haunts Rosette

Happy Halloween Rosette

Spooky & Antique Brad Rosettes

Boo Pennant Rosette

Pretty much everything but the bat punch pieces are current Stampin’ Up product.   Currently the bat punch IS available in the Clearance Rack of the online store.  If you want to use it…better grab it quick!  

 To see a list of supplies and a few basic directions, as well as links to where you can learn how to make these rosettes for yourself, download Patties outline PDF.

Patti’s Rosettes & Halloween Wreath – PDF

Thanks Patti for starting off October on my blog with Halloween fun and spooky high fashion.   And never fear my friend…love or hate your computer my goal is still to get you up and blogging in time for our next Llama blog hop on October 22nd!   Gotta share those shoes you’ve been making!   Also have you earn that Computer Guru of the Household title for real!

****************

If you are looking for help on making rosettes here’s a few helpful sites with tutorials:

http://www.youtube.com/watch?v=BorVDVTxRaI – simply score tour and rosette ornament

http://www.youtube.com/watch?v=WjJnP23LHXE – detailed view of creating rosettes

Alternate method using thread:

http://www.youtube.com/watch?v=dmwd6emDV8o

And a few tips:

Scoring:

When using a scoring tool, like the Simply Scored, it is easier to fold the strip accordion style if you score on one side of the strip for every other score line, then flip the strip over, and do the other score lines. For example, if scoring every ½ inch, then on one side score every inch, flip over, and score the alternating every inch.  When you go to fold, the paper will want to fold in the direction of the scoring, making the back and forth accordion style much easier!

Buttons: 

Need to keep costs down?  Use the button embosslit to create button embellishments for Rosette Wreaths, etc. – cover with Crystal effects to approximate shine of the real thing.

Glue gun seems to work the best for holding down rosettes over time and to attach to wreath backing.

I’ll be back another day to share more cool Rosette links, tutorials and projects.   As well as a look at our new scoring tool the fabulous…Simply Scored.    Until then, to see more about it download the Holiday Mini from my sidebar and check it out.   Or better yet…go to my online store (linked in the sidebar) and pick one up of your very own and just get scoring!

Hugs and blessings to you all – Jean