


Welcome everyone to the Wacky Watercooler February Sale-a-Bration Blog Hop. We’re an international crew so don’t be surprised if you see a few different spellings and price guides along the way. To clear up any confusion…here in the States it takes a $50 purchase to earn a FREE Sale-a-Bration item…the pricing in other parts of the globe may vary so don’t be surprised if you see different listings in different catalogs from different countries during the hop.
While we also have a nearly new Occasions Catalog(ue) as you saw in last month’s hop, today’s hop is focusing on Sale-a-Bration and all it’s awesome FREE goodies! Whoo hoo! Who doesn’t love FREE…right? If you haven’t seen the new Sale-a-Bration (SAB) catalog take a quick gander then jump right back into the hop. With all the inspiring hop projects you’ll see you’ll also want to keep a pen and order form handy so you can create your very own versions of what you see this weekend…and…earn FREE products while doing so!
 Click image to download the brochure
You’ve never before seen such a full Sale-a-Brations Catalog. Lots of inspiring samples, additional offers for hostesses and recruits and a few suggestions for other catalog products that will get you to that $50 goal. If you like the bundle listed there is even a simple and single order number…if you already have some of those items just add the items individually to create the “bundle” you do want to earn your FREE items.
Something else to note…if you fall in love with the new Decorative Dots embossing folder or the new Banner punch don’t despair if you forget to opt for those. Both of those cool new products will be available for sale in the upcoming 2014-2015 Annual Catalog
Here’s the U.S. 2014 Occasions Catalog you might like to select your $50 incremental purchases from so you can earn your FREE SAB merchandise. Of course any of our currently offered products and merchandise promotions will help you earn your way to FREE SAB product.
Occasions Stampin’ Supplies (PDF)
Revised Holiday Carryover List (PDF)
If you are moving in hop order you’ve arrived from the very talented Jackie’s Jack Otter Stamp blog. I love the title of her blog…love Jackie too – her blog title really gives you a sense of her fun side. You’ll definitely want to go back and check her past posts after the hop. If you are working in reverse order weren’t your socks knocked off by Susan’s wonderful projects? Susan is a wonderful new addition to our Watercooler Hop schedule as well as a dear friend I discovered through stamping and hers is another blog to investigate after the hop for sure!
However you are viewing the hop we’ve built it in a circle so you can join and hop on and off at will. If you get lost just click the hop banner or the home watercooler to get back to our hop home site with the list of participants. You may want to keep an eye on that site in between blog hops as we have plans to post somewhat regularly there too.
*****
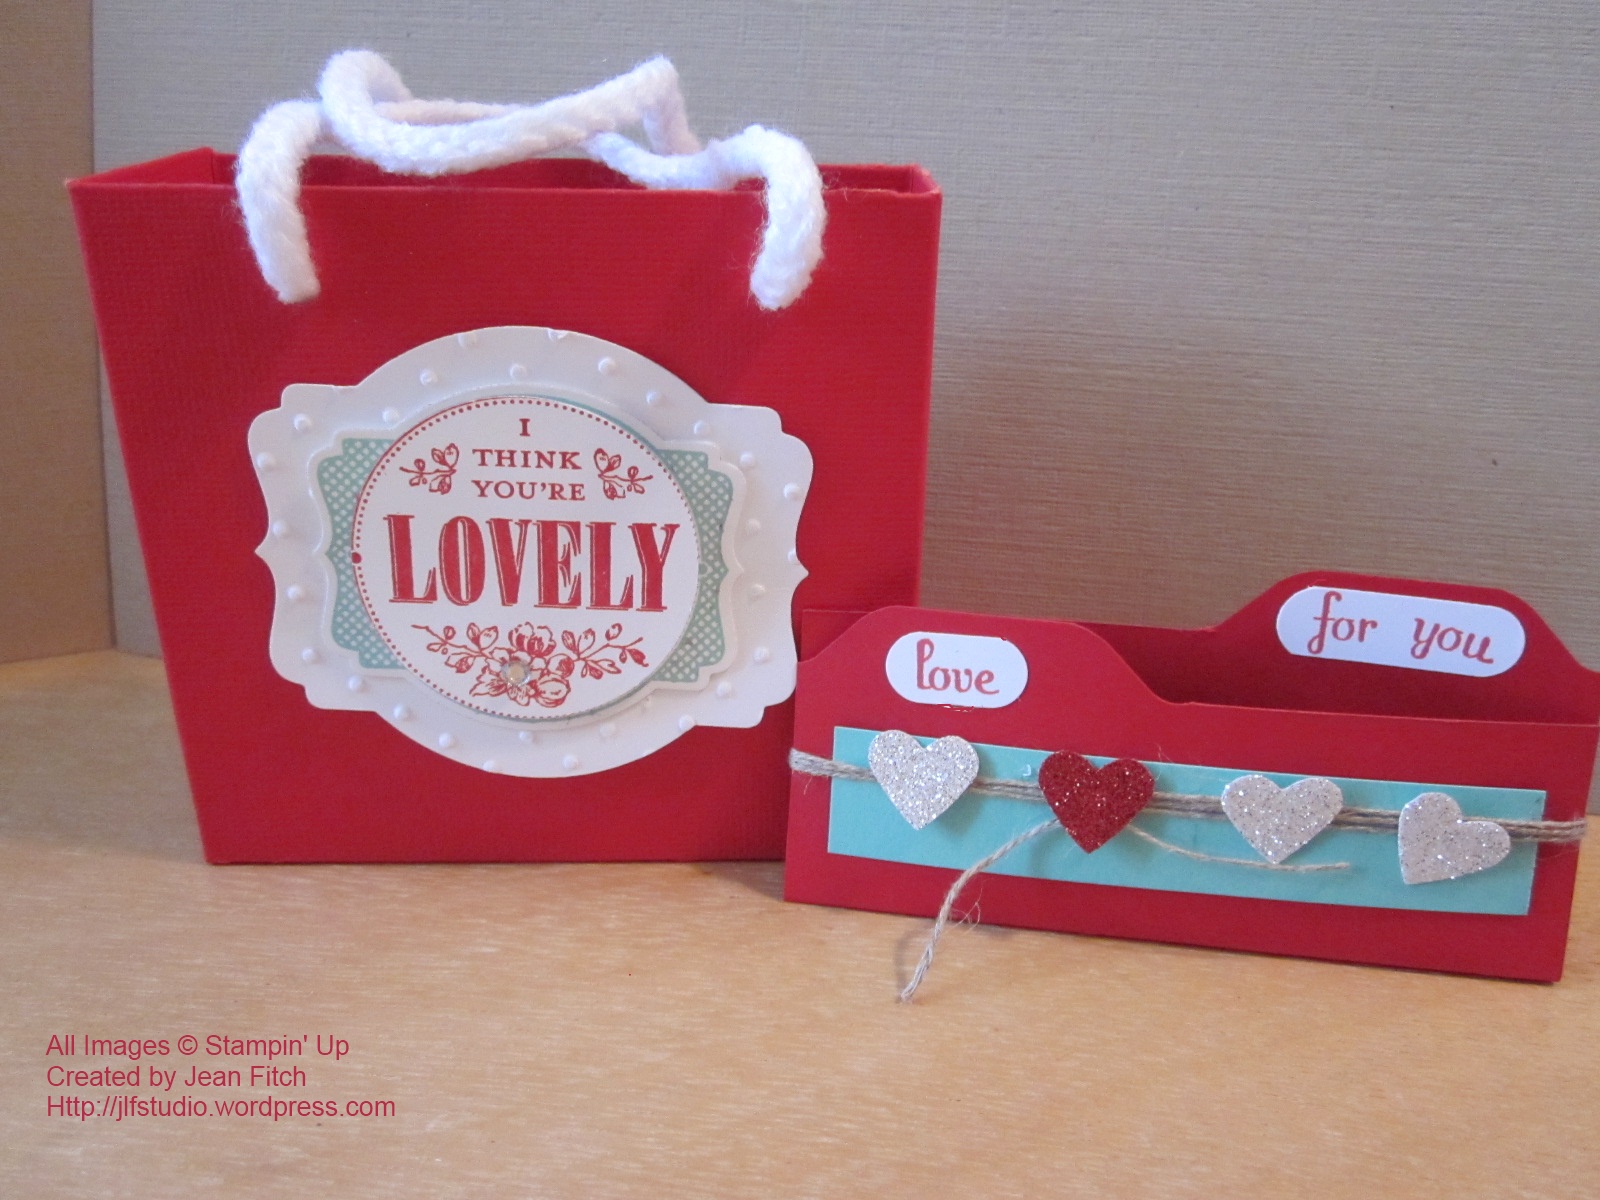
As I mentioned last hop… in this new year…I’m keeping it fresh & simple with designs you can create quickly and cleanly…you can even prep some pieces ahead so when you are ready to sit down and create it will literally only take you minutes. Today’s trio of hop projects illustrates that perfectly. With February being notorious for crisp clear colors like red and white (well Valentine’s as well as Winter probably has something to do with that color set) I’ve chosen to go Real Red, Whisper White and a hint of one of our latest In Colors – Coastal Cabana. All three projects work well together as a set or for individual uses. The designs also adapt themselves to pretty much any color scheme all year round.
Edited to Add: I’ve had a few requests for a PDF for this set of projects so I’ve put together a very basic collection of the pictures, supply lists and basic tips. You can download it here.
*****
You’re Lovely Treat Bag/Box

Box measures: 4″ x 3-1/2″ x 1-1/2″
First up is a sweet little box/bag. Practical too as you can get 2 box/bags out of a single sheet of 12″ x 12″ cardstock or Designer Series Paper. I found the perfect tutorial on a fellow demo’s blog and of course quickly pinned it to my Pinterest Simply Score Board. You can see it here. Thanks Jill for taking the math work out of this fun creation. Just score, fold, adhere, add handles and go. I’ve substituted the Sweater Trim from the Clearance Rack (yes those reduced price purchases also qualify you for free merchandise from SAB) for the Cotton Ribbon Jill used. This size is so handy for a variety of treats and gifts that you may want to keep several on hand in a variety of colors ready for quick decoration for any occasion. I like to keep them folded flat but scored and then just add Sticky Strip for a quick construction and decoration.
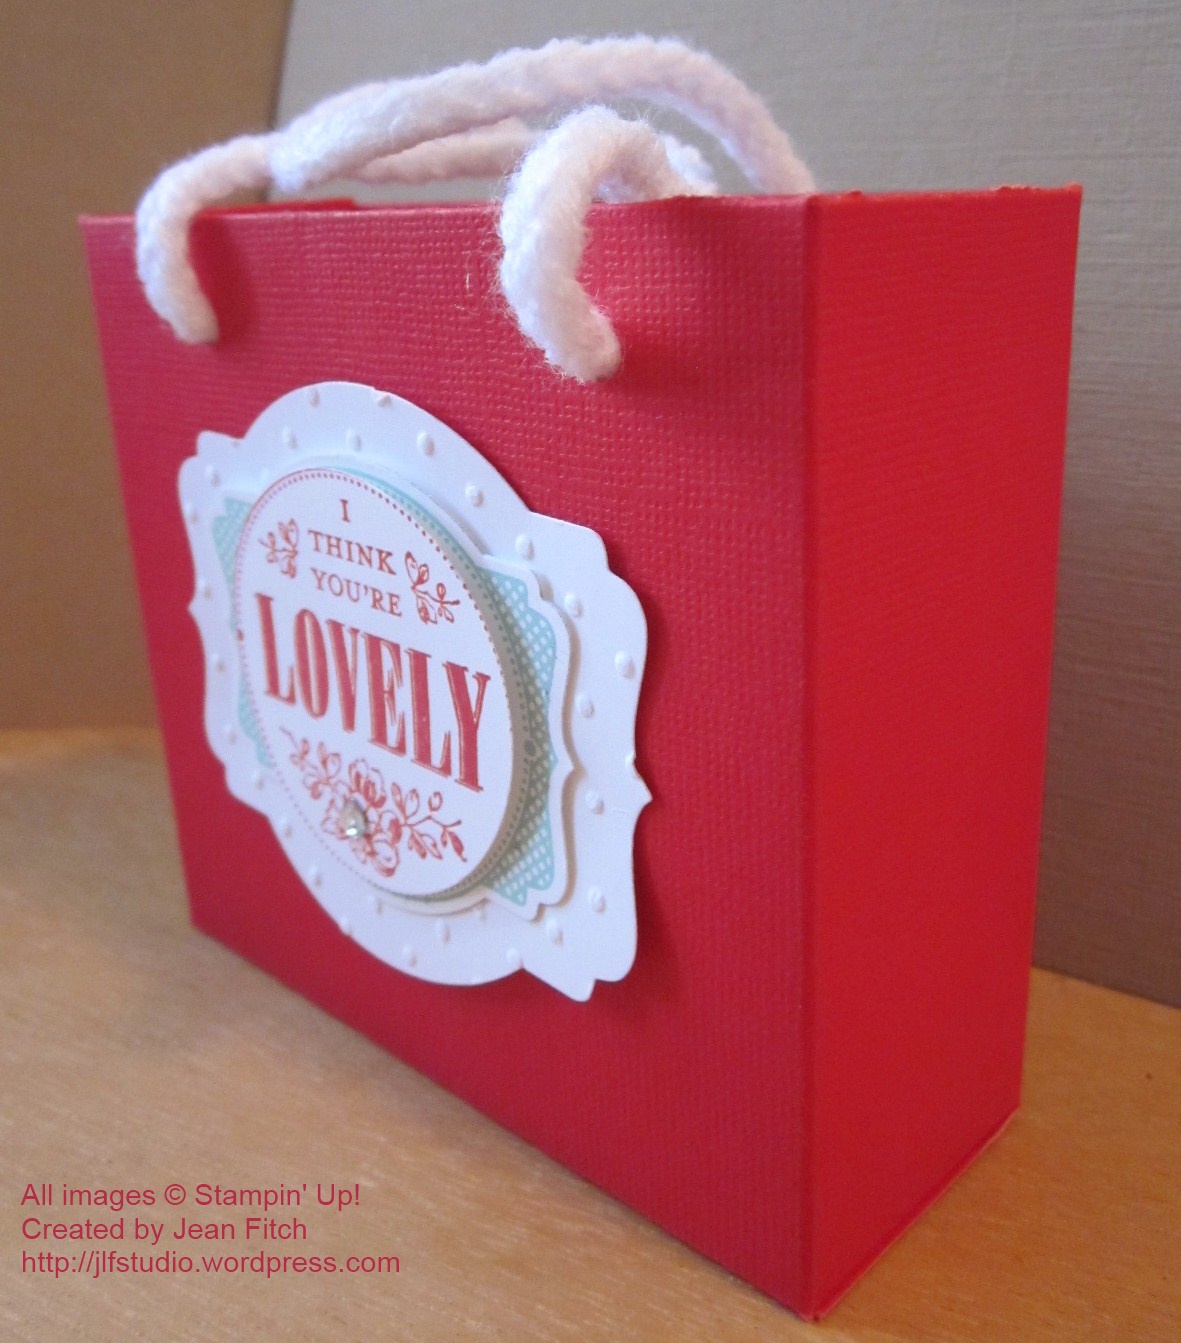 Side view of the bag/box
Supplies:
Stamps: You’re Lovely (SAB) 133575 wood and 133578 clear
Ink: Coastal Cabana, Real Red
Paper: Whisper White and Real Red Core’dinations Cardstock
Other: Big Shot, Deco Labels Collection Framelits, 1 ¾” Circle Punch, Stampin’ Dimensionals, Basic Rhinestones, Whisper White Sweater Trim (Clearance Rack), Simply Scored, Bone folder, Crop-a-Dile.
*****
You’re Lovely Banner Style Card

 Shown points down so you can see the banner effect.
I’ve had my eye on a creating a banner style card for some time now. It’s filled my thoughts, my sketches and even my dreams…lots of them. With hop, it seemed today was the day! Now that I’ve done one I can see more in my future. Lots of fun and very easy. I’m also hoping that having made one my dream self will be satisfied that I won’t forget how to do these.
Details: Measure to the halfway point on your card, make a mark. Then draw a line straight up from that mark to the height you want for your banner indent. Then using either your trimmer or long bladed pair of Craft Scissors cut from the corner point to that end point of your indent mark. Do that for both sides and Voila! A banner card. A bit of contrasting color on the inside so the banner points show up clearly and you are ready with your banner card base. Add decoration and there you have it. A simple but effective design anyone of any gender will enjoy.
One note about embossing the front of the card. Some folders including the Square Lattice will shrink the front edge of your card back just a bit so you may want to wait to score the card’s fold until after you’ve embossed the front end unless you enjoy fixing boo boo’s with the trimmer. Uh huh…ask me how I learned this tip. Sigh….
Supplies:
Stamps: You’re Lovely (SAB) 133575 wood and 133578 clear
Ink: Coastal Cabana, Real Red
Paper: Coastal Cabana, Real Red, Whisper White, Fresh Prints Designer Series Paper Pack
Other: Big Shot, Square Lattice Embossing folder, Deco Labels Collection Framelits, 1 ¾” Circle Punch, Stampin’ Dimensionals, Basic Rhinestones, Whisper White 3/8″ Taffeta Ribbon, Simply Scored, Bone folder.
*****
Last and perhaps simplest yet….a mini file folder that holds a Hershey’s treat. If it’s Feb. 13 and your darling daughter or son just asked you for Valentine’s treats for school this may be your life saver. Otherwise it’s a nice treat to drop in a lunch or place on a coworkers desk. Nice on a pillow too! 😀 If you want to kick it up a notch you could run the Coastal Cabana piece through the Adorning Accents mini hearts embossing folder. Of course I thought that might be just a bit too precious for the boy this folder is destined for.
Mini File Folder Treat Holder

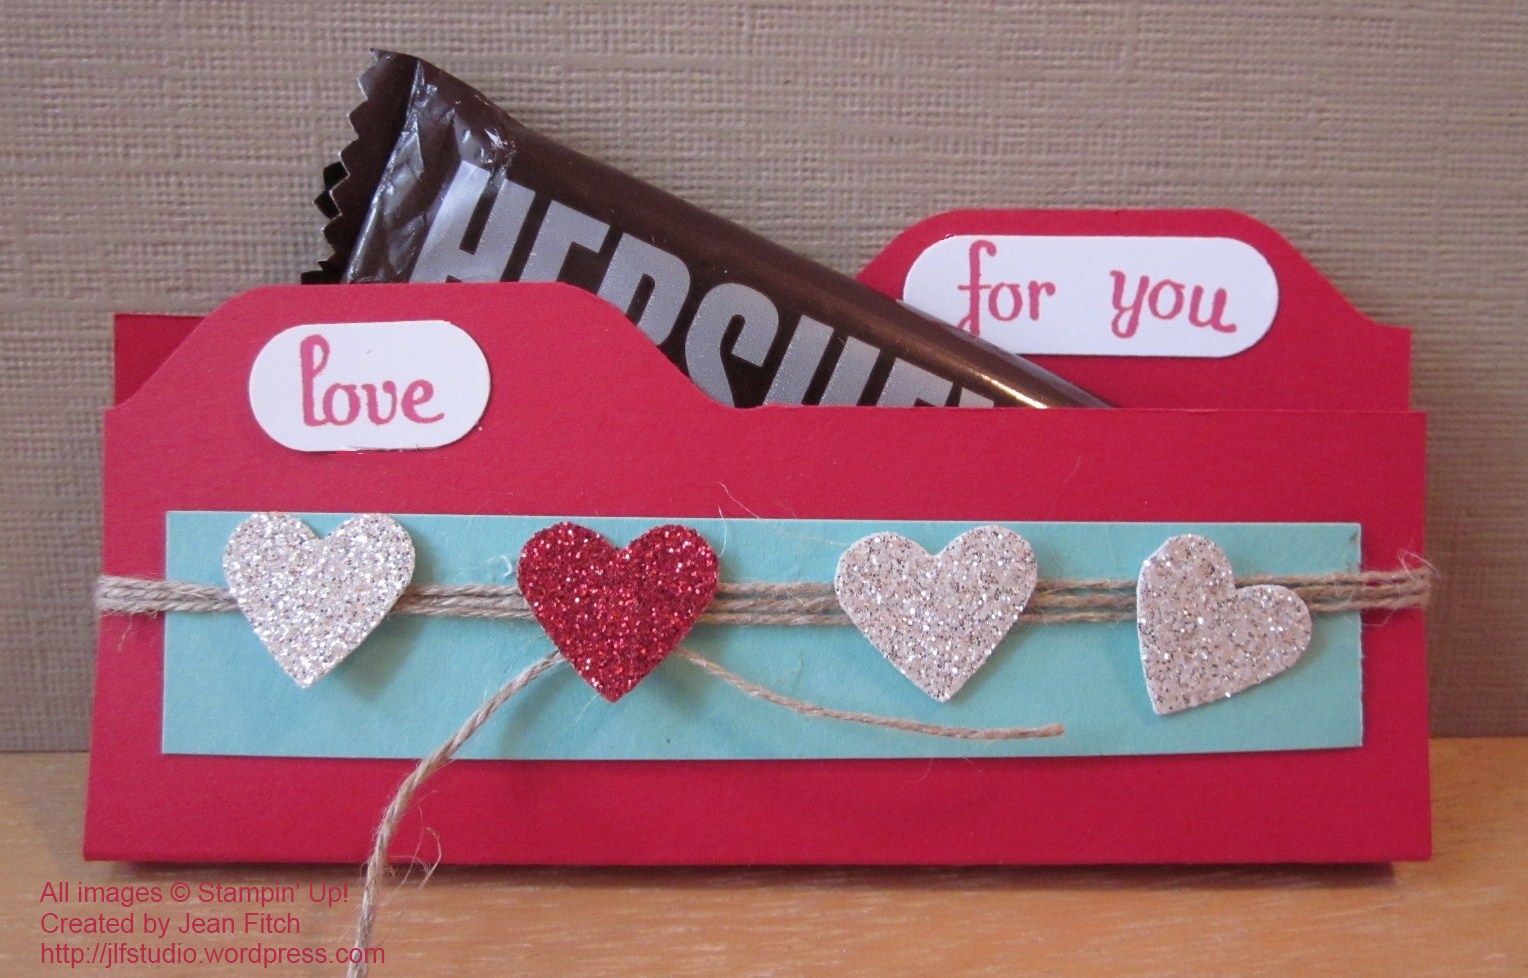
Pairs beautifully with either the coordinating card or bag:

Supplies:
Stamps: Fabulous Phrases
Ink: Real Red
Paper: Real Red, Whisper White & Coastal Cabana Cardstocks. Silver & Red Glimmer Papers.
Punches: Small Heart & Word Window
Other: Envelope Punch Board (#133774), Linen Thread, Hershey’s bar (or other similar sized)
*****
Have I mentioned that I love the new Stampin’ Up! Envelope Punch Board? Yep…it’s my latest heart throb. I’ve even created a Pinterest Board here with a steadily growing set of projects to CASE.
Here’s the quick and simple details for the Mini File Folder Treat Holder. Start with a 4″ square piece of cardstock and score at 2″ & 2-1/4″ in one direction. Fold and crease with a bone folder. Open out flat and using the Envelope Punch Board, place the left edge of the paper centered in the opening and punch. Then slide the edge over to the 2″ marking and punch again. Flip to the other end of the paper and repeat for a second tab. Then use your Stampin’ Trimmer to trim the excess cardstock by aligning the bottom of dips/troughs of the punched sections along the cutting line. Fold up around the candy bar. Use Linen thread (Washi Tape works too) to wrap around and secure the candy in the folder. Decorate as the spirit moves you. Better be fast though so you don’t succumb to the lure of the chocolate within the folder. To be on the safe side it helps to have a few extra bars around than you need to complete your project. Unless of course your willpower is much, much greater than mine. 😀
Note: After I completed my project I discovered another demo had made a fun video showing much the same thing (don’t you love it when great minds think alike?) and that might help you see the steps. Our measurements and candy choice are different but sometimes seeing the process makes it easier to follow a description. You can find my pin of Becky’s post and video here. Just click the Pinterest pin’s picture and you’ll be right where you can see it all.
*****
That’s it for my post for this second Watercooler Hop of 2014. Hop along now to see the rest of the fabulous hop entries and look for our Wacky Watercooler crew in the coming months as we create more new hops for your viewing and crafting pleasure. Click the watercooler buttons to find your way and may your Season of Sale-a-Bration (January 28th-March 31st) be filled with creativity, inspiration and of course lots of FREE new stamping stuff!

Filed under: 2013-2014 Annual Catalog, 2014 Occasions Catalog, 2014 Sale-a-Bration, 3D projects, Big Shot, Blog Tours, Cards, Envelope Punch Board, Punch Cards, Punches, Simply Scored | Tagged: 2013-2014 Annual Catalog, 2014 Sale-a-Bration, 3D projects, Big Shot, Blog Tours, Cards, Frugal crafting, Punch Projects, Simply Scored |


Jean, I love your projects. They are all wonderful and so original!
Adorable projects, Jean! I love how they all coordinate!
OMGosh Jean – I’m in love with every one of your projects!! And the fact that you’ve given directions on how to make them – I love you for that! 🙂 I know I’ll be making them, for sure.
Wow! Jean, these are outstanding! I love the colour combo. These are definitely CASE-worthy projects.
LOVE the colors – they really pop! Fabulous!
Jean I will have to try every one of those projects! Thanks!
Great creative projects!
I love everyone of your projects. You just did a class for me. I’m just going to change those hearts to flowers and there is my first Spring class. Great to talk to you last night, too. Bubble gum or Gumball?
That should have said every one (2 words)
Love the gift trio! So cute, and the colors are so clean and nice.
I love your color combos, I can’t wait to try some of your projects.
Love these projects, Jean!
Great projects, Jean. Love the little treat holder.
Hi Jean, it’s so great to have you blogging (and, even more importantly, back on the Internet). I seldom use Real Red and, looking at your projects, am wondering why. It’s a very bright and happy red, especially paired with the white and the Coastal Cabana. Lovely colour choices! (Isn’t that a perfect lead-in to your card?) Using the cut out of the front banner-cut to display that glimpse of DSP is such a tease! I love it!
My retired Sweater Trim Ribbon is lying unused but now that I’ve seen your bag, I realize I’m just not giving it a chance. I have a definite CASE planned for your bag. And, last but not least, that adorable little Hershey bar holder—what can I say? Another case, of course. With Easter on the horizon, I may just be able to sway some people into buying one of our Envelope Punch boards once they’ve had a chance to make one of these.
Great projects, especially having them all coordinated. Thanks for sharing.
[…] had a few requests for a PDF of the recent hop projects I showed here. So cut and paste to the rescue as well as Open Office and its PDF generator and you’ll […]
Gorgeous stuff! Glad to “see” you again!
JEAN! go figure my computer goes pttth just as you return! I’m sad that I missed out on the blog hop but I hope I’ll be back next time!! great projects, thanks for sharing!