WWC93 – Deb’s Color Challenge
Welcome to this weeks Watercooler Wednesday Challenge.
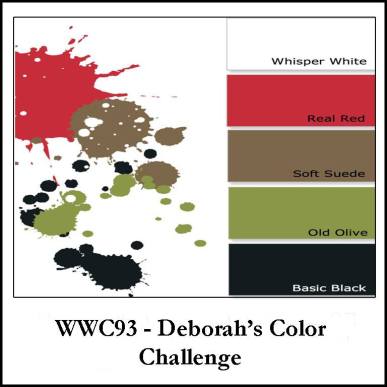
Deb has given us a cool set of colors to work with this week. I have to admit I had a hard time moving past those very cool and modern splotches and it took some time for my mind to wrap itself around a project idea. In part because of the colors and the splotches I kept thinking retro of some kind and masculine. Christmas never entered my head until I started seeing some of the rest of the teams ideas. Then I hit my head and said…of course…red and green and a couple of neutrals. Totally traditional and perfect for Christmas. Of course by that time I was down the modern rabbit hole so…ta..da..here’s my mix of retro modern with a hint of traditional for a Christmas card perfect for a guy.
**********
Noel Bells
(or should that be Noel’s Bells?)
(as always click the picture to see a larger image)
I really wish you could see this card in real life. Or that my photography set up was better. The dark vividness of the Real Red against the black mat and the stark white of the cardbase is really something. Then add the pop of green from the Old Olive and until you get to the Soft Suede bells this card has color that pops. It was quite a fun project. I found myself thinking modern graphic arts mixed with California Mission styles. Quite a combo. I’d love to know what you think.
Supplies:
Stamps: Merry Medley, Seasonal Bells
Inks: Memento Tuxedo Black, Soft Suede
Paper: Thick Whisper White, Real Red, Old Olive, Soft Suede, Basic Black Cardstock
Punches: Bell Punch
Tools & Adhesives: Big Shot, Pretty Pines Thinlit Dies, Christmas Stockings Thinlit Dies, Simply Score Tool, Bone Folder, Tombow Liquid Glue, Dimensionals, Glue Dots & SNAIL.
DIRECTIONS & Tips:
Tip: When inking the Merry Medley background stamp place the stamp on it’s block face up on the table and ink by dabbing the pad onto the stamp. This lets you see where you might need extra ink for a well inked image.
Tip: If you would like a wonderful set of greetings (about 14 I think) you can cut the background stamp into the individual sentiments that make up the whole stamp. Of course if you want the whole stamp back together again just keep track of a picture of the whole stamp to serve as a map for the complete block.
Cardbase: Thick Whisper White – 5-1/2″ x 8-1/2″ Score at 4-1/4″
Black Mat Layer: 4″ x 5-1/4″
Red Focal Layer: 3-3/4″ x 5″
1) Place your background stamp face up on the table and ink with Memento Tuxedo Black or Basic Black Archival ink. Decide where you want the placement of the Real Red Layer to best feature the sentiments you want to see. Adhere the red layer to the Basic Black mat layer.
2) Die cut the boughs and mistletoe from the Pretty Pines dies with Old Olive scraps of paper.
3) Stamp and punch two bells using your favorite bell image (I like the one that resembles mission bells) and Soft Suede ink on Soft Suede paper.
4) Assemble your boughs and bells and adhere to the focal layer. I glued the greenery directly to the paper using small dots of Tombow Liquid Glue. I let the glue set up a bit before attaching to the paper. Attach one bell with glue dots and the second with a couple of Dimensionals for varying height. If you want you can pierce the tops of the bells and thread some Linen thread or a very thin ribbon through and tie a bow or knot. My linen thread has gone walk about so I skipped that step. I was afraid thin black baker’s twine would look too funereal.
5) Add your focal piece to the white card base with dimensionals and voila! You’re ready to decorate the interior and envelope and then mail!
*********
Want to join in the challenge but can’t quite think what to do? Check out page 30 of the Holiday Catalog and find the Merry Medley sample at the bottom of the page. It’s perfect. Just swap out the black sentiment for a Soft Suede one and you are all set.
*********
That’s it for this challenge. To see the rest of the design teams contributions to Deb’s Color Challenge head on over to the Challenge blog website here. That’s also where you can add your own creation with the linky doodad. When you add your own design and there are more than three entries, one of you will be a challenge winner or runner up and have the option to place our badges on your own site. Of course…you’ll also win bragging rights!
Check here to see the winner of last weeks challenge. And here to see all of last weeks other linky and Artist Team entries. Check the challenge site for rules on competing for future challenges.
I hope you will add your own creations this week to the linky. I love the inspiration I find in your shared creations.
I hope you’ll also join us next Wednesday for yet another Watercooler Wednesday Challenge.
Filed under: 2016 Holiday Catalog, 2016-2017 Annual Catalog, Big Shot, Card Challenges, Cards, Christmas/Winter, Masculine, Punches, tips & ideas, Tool Tips | Tagged: 2016 Holiday Catalog, 2016-2017 Annual Catalog, Big Shot, Card Challenges, Cards, Christmas/Winter, Masculine, Punches, tips & ideas |


Just GORGEOUS Jean!! I love the background with the greenery and the bells. Great job with Deborah’s colour challenge. 🙂
What a great way to combine the stamp sets, framelits, and, of course, the bell punch, Jean. I’m sure it would be great to have all those sentiments available separately but once cut apart, I doubt I’d ever attempt to stamp them together, photo of the original stamp or not.